- Published on
Learn Go: The complete course
159 min read
- Authors
- Name
- Karan Pratap Singh
- @karan_6864


Table of Contents
- What is Go?
- Why learn Go?
- 1. Easy to learn
- 2. Fast and Reliable
- 3. Simple yet powerful
- 4. Career opportunities
- Installation and Setup
- Download
- Installation
- MacOS
- Linux
- Windows
- VS Code
- Extension
- Hello World
- Structure of a Go program
- Variables and Data Types
- Variables
- Constants
- Data Types
- String
- Bool
- Numeric types
- Zero Values
- Type Conversion
- Alias types
- Defined types
- String Formatting
- Flow Control
- If/Else
- Compact if
- Switch
- Loops
- For loop
- Forever loop
- Functions
- Simple declaration
- Returning the value
- Multiple returns
- Named returns
- Functions as values
- Closures
- Variadic Functions
- Init
- Defer
- Modules
- What are modules?
- Packages
- What are packages?
- External Dependencies
- Workspaces
- Useful Commands
- Build
- Pointers
- Dereferencing
- Pointers as function args
- New function
- Pointer to a Pointer
- But Why?
- Structs
- Defining
- Declaring and initializing
- Without field name
- Accessing fields
- Exported fields
- Embedding and composition
- Struct tags
- Properties
- Methods
- Methods with Pointer receivers
- Properties
- Why methods instead of functions?
- Arrays and Slices
- Arrays
- What is an array?
- Declaration
- Initialization
- Access
- Iteration
- Multi dimensional
- Properties
- Slices
- Declaration
- Initialization
- Iteration
- Functions
- Properties
- Maps
- Declaration
- Initialization
- Add
- Retrieve
- Exists
- Update
- Delete
- Iteration
- Properties
- Interfaces
- What is an interface?
- Empty Interface
- Type Assertion
- Type Switch
- Properties
- Zero value
- Embedding
- Values
- Interface Values
- Errors
- Constructing Errors
- errors package
- Sentinel Errors
- Custom Errors
- Panic and Recover
- Panic
- Recover
- Use Cases
- Testing
- Table driven tests
- Code coverage
- Fuzz testing
- Generics
- What are Generics?
- When to use generics
- Concurrency
- What is Concurrency
- Concurrency vs Parallelism
- Communicating Sequential Processes (CSP)
- Basic Concepts
- Data Race
- Race Conditions
- Deadlocks
- Livelocks
- Starvation
- Goroutines
- What is a goroutine?
- Fork-Join Model
- Channels
- So what are channels?
- Creating a channel
- Sending and Receiving data
- Buffered Channels
- Directional channels
- Closing channels
- Properties
- Select
- Sync Package
- WaitGroup
- Usage
- Example
- Mutex
- What's a critical section?
- Usage
- Example
- RWMutex
- Usage
- Example
- Cond
- But why do we need it?
- Usage
- Example
- Once
- Usage
- Example
- Pool
- But why do we need it?
- Usage
- Example
- Map
- But why do we need it?
- Usage
- Example
- Atomic
- Usage
- Example
- Advanced Concurrency Patterns
- Generator
- Fan-in
- Fan-out
- Pipeline
- Worker Pool
- Queuing
- Additional patterns
- Context
- Types
- Context
- CancelFunc
- Usage
- Background
- TODO
- WithValue
- WithCancel
- WithDeadline
- WithTimeout
- Example
- Next Steps
- References
Hey, welcome to the course, and thanks for learning Go. I hope this course provides a great learning experience!
What is Go?
Go (also known as Golang) is a programming language developed at Google in 2007 and open-sourced in 2009.
It focuses on simplicity, reliability, and efficiency. It was designed to combine the efficacy, speed, and safety of a statically typed and compiled language with the ease of programming of a dynamic language to make programming more fun again.
In a way, they wanted to combine the best parts of Python and C++ so that they can build reliable systems that can take advantage of multi-core processors.
Why learn Go?
Before we start this course, let us talk about why we should learn Go.
1. Easy to learn
Go is quite easy to learn and has a supportive and active community.
And being a multipurpose language you can use it for things like backend development, cloud computing, and more recently, data science.
2. Fast and Reliable
Which makes it highly suitable for distributed systems. Projects such as Kubernetes and Docker are written in Go.
3. Simple yet powerful
Go has just 25 keywords which makes it easy to read, write and maintain. The language itself is concise.
But don't be fooled by the simplicity, Go has several powerful features that we will later learn in the course.
4. Career opportunities
Go is growing fast and is being adopted by companies of any size. and with that, comes new high-paying job opportunities.
I hope this made you excited about Go. Let's start this course.
Installation and Setup
In this tutorial, we will install Go and setup our code editor.
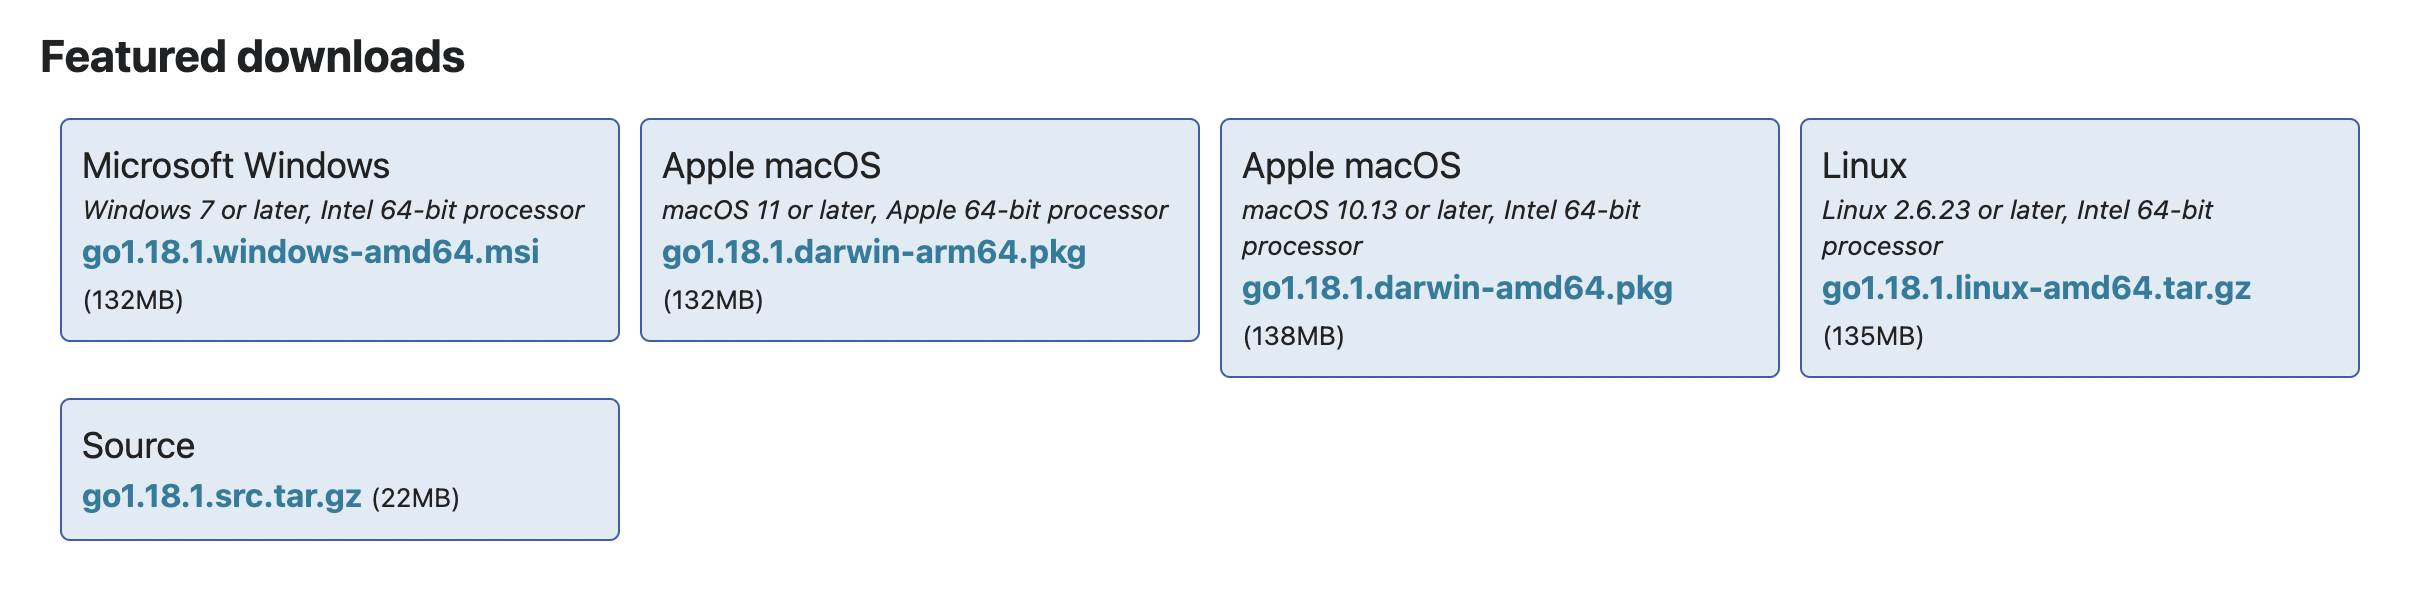
Download
We can install Go from the downloads section.

Installation
These instructions are from the official website.
MacOS
Open the package file you downloaded and follow the prompts to install Go. The package installs the Go distribution to
/usr/local/go. The package should put the/usr/local/go/bindirectory in yourPATHenvironment variable. You may need to restart any open Terminal sessions for the change to take effect.Verify that you've installed Go by opening a command prompt and typing the following command:
$ go version
- Confirm that the command prints the installed version of Go.
Linux
- Remove any previous Go installation by deleting the
/usr/local/gofolder (if it exists), then extract the archive you just downloaded into/usr/local, creating a fresh Go tree in/usr/local/go:
$ rm -rf /usr/local/go && tar -C /usr/local -xzf go1.18.1.linux-amd64.tar.gz
Note: You may need to run the command as root or through sudo.
Do not untar the archive into an existing /usr/local/go tree. This is known to produce broken Go installations.
- Add
/usr/local/go/binto the PATH environment variable. You can do this by adding the following line to your$HOME/.profileor/etc/profile(for a system-wide installation):
export PATH=$PATH:/usr/local/go/bin
Note: Changes made to a profile file may not apply until the next time you log into your computer. To apply the changes immediately, just run the shell commands directly or execute them from the profile using a command such as source $HOME/.profile.
- Verify that you've installed Go by opening a command prompt and typing the following command:
$ go version
- Confirm that the command prints the installed version of Go.
Windows
- Open the MSI file you downloaded and follow the prompts to install Go.
By default, the installer will install Go to Program Files or Program Files (x86). You can change the location as needed. After installing, you will need to close and reopen any open command prompts so that changes to the environment made by the installer are reflected at the command prompt.
- Verify that you've installed Go.
- In Windows, click the Start menu.
- In the menu's search box, type cmd, then press the Enter key.
- In the Command Prompt window that appears, type the following command:
$ go version
- Confirm that the command prints the installed version of Go.
VS Code
In this course, I will be using VS Code and you can download it from here.

Feel free to use any other code editor you prefer.
Extension
Make sure to also install the Go extension which makes it easier to work with Go in VS Code.


This is it for the installation and setup of Go, let's start the course and write our first hello world!
Hello World
Let's write our first hello world program, we can start by initializing a module. For that, we can use the go mod command.
$ go mod init example
But wait...what's a module? Don't worry we will discuss that soon! But for now, assume that the module is basically a collection of Go packages.
Moving ahead, let's now create a main.go file and write a program that simply prints hello world.
package main

import "fmt"

func main() {
	fmt.Println("Hello World!")
}
If you're wondering, fmt is part of the Go standard library which is a set of core packages provided by the language.
Structure of a Go program
Now, let's quickly break down what we did here, or rather the structure of a Go program.
First, we defined a package such as main.
package main
Then, we have some imports.
import "fmt"
Last but not least, is our main function which acts as an entry point for our application, just like in other languages like C, Java, or C#.
func main() {
	...
}
Remember, the goal here is to keep a mental note, and later in the course, we'll learn about functions, imports, and other things in detail!
Finally, to run our code, we can simply use go run command.
$ go run main.go
Hello World!
Congratulations, you just wrote your first Go program!
Variables and Data Types
In this tutorial, we will learn about variables. We will also learn about the different data types that Go provides us.
Variables
Let's start with declaring a variable.
This is also known as declaration without initialization:
var foo string
Declaration with initialization:
var foo string = "Go is awesome"
Multiple declarations:
var foo, bar string = "Hello", "World"
// OR
var (
	foo string = "Hello"
	bar string  = "World"
)
Type is omitted but will be inferred:
var foo = "What's my type?"
Shorthand declaration, here we omit var keyword and type is always implicit. This is how we will see variables being declared most of the time. We also use the := for declaration plus assignment.
foo := "Shorthand!"
Note: Shorthand only works inside function bodies.
Constants
We can also declare constants with the const keyword. Which as the name suggests, are fixed values that cannot be reassigned.
const constant = "This is a constant"
It is also important to note that, only constants can be assigned to other constants.
const a = 10
const b = a // ✅ Works

var a = 10
const b = a // ❌ a (variable of type int) is not constant (InvalidConstInit)
Data Types
Perfect! Now let's look at some basic data types available in Go. Starting with string.
String
In Go, a string is a sequence of bytes. They are declared either using double quotes or backticks which can span multiple lines.
var name string = "My name is Go"

var bio string = `I am statically typed.
									I was designed at Google.`
Bool
Next is bool which is used to store boolean values. It can have two possible values - true or false.
var value bool = false
var isItTrue bool = true
Operators
We can use the following operators on boolean types
| Type | Syntax |
|---|---|
| Logical | && || ! |
| Equality | == != |
Numeric types
Now, let's talk about numeric types.
Signed and Unsigned integers
Go has several built-in integer types of varying sizes for storing signed and unsigned integers
The size of the generic int and uint types are platform-dependent. This means it is 32-bits wide on a 32-bit system and 64-bits wide on a 64-bit system.
var i int = 404                     // Platform dependent
var i8 int8 = 127                   // -128 to 127
var i16 int16 = 32767               // -2^15 to 2^15 - 1
var i32 int32 = -2147483647         // -2^31 to 2^31 - 1
var i64 int64 = 9223372036854775807 // -2^63 to 2^63 - 1
Similar to signed integers, we have unsigned integers.
var ui uint = 404                     // Platform dependent
var ui8 uint8 = 255                   // 0 to 255
var ui16 uint16 = 65535               // 0 to 2^16
var ui32 uint32 = 2147483647          // 0 to 2^32
var ui64 uint64 = 9223372036854775807 // 0 to 2^64
var uiptr uintptr                     // Integer representation of a memory address
If you noticed, there's also an unsigned integer pointer uintptr type, which is an integer representation of a memory address. It is not recommended to use this, so we don't have to worry about it.
So which one should we use?
It is recommended that whenever we need an integer value, we should just use int unless we have a specific reason to use a sized or unsigned integer type.
Byte and Rune
Golang has two additional integer types called byte and rune that are aliases for uint8 and int32 data types respectively.
type byte = uint8
type rune = int32
A rune represents a unicode code point.
var b byte = 'a'
var r rune = '🍕'
Floating point
Next, we have floating point types which are used to store numbers with a decimal component.
Go has two floating point types float32 and float64. Both type follows the IEEE-754 standard.
The default type for floating point values is float64.
var f32 float32 = 1.7812 // IEEE-754 32-bit
var f64 float64 = 3.1415 // IEEE-754 64-bit
Operators
Go provides several operators for performing operations on numeric types.
| Type | Syntax |
|---|---|
| Arithmetic | + - * / % |
| Comparison | == != < > <= >= |
| Bitwise | & | ^ << >> |
| Increment/Decrement | ++ -- |
| Assignment | = += -= *= /= %= <<= >>= &= |= ^= |
Complex
There are 2 complex types in Go, complex128 where both real and imaginary parts are float64 and complex64 where real and imaginary parts are float32.
We can define complex numbers either using the built-in complex function or as literals.
var c1 complex128 = complex(10, 1)
var c2 complex64 = 12 + 4i
Zero Values
Now let's discuss zero values. So in Go, any variable declared without an explicit initial value is given its zero value. For example, let's declare some variables and see:
var i int
var f float64
var b bool
var s string

fmt.Printf("%v %v %v %q\n", i, f, b, s)
$ go run main.go
0 0 false ""
So, as we can see int and float are assigned as 0, bool as false, and string as an empty string. This is quite different from how other languages do it. For example, most languages initialize unassigned variables as null or undefined.
This is great, but what are those percent symbols in our Printf function? As you've already guessed, they are used for formatting and we will learn about them later.
Type Conversion
Moving on, now that we have seen how data types work, let's see how to do type conversion.
i := 42
f := float64(i)
u := uint(f)

fmt.Printf("%T %T", f, u)
$ go run main.go
float64 uint
And as we can see, it prints the type as float64 and uint.
Note that this is different from parsing.
Alias types
Alias types were introduced in Go 1.9. They allow developers to provide an alternate name for an existing type and use it interchangeably with the underlying type.
package main

import "fmt"

type MyAlias = string

func main() {
	var str MyAlias = "I am an alias"

	fmt.Printf("%T - %s", str, str) // Output: string - I am an alias
}
Defined types
Lastly, we have defined types that unlike alias types do not use an equals sign.
package main

import "fmt"

type MyDefined string

func main() {
	var str MyDefined = "I am defined"

	fmt.Printf("%T - %s", str, str) // Output: main.MyDefined - I am defined
}
But wait...what's the difference?
So, defined types do more than just give a name to a type.
It first defines a new named type with an underlying type. However, this defined type is different from any other type, including its underline type.
Hence, it cannot be used interchangeably with the underlying type like alias types.
It's a bit confusing at first, hopefully, this example will make things clear.
package main

import "fmt"

type MyAlias = string

type MyDefined string

func main() {
	var alias MyAlias
	var def MyDefined

	// ✅ Works
	var copy1 string = alias

	// ❌ Cannot use def (variable of type MyDefined) as string value in variable
	var copy2 string = def

	fmt.Println(copy1, copy2)
}
As we can see, we cannot use the defined type interchangeably with the underlying type, unlike alias types.
String Formatting
In this tutorial, we will learn about string formatting or sometimes also known as templating.
fmt package contains lots of functions. So to save time, we will discuss the most frequently used functions. Let's start with fmt.Print inside our main function.
...

fmt.Print("What", "is", "your", "name?")
fmt.Print("My", "name", "is", "golang")
...
$ go run main.go
Whatisyourname?Mynameisgolang
As we can see, Print does not format anything, it simply takes a string and prints it.
Next, we have Println which is the same as Print but it adds a new line at the end and also inserts space between the arguments.
...

fmt.Println("What", "is", "your", "name?")
fmt.Println("My", "name", "is", "golang")
...
$ go run main.go
What is your name?
My name is golang
That's much better!
Next, we have Printf also known as "Print Formatter", which allows us to format numbers, strings, booleans, and much more.
Let's look at an example.
...
name := "golang"

fmt.Println("What is your name?")
fmt.Printf("My name is %s", name)
...
$ go run main.go
What is your name?
My name is golang
As we can see that %s was substituted with our name variable.
But the question is what is %s and what does it mean?
So, these are called annotation verbs and they tell the function how to format the arguments. We can control things like width, types, and precision with these and there are lots of them. Here's a cheatsheet.
Now, let's quickly look at some more examples. Here we will try to calculate a percentage and print it to the console.
...
percent := (7.0 / 9) * 100
fmt.Printf("%f", percent)
...
$ go run main.go
77.777778
Let's say we want just 77.78 which is 2 points precision, we can do that as well by using .2f.
Also, to add an actual percent sign, we will need to escape it.
...
percent := (7.0 / 9) * 100
fmt.Printf("%.2f %%", percent)
...
$ go run main.go
77.78 %
This brings us to Sprint, Sprintln, and Sprintf. These are basically the same as the print functions, the only difference being they return the string instead of printing it.
Let's take a look at an example.
...
s := fmt.Sprintf("hex:%x bin:%b", 10 ,10)
fmt.Println(s)
...
$ go run main.go
hex:a bin:1010
So, as we can see Sprintf formats our integer as hex or binary and returns it as a string.
Lastly, we have multiline string literals, which can be used like this.
...
msg := `
Hello from
multiline
`

fmt.Println(msg)
...
Great! But this is just the tip of the iceberg...so make sure to check out the go doc for fmt package.
For those who are coming from C/C++ background, this should feel natural, but if you're coming from, let's say Python or JavaScript, this might be a little strange at first. But it is very powerful and you'll see this functionality used quite extensively.
Flow Control
Let's talk about flow control, starting with if/else.
If/Else
This works pretty much the same as you expect but the expression doesn't need to be surrounded by parentheses ().
func main() {
	x := 10

	if x > 5 {
		fmt.Println("x is gt 5")
	} else if x > 10 {
		fmt.Println("x is gt 10")
	} else {
		fmt.Println("else case")
	}
}
$ go run main.go
x is gt 5
Compact if
We can also compact our if statements.
func main() {
	if x := 10; x > 5 {
		fmt.Println("x is gt 5")
	}
}
Note: This pattern is quite common.
Switch
Next, we have switch statement, which is often a shorter way to write conditional logic.
In Go, the switch case only runs the first case whose value is equal to the condition expression and not all the cases that follow. Hence, unlike other languages, break statement is automatically added at the end of each case.
This means that it evaluates cases from top to bottom, stopping when a case succeeds. Let's take a look at an example:
func main() {
	day := "monday"

	switch day {
	case "monday":
		fmt.Println("time to work!")
	case "friday":
		fmt.Println("let's party")
	default:
		fmt.Println("browse memes")
	}
}
$ go run main.go
time to work!
Switch also supports shorthand declaration like this.
	switch day := "monday"; day {
	case "monday":
		fmt.Println("time to work!")
	case "friday":
		fmt.Println("let's party")
	default:
		fmt.Println("browse memes")
	}
We can also use the fallthrough keyword to transfer control to the next case even though the current case might have matched.
	switch day := "monday"; day {
	case "monday":
		fmt.Println("time to work!")
		fallthrough
	case "friday":
		fmt.Println("let's party")
	default:
		fmt.Println("browse memes")
	}
And if we run this, we'll see that after the first case matches the switch statement continues to the next case because of the fallthrough keyword.
$ go run main.go
time to work!
let's party
We can also use it without any condition, which is the same as switch true.
x := 10

switch {
	case x > 5:
		fmt.Println("x is greater")
	default:
		fmt.Println("x is not greater")
}
Loops
Now, let's turn our attention toward loops.
So in Go, we only have one type of loop which is the for loop.
But it's incredibly versatile. Same as if statement, for loop, doesn't need any parenthesis () unlike other languages.
For loop
Let's start with the basic for loop.
func main() {
	for i := 0; i < 10; i++ {
		fmt.Println(i)
	}
}
The basic for loop has three components separated by semicolons:
- init statement: which is executed before the first iteration.
- condition expression: which is evaluated before every iteration.
- post statement: which is executed at the end of every iteration.
Break and continue
As expected, Go also supports both break and continue statements for loop control. Let's try a quick example:
func main() {
	for i := 0; i < 10; i++ {
		if i < 2 {
			continue
		}

		fmt.Println(i)

		if i > 5 {
			break
		}
	}

	fmt.Println("We broke out!")
}
So, the continue statement is used when we want to skip the remaining portion of the loop, and break statement is used when we want to break out of the loop.
Also, Init and post statements are optional, hence we can make our for loop behave like a while loop as well.
func main() {
	i := 0

	for ;i < 10; {
		i += 1
	}
}
Note: we can also remove the additional semi-colons to make it a little cleaner.
Forever loop
Lastly, If we omit the loop condition, it loops forever, so an infinite loop can be compactly expressed. This is also known as the forever loop.
func main() {
	for {
		// do stuff here
	}
}
Functions
In this tutorial, we will discuss how we work with functions in Go. So, let's start with a simple function declaration.
Simple declaration
func myFunction() {}
And we can call or execute it as follows.
...
myFunction()
...
Let's pass some parameters to it.
func main() {
	myFunction("Hello")
}

func myFunction(p1 string) {
	fmt.Println(p1)
}
$ go run main.go
As we can see it prints our message. We can also do a shorthand declaration if the consecutive parameters have the same type. For example:
func myNextFunction(p1, p2 string) {}
Returning the value
Now let's also return a value.
func main() {
	s := myFunction("Hello")
	fmt.Println(s)
}

func myFunction(p1 string) string {
	msg := fmt.Sprintf("%s function", p1)
	return msg
}
Multiple returns
Why return one value at a time, when we can do more? Go also supports multiple returns!
func main() {
	s, i := myFunction("Hello")
	fmt.Println(s, i)
}

func myFunction(p1 string) (string, int) {
	msg := fmt.Sprintf("%s function", p1)
	return msg, 10
}
Named returns
Another cool feature is named returns, where return values can be named and treated as their own variables.
func myFunction(p1 string) (s string, i int) {
	s = fmt.Sprintf("%s function", p1)
	i = 10

	return
}
Notice how we added a return statement without any arguments, this is also known as naked return.
I will say that, although this feature is interesting, please use it with care as this might reduce readability for larger functions.
Functions as values
Next, let's talk about functions as values, in Go functions are first class and we can use them as values. So, let's clean up our function and try it out!
func myFunction() {
	fn := func() {
		fmt.Println("inside fn")
	}

	fn()
}
We can also simplify this by making fn an anonymous function.
func myFunction() {
	func() {
		fmt.Println("inside fn")
	}()
}
Notice how we execute it using the parenthesis at the end.
Closures
Why stop there? let's also return a function and hence create something called a closure. A simple definition can be that a closure is a function value that references variables from outside its body.
Closures are lexically scoped, which means functions can access the values in scope when defining the function.
func myFunction() func(int) int {
	sum := 0

	return func(v int) int {
		sum += v

		return sum
	}
}
...
add := myFunction()

add(5)
fmt.Println(add(10))
...
As we can see, we get a result of 15 as sum variable is bound to the function. This is a very powerful concept and definitely, a must know.
Variadic Functions
Now let's look at variadic functions, which are functions that can take zero or multiple arguments using the ... ellipses operator.
An example here would be a function that can add a bunch of values.
func main() {
	sum := add(1, 2, 3, 5)
	fmt.Println(sum)
}

func add(values ...int) int {
	sum := 0

	for _, v := range values {
		sum += v
	}

	return sum
}
Pretty cool huh? Also, don't worry about the range keyword, we will discuss it later in the course.
Fun fact: fmt.Println is a variadic function, that's how we were able to pass multiple values to it.
Init
In Go, init is a special lifecycle function that is executed before the main function.
Similar to main, the init function does not take any arguments nor returns any value. Let's see how it works with an example.
package main

import "fmt"

func init() {
	fmt.Println("Before main!")
}

func main() {
	fmt.Println("Running main")
}
As expected, the init function was executed before the main function.
$ go run main.go
Before main!
Running main
Unlike main, there can be more than one init function in single or multiple files.
For multiple init in a single file, their processing is done in the order of their declaration, while init functions declared in multiple files are processed according to the lexicographic filename order.
package main

import "fmt"

func init() {
	fmt.Println("Before main!")
}

func init() {
	fmt.Println("Hello again?")
}

func main() {
	fmt.Println("Running main")
}
And if we run this, we'll see the init functions were executed in the order they were declared.
$ go run main.go
Before main!
Hello again?
Running main
The init function is optional and is particularly used for any global setup which might be essential for our program, such as establishing a database connection, fetching configuration files, setting up environment variables, etc.
Defer
Lastly, let's discuss the defer keyword, which lets us postpones the execution of a function until the surrounding function returns.
func main() {
	defer fmt.Println("I am finished")
	fmt.Println("Doing some work...")
}
Can we use multiple defer functions? Absolutely, this brings us to what is known as defer stack. Let's take a look at an example:
func main() {
	defer fmt.Println("I am finished")
	defer fmt.Println("Are you?")

	fmt.Println("Doing some work...")
}
$ go run main.go
Doing some work...
Are you?
I am finished
As we can see, defer statements are stacked and executed in a last in first out manner.
So, Defer is incredibly useful and is commonly used for doing cleanup or error handling.
Functions can also be used with generics but we will discuss them later in the course.
Modules
In this tutorial, we will learn about modules.
What are modules?
Simply defined, A module is a collection of Go packages stored in a file tree with a go.mod file at its root, provided the directory is outside $GOPATH/src.
Go modules were introduced in Go 1.11, which brings native support for versions and modules. Earlier, we needed the GO111MODULE=on flag to turn on the modules functionality when it was experimental. But now after Go 1.13 modules mode is the default for all development.
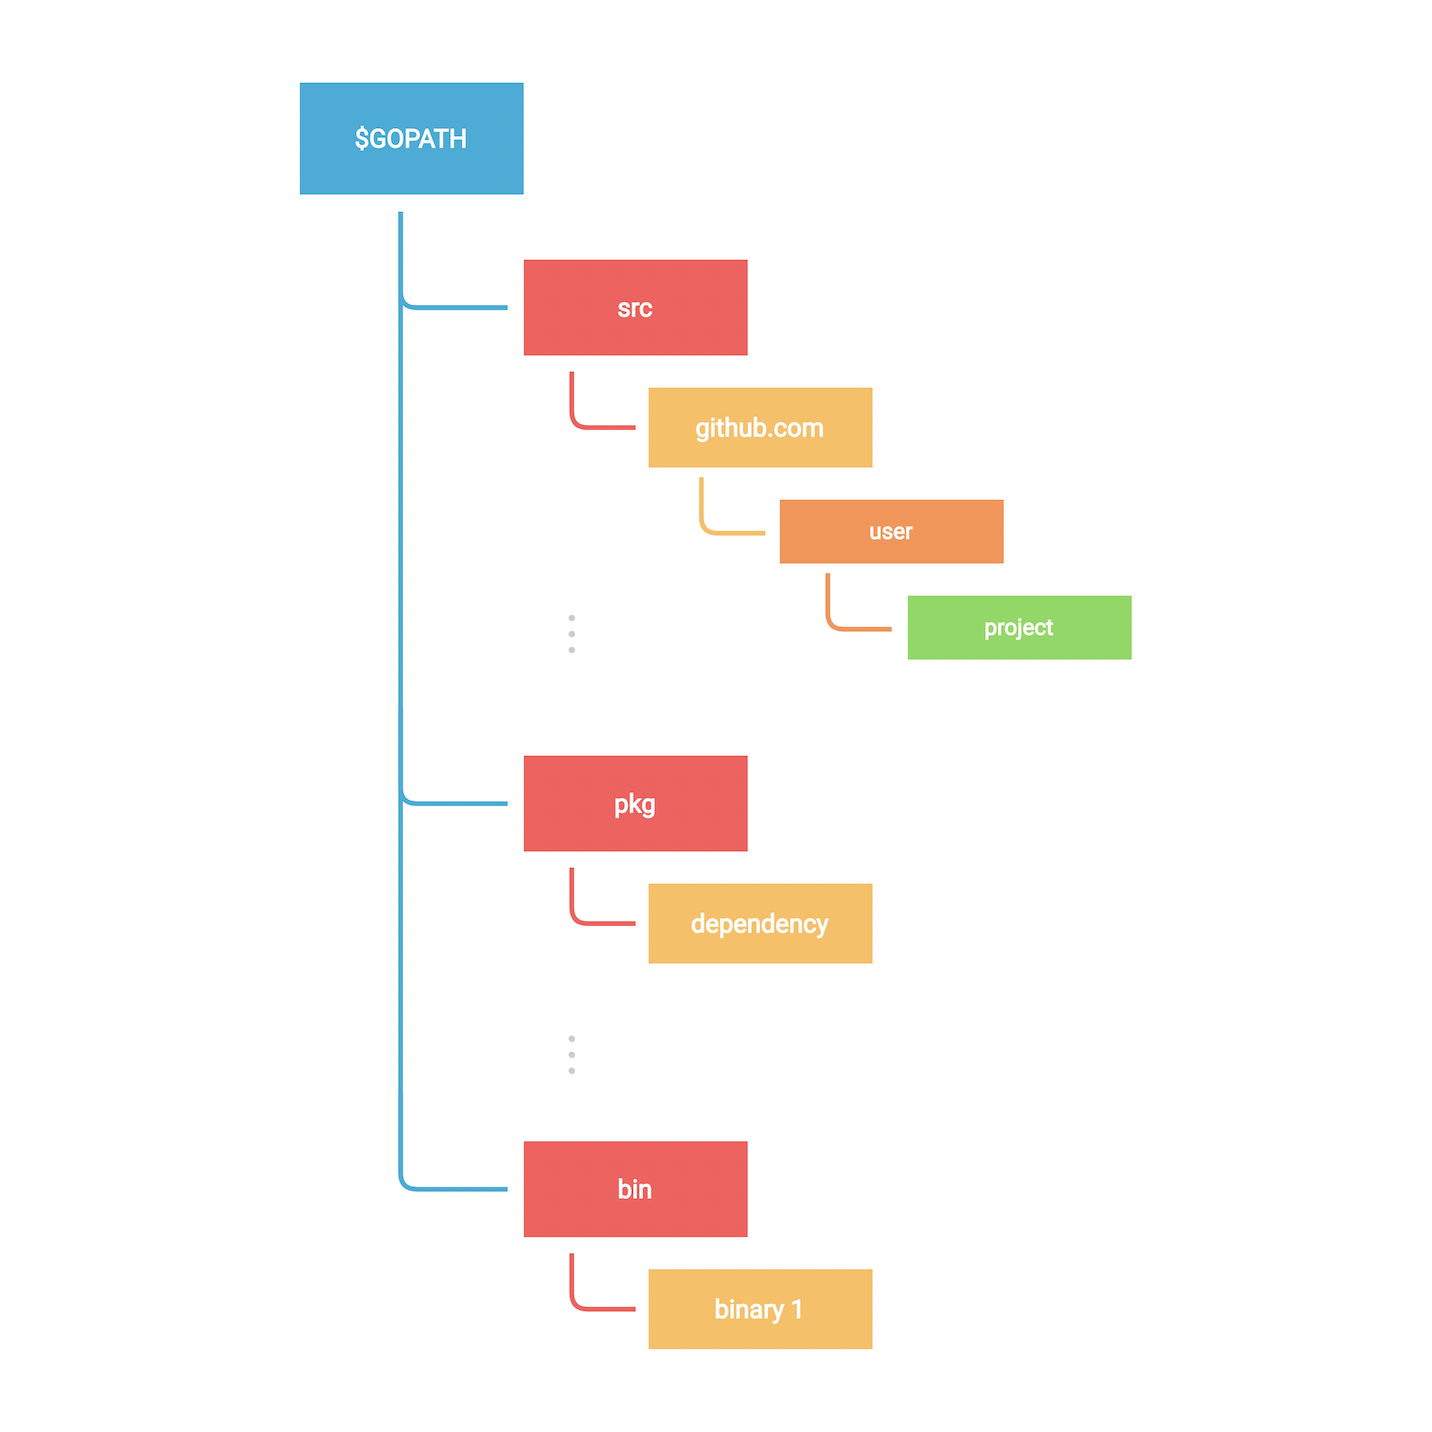
But wait, what is GOPATH?
Well, GOPATH is a variable that defines the root of your workspace and it contains the following folders:
- src: contains Go source code organized in a hierarchy.
- pkg: contains compiled package code.
- bin: contains compiled binaries and executables.

Like earlier, let's create a new module using go mod init command which creates a new module and initializes the go.mod file that describes it.
$ go mod init example
The important thing to note here is that a Go module can correspond to a Github repository as well if you plan to publish this module. For example:
$ go mod init example
Now, let's explore go.mod which is the file that defines the module's module path and also the import path used for the root directory, and its dependency requirements.
module <name>

go <version>

require (
	...
)
And if we want to add a new dependency, we will use go install command:
$ go install github.com/rs/zerolog
As we can see a go.sum file was also created. This file contains the expected hashes of the content of the new modules.
We can list all the dependencies using go list command as follows:
$ go list -m all
If the dependency is not used, we can simply remove it using go mod tidy command:
$ go mod tidy
Finishing up our discussion on modules, let's also discuss vendoring.
Vendoring is the act of making your own copy of the 3rd party packages your project is using. Those copies are traditionally placed inside each project and then saved in the project repository.
This can be done through go mod vendor command.
So, let's reinstall the removed module using go mod tidy.
package main

import "github.com/rs/zerolog/log"

func main() {
	log.Info().Msg("Hello")
}
$ go mod tidy
go: finding module for package github.com/rs/zerolog/log
go: found github.com/rs/zerolog/log in github.com/rs/zerolog v1.26.1
$ go mod vendor
After the go mod vendor command is executed, a vendor directory will be created.
├── go.mod
├── go.sum
├── go.work
├── main.go
└── vendor
    ├── github.com
    │   └── rs
    │       └── zerolog
    │           └── ...
    └── modules.txt
Packages
In this tutorial, we will talk about packages.
What are packages?
A package is nothing but a directory containing one or more Go source files, or other Go packages.
This means every Go source file must belong to a package and package declaration is done at top of every source file as follows.
package <package_name>
So far, we've done everything inside of package main. By convention, executable programs (by that I mean the ones with the main package) are called Commands, others are simply called Packages.
The main package should also contain a main() function which is a special function that acts as the entry point of an executable program.
Let's take a look at an example by creating our own package custom and adding some source files to it such as code.go.
package custom
Before we proceed any further, we should talk about imports and exports. Just like other languages, go also has a concept of imports and exports but it's very elegant.
Basically, any value (like a variable or function) can be exported and visible from other packages if they have been defined with an upper case identifier.
Let's try an example in our custom package.
package custom

var value int = 10 // Will not be exported
var Value int = 20 // Will be exported
As we can see lower case identifiers will not be exported and will be private to the package it's defined in. In our case the custom package.
That's great but how do we import or access it? Well, same as we've been doing so far unknowingly. Let's go to our main.go file and import our custom package.
Here we can refer to it using the module we had initialized in our go.mod file earlier.
---go.mod---
module example

go 1.18

---main.go--
package main

import "example/custom"

func main() {
	custom.Value
}
Notice how the package name is the last name of the import path.
We can import multiple packages as well like this.
package main

import (
	"fmt"

	"example/custom"
)

func main() {
	fmt.Println(custom.Value)
}
We can also alias our imports to avoid collisions like this.
package main

import (
	"fmt"

	abcd "example/custom"
)

func main() {
	fmt.Println(abcd.Value)
}
External Dependencies
In Go, we are not only limited to working with local packages, we can also install external packages using go install command as we saw earlier.
So let's download a simple logging package github.com/rs/zerolog/log.
$ go install github.com/rs/zerolog
package main

import (
	"github.com/rs/zerolog/log"

	abcd "example/custom"
)

func main() {
	log.Print(abcd.Value)
}
Also, make sure to check out the go doc of packages you install, which is usually located in the project's readme file. go doc parses the source code and generates documentation in HTML format. Reference to It is usually located in readme files.
Lastly, I will add that, Go doesn't have a particular "folder structure" convention, always try to organize your packages in a simple and intuitive way.
Workspaces
In this tutorial, we will learn about multi-module workspaces that were introduced in Go 1.18.
Workspaces allow us to work with multiple modules simultaneously without having to edit go.mod files for each module. Each module within a workspace is treated as a root module when resolving dependencies.
To understand this better, let's start by creating a hello module.
$ mkdir workspaces && cd workspaces
$ mkdir hello && cd hello
$ go mod init hello
For demonstration purposes, I will add a simple main.go and install an example package.
package main

import (
	"fmt"

	"golang.org/x/example/stringutil"
)

func main() {
	result := stringutil.Reverse("Hello Workspace")
	fmt.Println(result)
}
$ go get golang.org/x/example
go: downloading golang.org/x/example v0.0.0-20220412213650-2e68773dfca0
go: added golang.org/x/example v0.0.0-20220412213650-2e68773dfca0
And if we run this, we should see our output in reverse.
$ go run main.go
ecapskroW olleH
This is great, but what if we want to modify the stringutil module that our code depends on?
Until now, we had to do it using the replace directive in the go.mod file, but now let's see how we can use workspaces here.
So, let's create our workspace in the workspaces directory.
$ go work init
This will create a go.work file.
$ cat go.work
go 1.18
We will also add our hello module to the workspace.
$ go work use ./hello
This should update the go.work file with a reference to our hello module.
go 1.18

use ./hello
Now, let's download and modify the stringutil package and update the Reverse function implementation.
$ git clone https://go.googlesource.com/example
Cloning into 'example'...
remote: Total 204 (delta 39), reused 204 (delta 39)
Receiving objects: 100% (204/204), 467.53 KiB | 363.00 KiB/s, done.
Resolving deltas: 100% (39/39), done.
example/stringutil/reverse.go
func Reverse(s string) string {
	return fmt.Sprintf("I can do whatever!! %s", s)
}
Finally, let's add example package to our workspace.
$ go work use ./example
$ cat go.work
go 1.18

use (
	./example
	./hello
)
Perfect, now if we run our hello module we will notice that the Reverse function has been modified.
$ go run hello
I can do whatever!! Hello Workspace
This is a very underrated feature from Go 1.18 but it is quite useful in certain circumstances.
Useful Commands
During our module discussion, we discussed some go commands related to go modules, let's now discuss some other important commands.
Starting with go fmt, which formats the source code and it's enforced by that language so that we can focus on how our code should work rather than how our code should look.
$ go fmt
This might seem a little weird at first especially if you're coming from a javascript or python background like me but frankly, it's quite nice not to worry about linting rules.
Next, we have go vet which reports likely mistakes in our packages.
So, if I go ahead and make a mistake in the syntax, and then run go vet.
It should notify me of the errors.
$ go vet
Next, we have go env which simply prints all the go environment information, we'll learn about some of these build-time variables later.
Lastly, we have go doc which shows documentation for a package or symbol, here's an example of the fmt package.
$ go doc -src fmt Printf
Let's use go help command to see what other commands are available.
$ go help
As we can see, we have:
go fix finds Go programs that use old APIs and rewrites them to use newer ones.
go generate is usually used for code generation.
go install compiles and installs packages and dependencies.
go clean is used for cleaning files that are generated by compilers.
Some other very important commands are go build and go test but we will learn about them in detail later in the course.
Build
Building static binaries is one of the best features of Go which enables us to ship our code efficiently.
We can do this very easily using the go build command.
package main

import "fmt"

func main() {
	fmt.Println("I am a binary!")
}
$ go build
This should produce a binary with the name of our module. For example, here we have example.
We can also specify the output.
$ go build -o app
Now to run this, we simply need to execute it.
$ ./app
I am a binary!
Yes, it's as simple as that!
Now, let's talk about some important build time variables, starting with:
GOOSandGOARCH
These environment variables help us build go programs for different operating systems and underlying processor architectures.
We can list all the supported architecture using go tool command.
$ go tool dist list
android/amd64
ios/amd64
js/wasm
linux/amd64
windows/arm64
.
.
.
Here's an example for building a windows executable from macOS!
$ GOOS=windows GOARCH=amd64 go build -o app.exe
CGO_ENABLED
This variable allows us to configure CGO, which is a way in Go to call C code.
This helps us to produce a statically linked binary that works without any external dependencies.
This is quite helpful for, let's say when we want to run our go binaries in a docker container with minimum external dependencies.
Here's an example of how to use it:
$ CGO_ENABLED=0 go build -o app
Pointers
In this tutorial, we will discuss pointers. So what are Pointers?
Simply defined, a Pointer is a variable that is used to store the memory address of another variable.

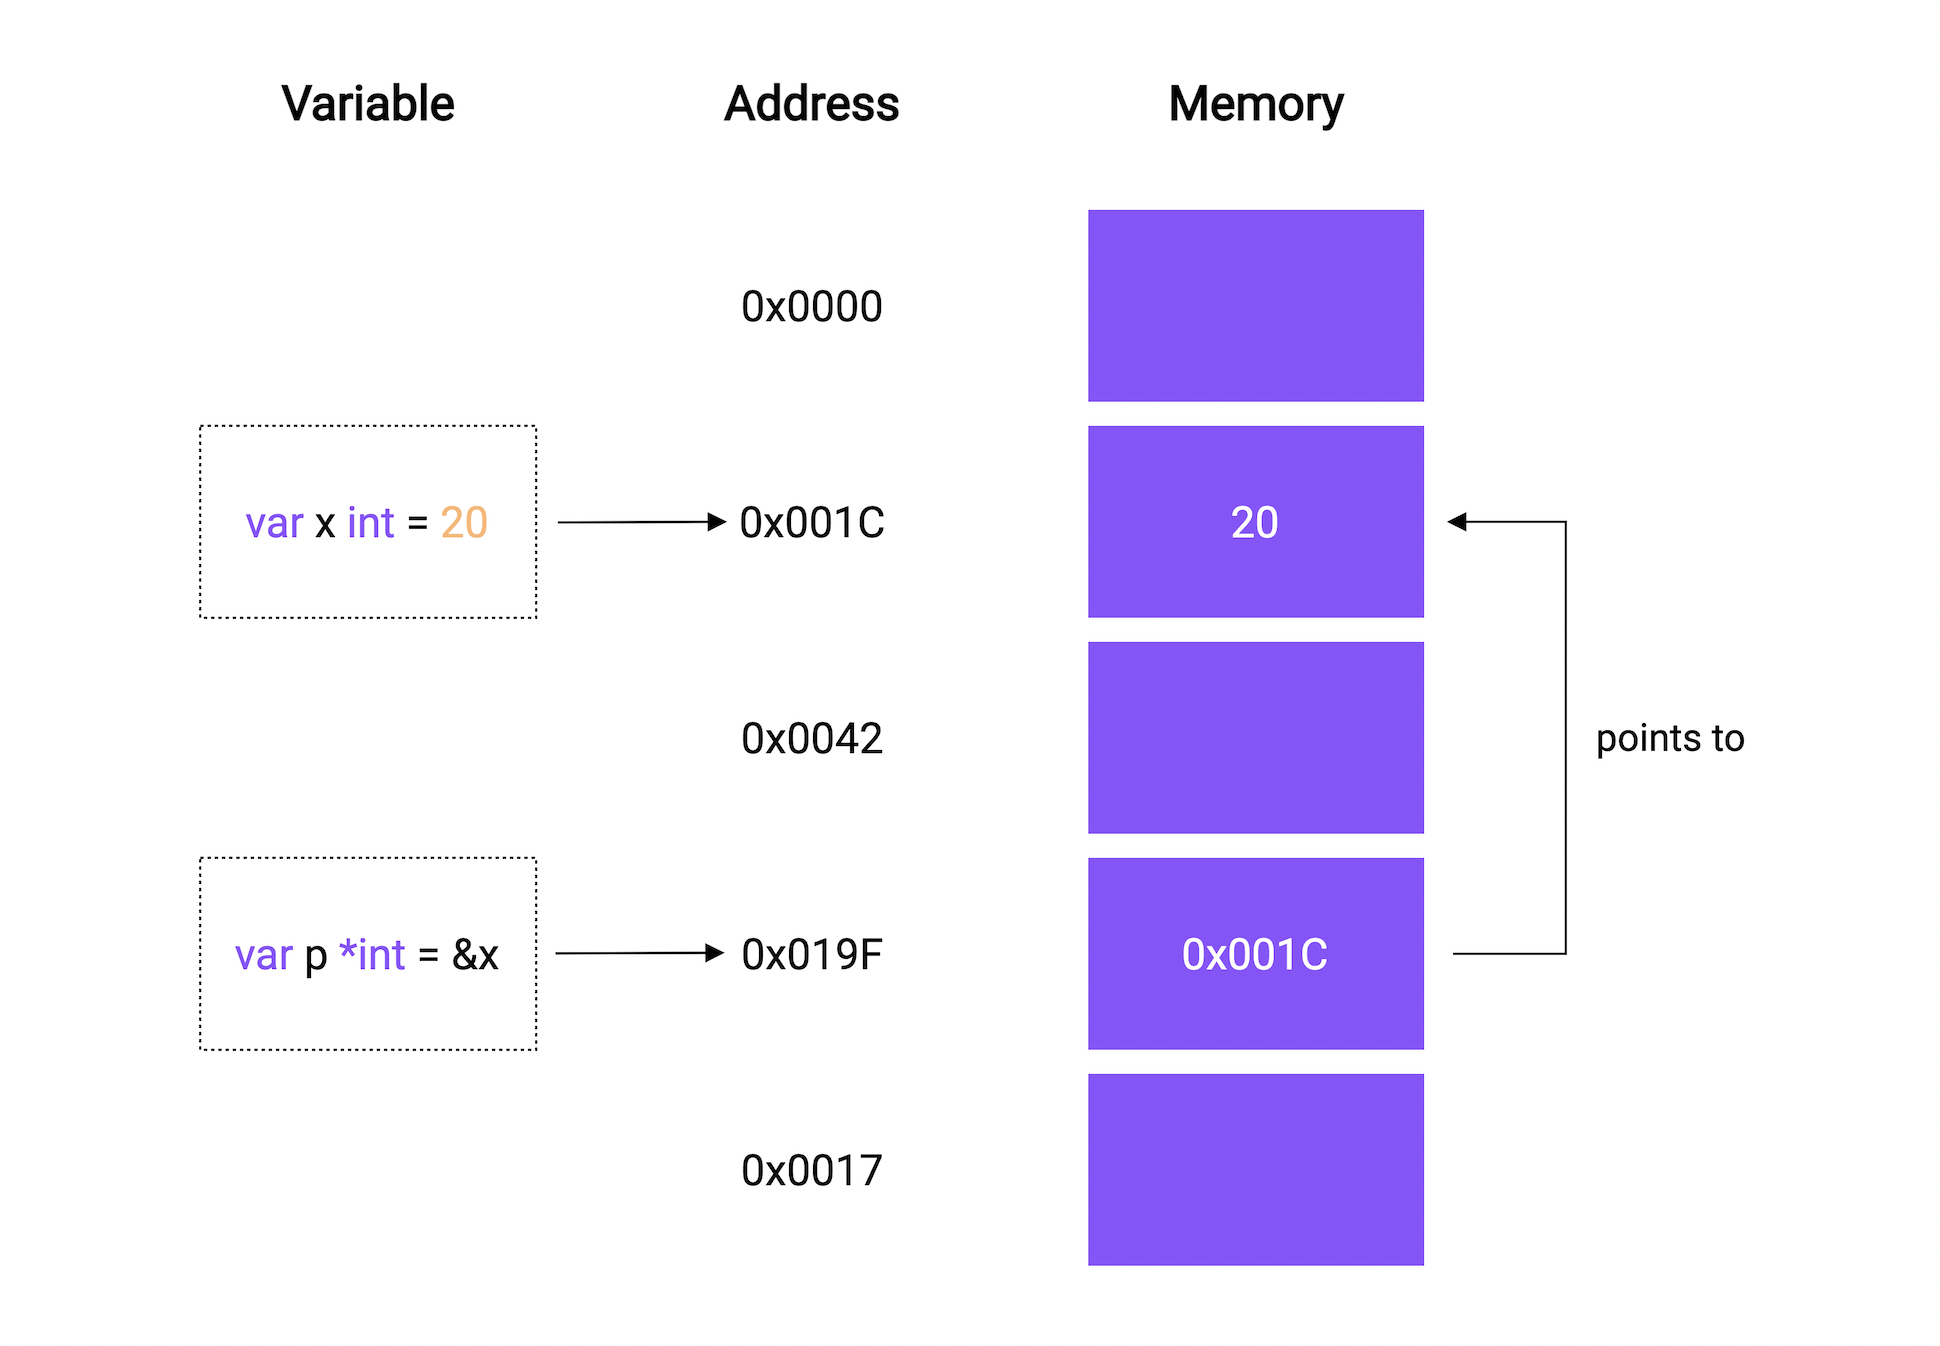
It can be used like this:
var x *T
Where T is the type such as int, string, float, and so on.
Let's try a simple example and see it in action.
package main

import "fmt"

func main() {
	var p *int

	fmt.Println(p)
}
$ go run main.go
nil
Hmm, this prints nil, but what is nil?
So nil is a predeclared identifier in Go that represents zero value for pointers, interfaces, channels, maps, and slices.
This is just like what we learned in the variables and datatypes section, where we saw that uninitialized int has a zero value of 0, a bool has false, and so on.
Okay, now let's assign a value to the pointer.
package main

import "fmt"

func main() {
	a := 10

	var p *int = &a

	fmt.Println("address:", p)
}
We use the & ampersand operator to refer to a variable's memory address.
$ go run main.go
0xc0000b8000
This must be the value of the memory address of the variable a.
Dereferencing
We can also use the * asterisk operator to retrieve the value stored in the variable that the pointer points to. This is also called dereferencing.
For example, we can access the value of the variable a through the pointer p using that * asterisk operator.
package main

import "fmt"

func main() {
	a := 10

	var p *int = &a

	fmt.Println("address:", p)
	fmt.Println("value:", *p)
}
$ go run main.go
address: 0xc000018030
value: 10
We can not only access it but change it as well through the pointer.
package main

import "fmt"

func main() {
	a := 10

	var p *int = &a

	fmt.Println("before", a)
	fmt.Println("address:", p)

	*p = 20
	fmt.Println("after:", a)
}
$ go run main.go
before 10
address: 0xc000192000
after: 20
I think this is pretty neat!
Pointers as function args
Pointers can also be used as arguments for a function when we need to pass some data by reference.
Here's an example:
myFunction(&a)
...

func myFunction(ptr *int) {}
New function
There's also another way to initialize a pointer. We can use the new function which takes a type as an argument, allocates enough memory to accommodate a value of that type, and returns a pointer to it.
Here's an example:
package main

import "fmt"

func main() {
	p := new(int)
	*p = 100

	fmt.Println("value", *p)
	fmt.Println("address", p)
}
$ go run main.go
value 100
address 0xc000018030
Pointer to a Pointer
Here's an interesting idea...can we create a pointer to a pointer? The answer is yes! Yes, we can.
package main

import "fmt"

func main() {
	p := new(int)
	*p = 100

	p1 := &p

	fmt.Println("P value", *p, " address", p)
	fmt.Println("P1 value", *p1, " address", p)

	fmt.Println("Dereferenced value", **p1)
}
$ go run main.go
P value 100  address 0xc0000be000
P1 value 0xc0000be000  address 0xc0000be000
Dereferenced value 100
Notice how the value of p1 matches the address of p.
Also, it is important to know that pointers in Go do not support pointer arithmetic like in C or C++.
p1 := p * 2 // Compiler Error: invalid operation
However, we can compare two pointers of the same type for equality using a == operator.
p := &a
p1 := &a

fmt.Println(p == p1)
But Why?
This brings us to the million-dollar question, why do we need pointers?
Well, there's no definite answer for that, and pointers are just another useful feature that helps us mutate our data efficiently without copying a large amount of data.
Lastly, I will add that if you are coming from a language with no notion of pointers, don't panic and try to form a mental model of how pointers work.
Structs
In this tutorial, we will learn about structs.
So, a struct is a user-defined type that contains a collection of named fields. Basically, it is used to group related data together to form a single unit.
If you're coming from an objected-oriented background, think of structs as lightweight classes which that support composition but not inheritance.
Defining
We can define a struct like this:
type Person struct {}
We use the type keyword to introduce a new type, followed by the name and then the struct keyword to indicate that we're defining a struct.
Now, let's give it some fields:
type Person struct {
	FirstName string
	LastName  string
	Age       int
}
And, if the fields have the same type, we can collapse them as well.
type Person struct {
	FirstName, LastName string
	Age                 int
}
Declaring and initializing
Now that we have our struct, we can declare it the same as other datatypes.
func main() {
	var p1 Person

	fmt.Println("Person 1:", p1)
}
$ go run main.go
Person 1: {  0}
As we can see, all the struct fields are initialized with their zero values. So the FirstName and LastName are set to "" empty string and Age is set to 0.
We can also initialize it as "struct literal".
func main() {
	var p1 Person

	fmt.Println("Person 1:", p1)

	var p2 = Person{FirstName: "Karan", LastName: "Pratap Singh", Age: 22}

	fmt.Println("Person 2:", p2)
}
For readability, we can separate by new line but this will also require a trailing comma.
	var p2 = Person{
		FirstName: "Karan",
		LastName:  "Pratap Singh",
		Age:       22,
	}
$ go run main.go
Person 1: {  0}
Person 2: {Karan Pratap Singh 22}
We can also initialize only a subset of fields.
func main() {
	var p1 Person

	fmt.Println("Person 1:", p1)

	var p2 = Person{
		FirstName: "Karan",
		LastName:  "Pratap Singh",
		Age:       22,
	}

	fmt.Println("Person 2:", p2)

	var p3 = Person{
		FirstName: "Tony",
		LastName:  "Stark",
	}

	fmt.Println("Person 3:", p3)
}
$ go run main.go
Person 1: {  0}
Person 2: {Karan Pratap Singh 22}
Person 3: {Tony Stark 0}
As we can see, the age field of person 3 has defaulted to the zero value.
Without field name
Go structs also supports initialization without field names.
func main() {
	var p1 Person

	fmt.Println("Person 1:", p1)

	var p2 = Person{
		FirstName: "Karan",
		LastName:  "Pratap Singh",
		Age:       22,
	}

	fmt.Println("Person 2:", p2)

	var p3 = Person{
		FirstName: "Tony",
		LastName:  "Stark",
	}

	fmt.Println("Person 3:", p3)

	var p4 = Person{"Bruce", "Wayne"}

	fmt.Println("Person 4:", p4)
}
But here's the catch, we will need to provide all the values during the initialization or it will fail.
$ go run main.go
# command-line-arguments
./main.go:30:27: too few values in Person{...}
	var p4 = Person{"Bruce", "Wayne", 40}

	fmt.Println("Person 4:", p4)
We can also declare an anonymous struct.
func main() {
	var p1 Person

	fmt.Println("Person 1:", p1)

	var p2 = Person{
		FirstName: "Karan",
		LastName:  "Pratap Singh",
		Age:       22,
	}

	fmt.Println("Person 2:", p2)

	var p3 = Person{
		FirstName: "Tony",
		LastName:  "Stark",
	}

	fmt.Println("Person 3:", p3)

	var p4 = Person{"Bruce", "Wayne", 40}

	fmt.Println("Person 4:", p4)

	var a = struct {
		Name string
	}{"Golang"}

	fmt.Println("Anonymous:", a)
}
Accessing fields
Let's clean up our example a bit and see how we can access individual fields.
func main() {
	var p = Person{
		FirstName: "Karan",
		LastName:  "Pratap Singh",
		Age:       22,
	}

	fmt.Println("FirstName", p.FirstName)
}
We can also create a pointer to structs as well.
func main() {
	var p = Person{
		FirstName: "Karan",
		LastName:  "Pratap Singh",
		Age:       22,
	}

	ptr := &p

	fmt.Println((*ptr).FirstName)
	fmt.Println(ptr.FirstName)
}
Both statements are equal as in Go we don't need to explicitly dereference the pointer. We can also use the built-in new function.
func main() {
	p := new(Person)

	p.FirstName = "Karan"
	p.LastName = "Pratap Singh"
	p.Age = 22

	fmt.Println("Person", p)
}
$ go run main.go
Person &{Karan Pratap Singh 22}
As a side note, two structs are equal if all their corresponding fields are equal as well.
func main() {
	var p1 = Person{"a", "b", 20}
	var p2 = Person{"a", "b", 20}

	fmt.Println(p1 == p2)
}
$ go run main.go
true
Exported fields
Now let's learn what is exported and unexported fields in a struct. Same as the rules for variables and functions, if a struct field is declared with a lower case identifier, it will not be exported and only be visible to the package it is defined in.
type Person struct {
	FirstName, LastName  string
	Age                  int
	zipCode              string
}
So, the zipCode field won't be exported. Also, the same goes for the Person struct, if we rename it as person, it won't be exported as well.
type person struct {
	FirstName, LastName  string
	Age                  int
	zipCode              string
}
Embedding and composition
As we discussed earlier, Go doesn't necessarily support inheritance, but we can do something similar with embedding.
type Person struct {
	FirstName, LastName  string
	Age                  int
}

type SuperHero struct {
	Person
	Alias string
}
So, our new struct will have all the properties of the original struct. And it should behave the same as our normal struct.
func main() {
	s := SuperHero{}

	s.FirstName = "Bruce"
	s.LastName = "Wayne"
	s.Age = 40
	s.Alias = "batman"

	fmt.Println(s)
}
$ go run main.go
{{Bruce Wayne 40} batman}
However, this is usually not recommended and in most cases, composition is preferred. So rather than embedding, we will just define it as a normal field.
type Person struct {
	FirstName, LastName  string
	Age                  int
}

type SuperHero struct {
	Person Person
	Alias  string
}
Hence, we can rewrite our example with composition as well.
func main() {
	p := Person{"Bruce", "Wayne", 40}
	s := SuperHero{p, "batman"}

	fmt.Println(s)
}
$ go run main.go
{{Bruce Wayne 40} batman}
Again, there is no right or wrong here, but nonetheless, embedding comes in handy sometimes.
Struct tags
A struct tag is just a tag that allows us to attach metadata information to the field which can be used for custom behavior using the reflect package.
Let's learn how we can define struct tags.
type Animal struct {
	Name    string `key:"value1"`
	Age     int    `key:"value2"`
}
You will often find tags in encoding packages, such as XML, JSON, YAML, ORMs, and Configuration management.
Here's a tags example for the JSON encoder.
type Animal struct {
	Name    string `json:"name"`
	Age     int    `json:"age"`
}
Properties
Finally, let's discuss the properties of structs.
Structs are value types. When we assign one struct variable to another, a new copy of the struct is created and assigned.
Similarly, when we pass a struct to another function, the function gets its own copy of the struct.
package main

import "fmt"

type Point struct {
	X, Y float64
}

func main() {
	p1 := Point{1, 2}
	p2 := p1 // Copy of p1 is assigned to p2

	p2.X = 2

	fmt.Println(p1) // Output: {1 2}
	fmt.Println(p2) // Output: {2 2}
}
Empty struct occupies zero bytes of storage.
package main

import (
	"fmt"
	"unsafe"
)

func main() {
	var s struct{}
	fmt.Println(unsafe.Sizeof(s)) // Output: 0
}
Methods
Let's talk about methods, sometimes also known as function receivers.
Technically, Go is not an object-oriented programming language. It doesn't have classes, objects, and inheritance.
However, Go has types. And, you can define methods on types.
A method is nothing but a function with a special receiver argument. Let's see how we can declare methods.
func (variable T) Name(params) (returnTypes) {}
The receiver argument has a name and a type. It appears between the func keyword and the method name.
For example, let's define a Car struct.
type Car struct {
	Name string
	Year int
}
Now, let us define a method like IsLatest which will tell us if a car was manufactured within the last 5 years.
func (c Car) IsLatest() bool {
	return c.Year >= 2017
}
As you can see, we can access the instance of Car using the receiver variable c. I like to think of it as this keyword from the object-oriented world.
Now we should be able to call this method after we initialize our struct, just like we do with classes in other languages.
func main() {
	c := Car{"Tesla", 2021}

	fmt.Println("IsLatest", c.IsLatest())
}
Methods with Pointer receivers
All the examples that we saw previously had a value receiver.
With a value receiver, the method operates on a copy of the value passed to it. Therefore, any modifications done to the receiver inside the methods are not visible to the caller.
For example, let's make another method called UpdateName which will update the name of the Car.
func (c Car) UpdateName(name string) {
	c.Name = name
}
Now, let's run this.
func main() {
	c := Car{"Tesla", 2021}

	c.UpdateName("Toyota")
	fmt.Println("Car:", c)
}
$ go run main.go
Car: {Tesla 2021}
Seems like the name wasn't updated, so now let's switch our receiver to pointer type and try again.
func (c *Car) UpdateName(name string) {
	c.Name = name
}
$ go run main.go
Car: {Toyota 2021}
As expected, methods with pointer receivers can modify the value to which the receiver points. Such modifications are visible to the caller of the method as well.
Properties
Let's also see some properties of the methods!
- Go is smart enough to interpret our function call correctly, and hence, pointer receiver method calls are just syntactic sugar provided by Go for convenience.
(&c).UpdateName(...)
- We can omit the variable part of the receiver as well if we're not using it.
func (Car) UpdateName(...) {}
- Methods are not limited to structs but can also be used with non-struct types as well.
package main

import "fmt"

type MyInt int

func (i MyInt) isGreater(value int) bool {
	return i > MyInt(value)
}

func main() {
	i := MyInt(10)

	fmt.Println(i.isGreater(5))
}
Why methods instead of functions?
So the question is, why use methods instead of functions?
As always, there's no particular answer for this, and in no way one is better than the other. Instead, they should be used appropriately when the situation arrives.
One thing I can think of right now is that methods can help us avoid naming conflicts.
Since a method is tied to a particular type, we can have the same method names for multiple receivers.
But in the end, it might just come down to preference, such as "method calls are much easier to read and understand than function calls" or the other way around.
Arrays and Slices
In this tutorial, we will learn about arrays and slices in Go.
Arrays
What is an array?
An array is a fixed-size collection of elements of the same type. The elements of the array are stored sequentially and can be accessed using their index.


Declaration
We can declare an array as follows:
var a [n]T
Here, n is the length and T can be any type like integer, string, or user-defined structs.
Now, let's declare an array of integers with length 4 and print it.
func main() {
	var arr [4]int

	fmt.Println(arr)
}
$ go run main.go
[0 0 0 0]
By default, all the array elements are initialized with the zero value of the corresponding array type.
Initialization
We can also initialize an array using an array literal.
var a [n]T = [n]T{V1, V2, ... Vn}
func main() {
	var arr = [4]int{1, 2, 3, 4}

	fmt.Println(arr)
}
$ go run main.go
[1 2 3 4]
We can even do a shorthand declaration.
...
arr := [4]int{1, 2, 3, 4}
Access
And similar to other languages, we can access the elements using the index as they're stored sequentially.
func main() {
	arr := [4]int{1, 2, 3, 4}

	fmt.Println(arr[0])
}
$ go run main.go
1
Iteration
Now, let's talk about iteration.
So, there are multiple ways to iterate over arrays.
The first one is using the for loop with the len function which gives us the length of the array.
func main() {
	arr := [4]int{1, 2, 3, 4}

	for i := 0; i < len(arr); i++ {
		fmt.Printf("Index: %d, Element: %d\n", i, arr[i])
	}
}
$ go run main.go
Index: 0, Element: 1
Index: 1, Element: 2
Index: 2, Element: 3
Index: 3, Element: 4
Another way is to use the range keyword with the for loop.
func main() {
	arr := [4]int{1, 2, 3, 4}

	for i, e := range arr {
		fmt.Printf("Index: %d, Element: %d\n", i, e)
	}
}
$ go run main.go
Index: 0, Element: 1
Index: 1, Element: 2
Index: 2, Element: 3
Index: 3, Element: 4
As we can see, our example works the same as before.
But the range keyword is quite versatile and can be used in multiple ways.
for i, e := range arr {} // Normal usage of range

for _, e := range arr {} // Omit index with _ and use element

for i := range arr {} // Use index only

for range arr {} // Simply loop over the array
Multi dimensional
All the arrays that we created so far are one-dimensional. We can also create multi-dimensional arrays in Go.
Let's take a look at an example:
func main() {
	arr := [2][4]int{
		{1, 2, 3, 4},
		{5, 6, 7, 8},
	}

	for i, e := range arr {
		fmt.Printf("Index: %d, Element: %d\n", i, e)
	}
}
$ go run main.go
Index: 0, Element: [1 2 3 4]
Index: 1, Element: [5 6 7 8]
We can also let the compiler infer the length of the array by using ... ellipses instead of the length.
func main() {
	arr := [...][4]int{
		{1, 2, 3, 4},
		{5, 6, 7, 8},
	}

	for i, e := range arr {
		fmt.Printf("Index: %d, Element: %d\n", i, e)
	}
}
$ go run main.go
Index: 0, Element: [1 2 3 4]
Index: 1, Element: [5 6 7 8]
Properties
Now let's talk about some properties of arrays.
The array's length is part of its type. So, the array a and b are completely distinct types, and we cannot assign one to the other.
This also means that we cannot resize an array, because resizing an array would mean changing its type.
package main

func main() {
	var a = [4]int{1, 2, 3, 4}
	var b [2]int = a // Error, cannot use a (type [4]int) as type [2]int in assignment
}
Arrays in Go are value types unlike other languages like C, C++, and Java where arrays are reference types.
This means that when we assign an array to a new variable or pass an array to a function, the entire array is copied.
So, if we make any changes to this copied array, the original array won't be affected and will remain unchanged.
package main

import "fmt"

func main() {
	var a = [7]string{"Mon", "Tue", "Wed", "Thu", "Fri", "Sat", "Sun"}
	var b = a // Copy of a is assigned to b

	b[0] = "Monday"

	fmt.Println(a) // Output: [Mon Tue Wed Thu Fri Sat Sun]
	fmt.Println(b) // Output: [Monday Tue Wed Thu Fri Sat Sun]
}
Slices
I know what you're thinking, arrays are useful but a bit inflexible due to the limitation caused by their fixed size.
This brings us to Slice, so what is a slice?
A Slice is a segment of an array. Slices build on arrays and provide more power, flexibility, and convenience.

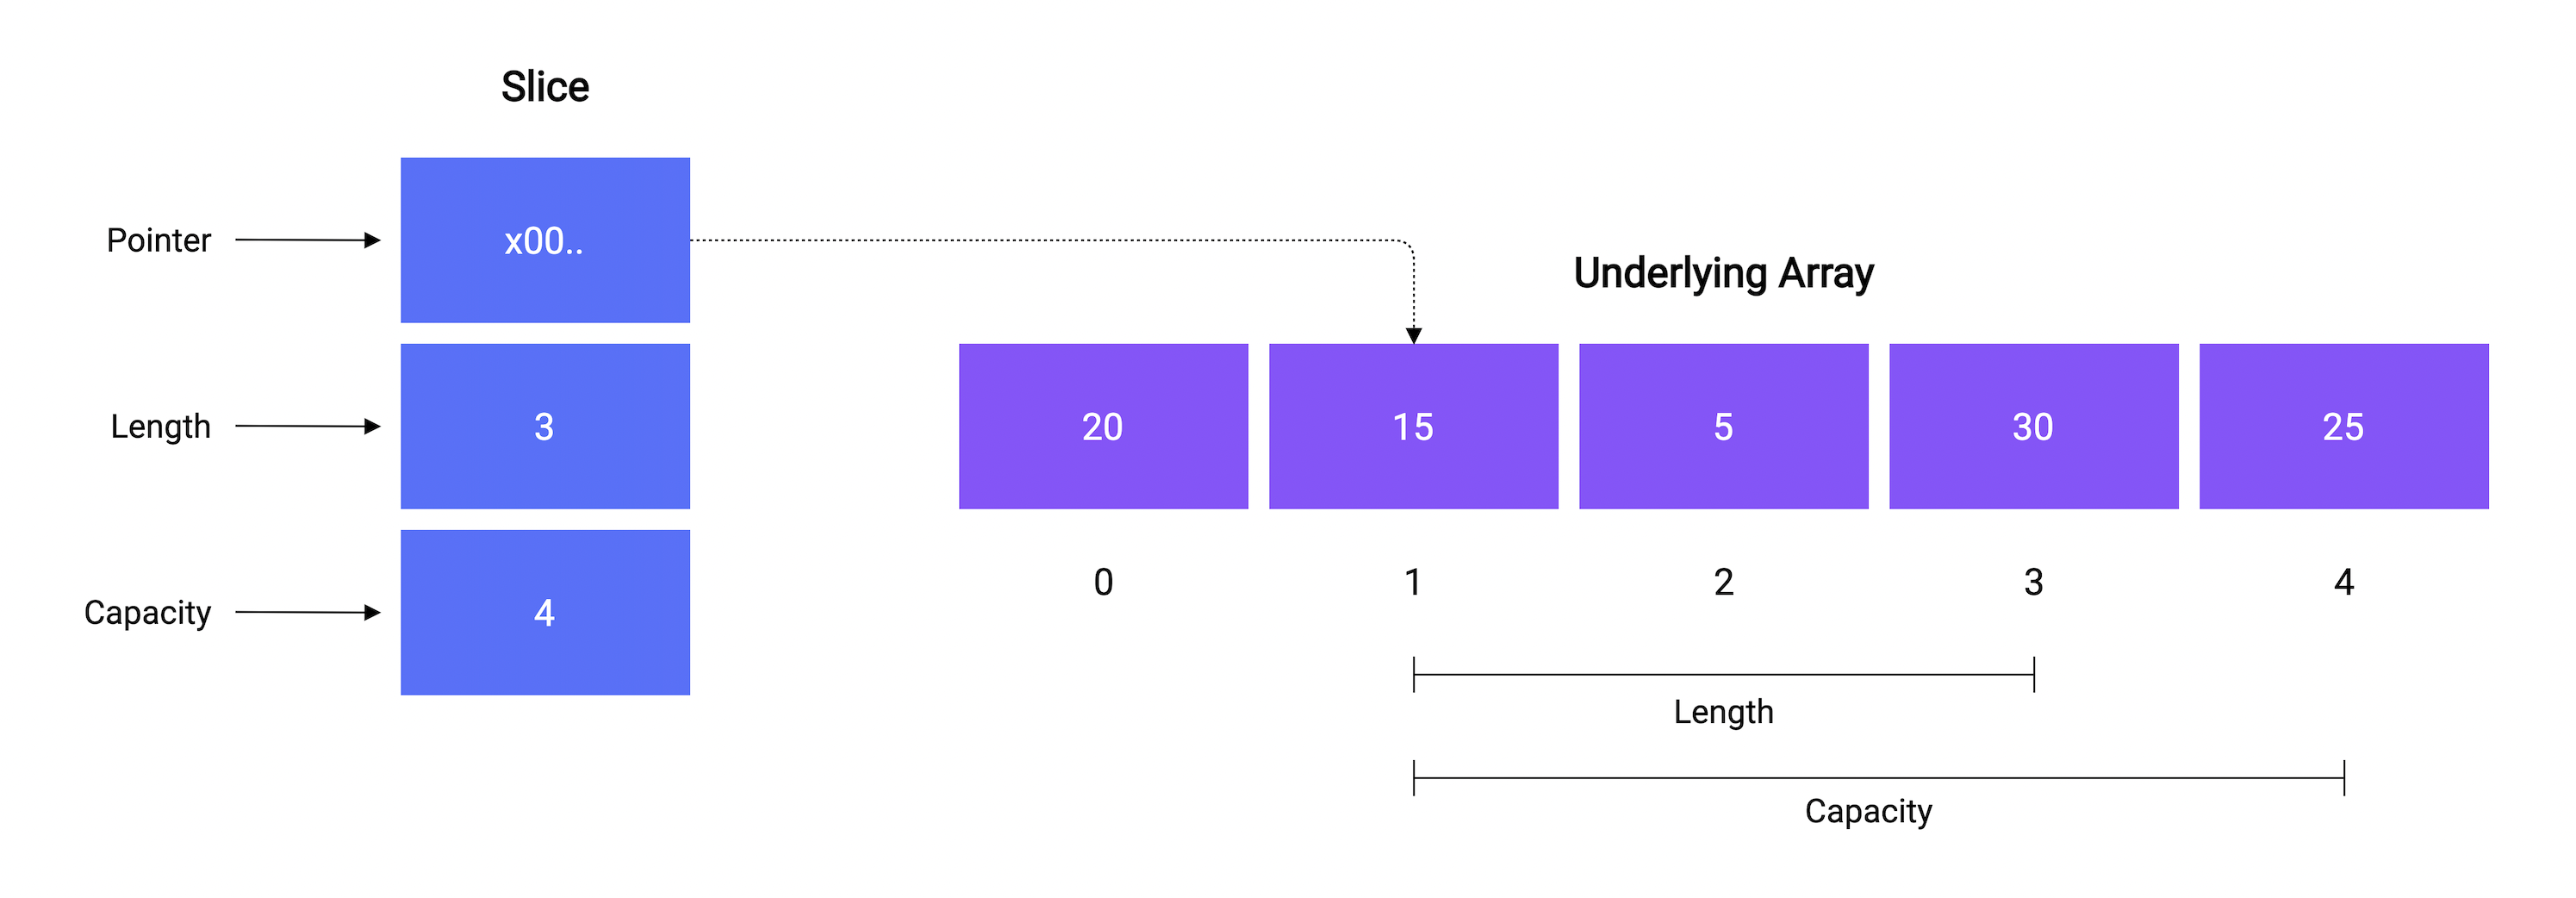
A slice consists of three things:
- A pointer reference to an underlying array.
- The length of the segment of the array that the slice contains.
- And, the capacity, which is the maximum size up to which the segment can grow.
Just like len function, we can determine the capacity of a slice using the built-in cap function. Here's an example:
package main

import "fmt"

func main() {
	a := [5]int{20, 15, 5, 30, 25}

	s := a[1:4]

	// Output: Array: [20 15 5 30 25], Length: 5, Capacity: 5
	fmt.Printf("Array: %v, Length: %d, Capacity: %d\n", a, len(a), cap(a))

	// Output: Slice [15 5 30], Length: 3, Capacity: 4
	fmt.Printf("Slice: %v, Length: %d, Capacity: %d", s, len(s), cap(s))
}
Don't worry, we are going to discuss everything shown here in detail.
Declaration
Let's see how we can declare a slice.
var s []T
As we can see, we don't need to specify any length. Let's declare a slice of integers and see how it works.
func main() {
	var s []string

	fmt.Println(s)
	fmt.Println(s == nil)
}
$ go run main.go
[]
true
So, unlike arrays, the zero value of a slice is nil.
Initialization
There are multiple ways to initialize our slice. One way is to use the built-in make function.
make([]T, len, cap) []T
func main() {
	var s = make([]string, 0, 0)

	fmt.Println(s)
}
$ go run main.go
[]
Similar to arrays, we can use the slice literal to initialize our slice.
func main() {
	var s = []string{"Go", "TypeScript"}

	fmt.Println(s)
}
$ go run main.go
[Go TypeScript]
Another way is to create a slice from an array. Since a slice is a segment of an array, we can create a slice from index low to high as follows.
a[low:high]
func main() {
	var a = [4]string{
		"C++",
		"Go",
		"Java",
		"TypeScript",
	}

	s1 := a[0:2] // Select from 0 to 2
	s2 := a[:3]  // Select first 3
	s3 := a[2:]  // Select last 2

	fmt.Println("Array:", a)
	fmt.Println("Slice 1:", s1)
	fmt.Println("Slice 2:", s2)
	fmt.Println("Slice 3:", s3)
}
$ go run main.go
Array: [C++ Go Java TypeScript]
Slice 1: [C++ Go]
Slice 2: [C++ Go Java]
Slice 3: [Java TypeScript]
Missing low index implies 0 and missing high index implies the length of the underlying array (len(a)).
The thing to note here is we can create a slice from other slices too and not just arrays.
var a = []string{
	"C++",
	"Go",
	"Java",
	"TypeScript",
}
Iteration
We can iterate over a slice in the same way you iterate over an array, by using the for loop with either len function or range keyword.
Functions
So now, let's talk about built-in slice functions provided in Go.
copy
The copy() function copies elements from one slice to another. It takes 2 slices, a destination, and a source. It also returns the number of elements copied.
func copy(dst, src []T) int
Let's see how we can use it.
func main() {
	s1 := []string{"a", "b", "c", "d"}
	s2 := make([]string, len(s1))

	e := copy(s2, s1)

	fmt.Println("Src:", s1)
	fmt.Println("Dst:", s2)
	fmt.Println("Elements:", e)
}
$ go run main.go
Src: [a b c d]
Dst: [a b c d]
Elements: 4
As expected, our 4 elements from the source slice were copied to the destination slice.
append
Now, let's look at how we can append data to our slice using the built-in append function which appends new elements at the end of a given slice.
It takes a slice and a variable number of arguments. It then returns a new slice containing all the elements.
append(slice []T, elems ...T) []T
Let's try it in an example by appending elements to our slice.
func main() {
	s1 := []string{"a", "b", "c", "d"}

	s2 := append(s1, "e", "f")

	fmt.Println("s1:", s1)
	fmt.Println("s2:", s2)
}
$ go run main.go
s1: [a b c d]
s2: [a b c d e f]
As we can see, the new elements were appended and a new slice was returned.
But if the given slice doesn't have sufficient capacity for the new elements then a new underlying array is allocated with a bigger capacity.
All the elements from the underlying array of the existing slice are copied to this new array, and then the new elements are appended.
Properties
Finally, let's discuss some properties of slices.
Slices are reference types, unlike arrays.
This means modifying the elements of a slice will modify the corresponding elements in the referenced array.
package main

import "fmt"

func main() {
	a := [7]string{"Mon", "Tue", "Wed", "Thu", "Fri", "Sat", "Sun"}

	s := a[0:2]

	s[0] = "Sun"

	fmt.Println(a) // Output: [Sun Tue Wed Thu Fri Sat Sun]
	fmt.Println(s) // Output: [Sun Tue]
}
Slices can be used with variadic types as well.
package main

import "fmt"

func main() {
	values := []int{1, 2, 3}
	sum := add(values...)
	fmt.Println(sum)
}

func add(values ...int) int {
	sum := 0
	for _, v := range values {
		sum += v
	}

	return sum
}
Maps
So, Go provides a built-in map type, and we'll learn how to use it.
But, the question is what are maps? And why do we need them?

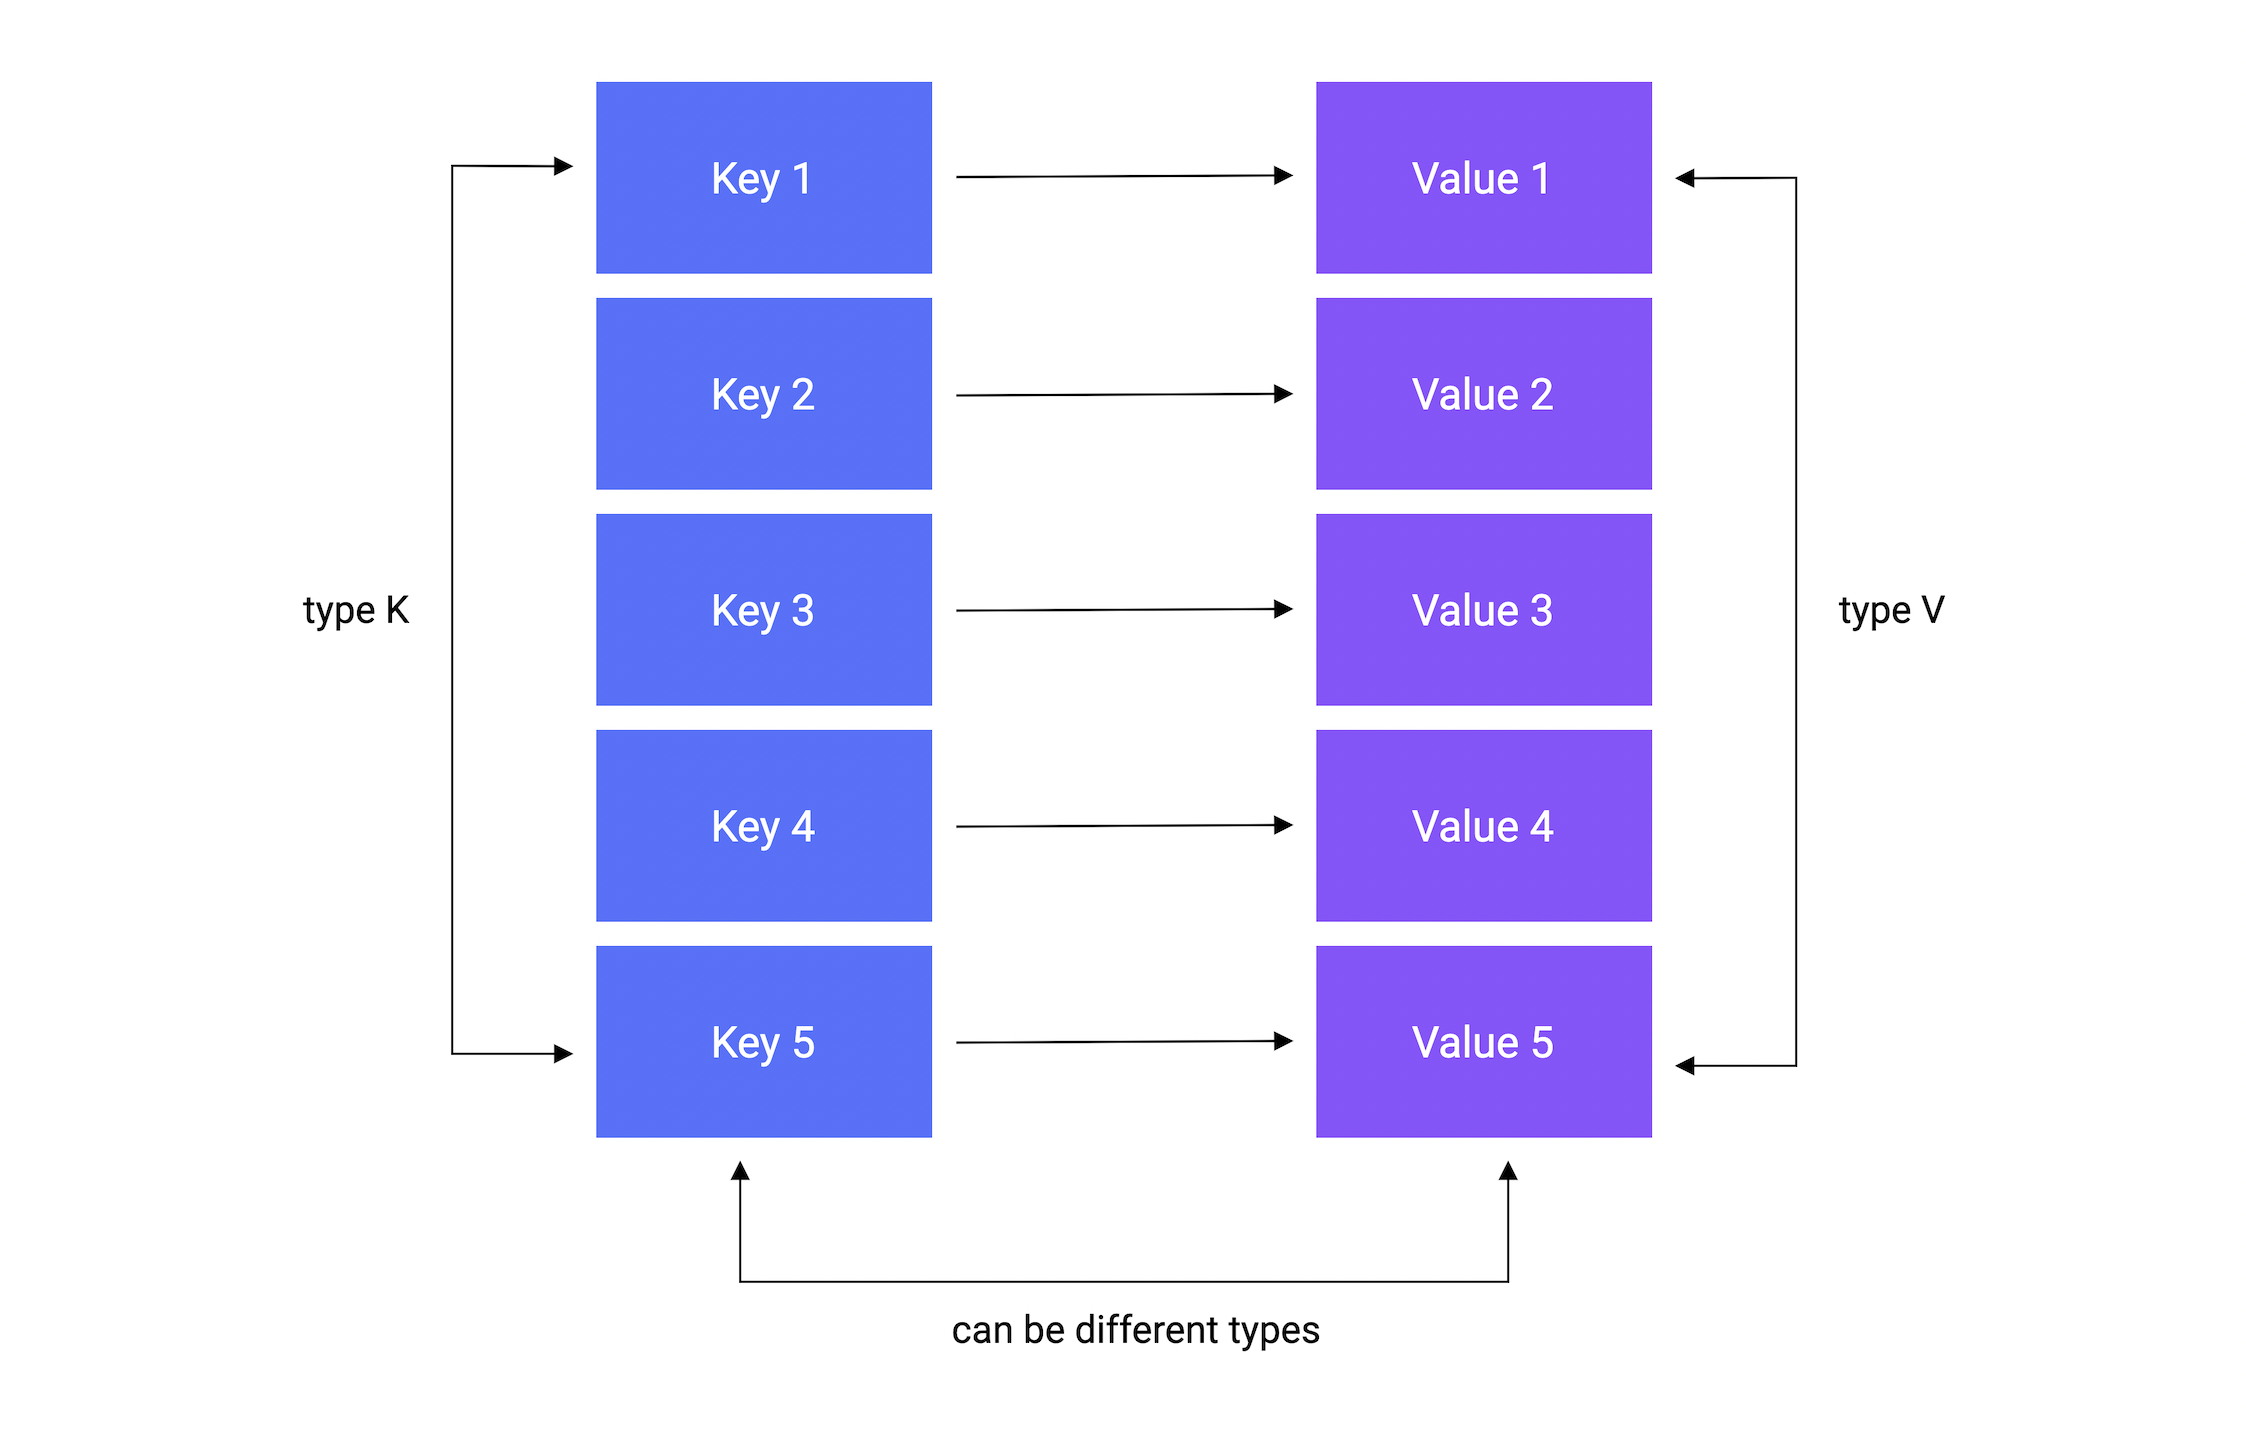
Well, A map is an unordered collection of key-value pairs. It maps keys to values. The keys are unique within a map while the values may not be.
It is used for fast lookups, retrieval, and deletion of data based on keys. It is one of the most used data structures.
Declaration
Let's start with the declaration.
A map is declared using the following syntax:
var m map[K]V
Where K is the key type and V is the value type.
For example, here's how we can declare a map of string keys to int values.
func main() {
	var m map[string]int

	fmt.Println(m)
}
$ go run main.go
nil
As we can see, the zero value of a map is nil.
A nil map has no keys. Moreover, any attempt to add keys to a nil map will result in a runtime error.
Initialization
There are multiple ways to initialize a map.
make function
We can use the built-in make function, which allocates memory for referenced data types and initializes their underlying data structures.
func main() {
	var m = make(map[string]int)

	fmt.Println(m)
}
$ go run main.go
map[]
map literal
Another way is using a map literal.
func main() {
	var m = map[string]int{
		"a": 0,
    "b": 1,
	}

	fmt.Println(m)
}
Note that the trailing comma is required.
$ go run main.go
map[a:0 b:1]
As always, we can use our custom types as well.
type User struct {
	Name string
}

func main() {
	var m = map[string]User{
		"a": User{"Peter"},
		"b": User{"Seth"},
	}

	fmt.Println(m)
}
We can even remove the value type and Go will figure it out!
var m = map[string]User{
	"a": {"Peter"},
	"b": {"Seth"},
}
$ go run main.go
map[a:{Peter} b:{Seth}]
Add
Now, let's see how we can add a value to our map.
func main() {
	var m = map[string]User{
		"a": {"Peter"},
		"b": {"Seth"},
	}

	m["c"] = User{"Steve"}

	fmt.Println(m)
}
$ go run main.go
map[a:{Peter} b:{Seth} c:{Steve}]
Retrieve
We can also retrieve our values from the map using the key.
...
c := m["c"]
fmt.Println("Key c:", c)
$ go run main.go
key c: {Steve}
What if we use a key that is not present in the map?
...
d := m["d"]
fmt.Println("Key d:", d)
Yes, you guessed it! we will get the zero value of the map's value type.
$ go run main.go
Key c: {Steve}
Key d: {}
Exists
When you retrieve the value assigned to a given key, it returns an additional boolean value as well. The boolean variable will be true if the key exists, and false otherwise.
Let's try this in an example:
...
c, ok := m["c"]
fmt.Println("Key c:", c, ok)

d, ok := m["d"]
fmt.Println("Key d:", d, ok)
$ go run main.go
Key c: {Steve} Present: true
Key d: {} Present: false
Update
We can also update the value for a key by simply re-assigning a key.
...
m["a"] = "Roger"
$ go run main.go
map[a:{Roger} b:{Seth} c:{Steve}]
Delete
Or, we can delete the key using the built-in delete function.
Here's how the syntax looks:
...
delete(m, "a")
The first argument is the map, and the second is the key we want to delete.
The delete() function doesn't return any value. Also, it doesn't do anything if the key doesn't exist in the map.
$ go run main.go
map[a:{Roger} c:{Steve}]
Iteration
Similar to arrays or slices, we can iterate over maps with the range keyword.
package main

import "fmt"

func main() {
	var m = map[string]User{
		"a": {"Peter"},
		"b": {"Seth"},
	}

	m["c"] = User{"Steve"}

	for key, value := range m {
		fmt.Println("Key: %s, Value: %v", key, value)
	}
}
$ go run main.go
Key: c, Value: {Steve}
Key: a, Value: {Peter}
Key: b, Value: {Seth}
Note that a map is an unordered collection, and therefore the iteration order of a map is not guaranteed to be the same every time we iterate over it.
Properties
Lastly, let's talk about map properties.
Maps are reference types, which means when we assign a map to a new variable, they both refer to the same underlying data structure.
Therefore, changes done by one variable will be visible to the other.
package main

import "fmt"

type User struct {
	Name string
}

func main() {
	var m1 = map[string]User{
		"a": {"Peter"},
		"b": {"Seth"},
	}

	m2 := m1
	m2["c"] = User{"Steve"}

	fmt.Println(m1) // Output: map[a:{Peter} b:{Seth} c:{Steve}]
	fmt.Println(m2) // Output: map[a:{Peter} b:{Seth} c:{Steve}]
}
Interfaces
In this section, let's talk about the interfaces.
What is an interface?
So, an interface in Go is an abstract type that is defined using a set of method signatures. The interface defines the behavior for similar types of objects.
Here, behavior is a key term that we will discuss shortly.
Let's take a look at an example to understand this better.
One of the best real-world examples of interfaces is the power socket. Imagine that we need to connect different devices to the power socket.

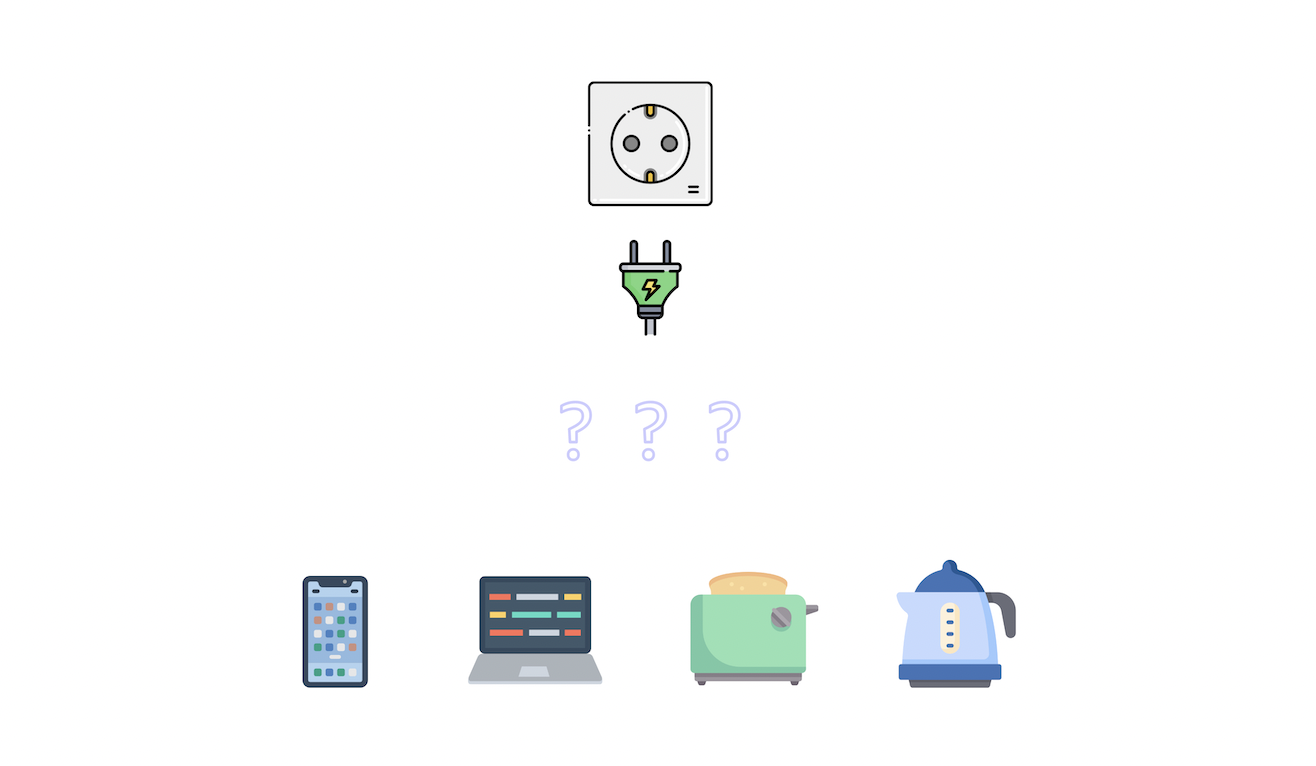
Let's try to implement this. Here are the device types we will be using.
type mobile struct {
	brand string
}

type laptop struct {
	cpu string
}

type toaster struct {
	amount int
}

type kettle struct {
	quantity string
}

type socket struct{}
Now, let's define a Draw method on a type, let's say mobile. Here we will simply print the properties of the type.
func (m mobile) Draw(power int) {
	fmt.Printf("%T -> brand: %s, power: %d", m, m.brand, power)
}
Great, now we will define the Plug method on the socket type which accepts our mobile type as an argument.
func (socket) Plug(device mobile, power int) {
	device.Draw(power)
}
Let's try to "connect" or "plug in" the mobile type to our socket type in the main function.
package main
import "fmt"
func main() {
m := mobile{"Apple"}
s := socket{}
s.Plug(m, 10)
}
And if we run this we'll see the following.
$ go run main.go
main.mobile -> brand: Apple, power: 10
This is interesting, but let's say now we want to connect our laptop type.
package main
import "fmt"
func main() {
m := mobile{"Apple"}
l := laptop{"Intel i9"}
s := socket{}
s.Plug(m, 10)
s.Plug(l, 50) // Error: cannot use l as mobile value in argument
}
As we can see, this will throw an error.
What should we do now? Define another method? Such as PlugLaptop?
Sure, but then every time we add a new device type we will need to add a new method to the socket type as well and that's not ideal.
This is where the interface comes in. Essentially, we want to define a contract that, in the future, must be implemented.
We can simply define an interface such as PowerDrawer and use it in our Plug function to allow any device that satisfies the criteria, which is that the type must have a Draw method matching the signature that the interface requires.
And anyways, the socket doesn't need to know anything about our device and can simply call the Draw method.

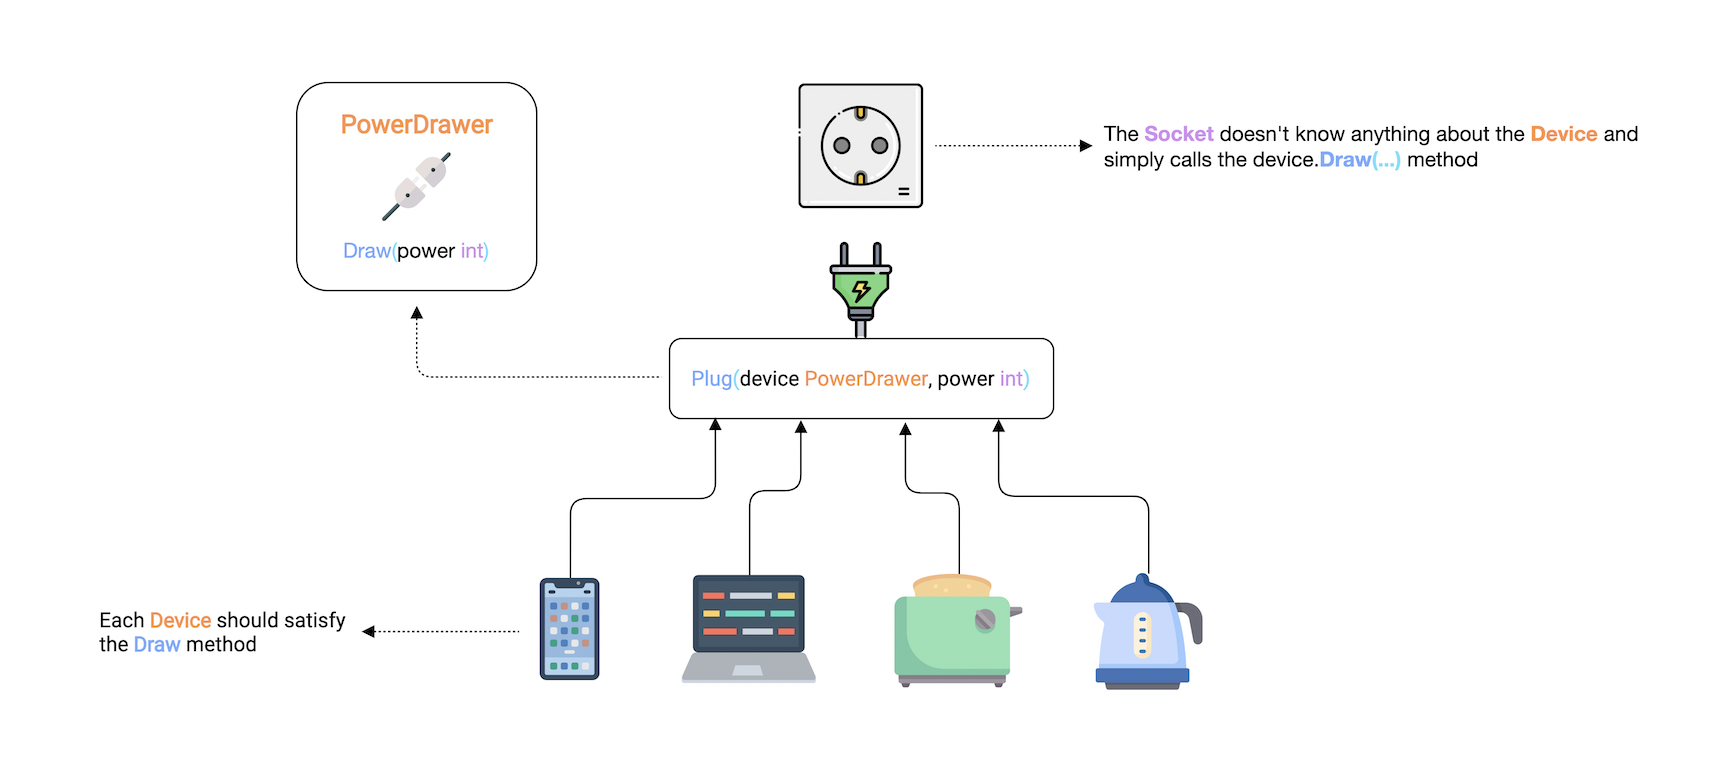
Now let's try to implement our PowerDrawer interface. Here's how it will look.
The convention is to use "-er" as a suffix in the name. And as we discussed earlier, an interface should only describe the expected behavior. Which in our case is the Draw method.

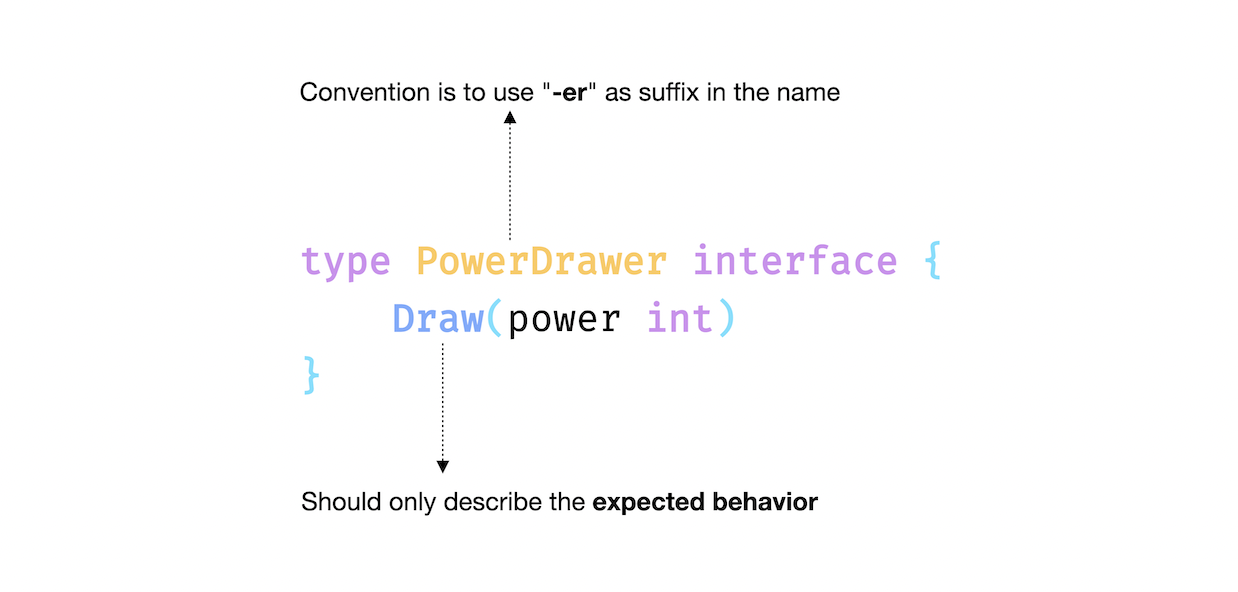
type PowerDrawer interface {
Draw(power int)
}
Now, we need to update our Plug method to accept a device that implements the PowerDrawer interface as an argument.
func (socket) Plug(device PowerDrawer, power int) {
device.Draw(power)
}
And to satisfy the interface, we can simply add Draw methods to all the device types.
type mobile struct {
brand string
}
func (m mobile) Draw(power int) {
fmt.Printf("%T -> brand: %s, power: %d\n", m, m.brand, power)
}
type laptop struct {
cpu string
}
func (l laptop) Draw(power int) {
fmt.Printf("%T -> cpu: %s, power: %d\n", l, l.cpu, power)
}
type toaster struct {
amount int
}
func (t toaster) Draw(power int) {
fmt.Printf("%T -> amount: %d, power: %d\n", t, t.amount, power)
}
type kettle struct {
quantity string
}
func (k kettle) Draw(power int) {
fmt.Printf("%T -> quantity: %s, power: %d\n", k, k.quantity, power)
}
Now, we can connect all our devices to the socket with the help of our interface!
func main() {
m := mobile{"Apple"}
l := laptop{"Intel i9"}
t := toaster{4}
k := kettle{"50%"}
s := socket{}
s.Plug(m, 10)
s.Plug(l, 50)
s.Plug(t, 30)
s.Plug(k, 25)
}
And it works just as we expected.
$ go run main.go
main.mobile -> brand: Apple, power: 10
main.laptop -> cpu: Intel i9, power: 50
main.toaster -> amount: 4, power: 30
main.kettle -> quantity: Half Empty, power: 25
But why is this considered such a powerful concept?
Well, an interface can help us decouple our types. For example, because we have the interface, we don't need to update our socket implementation. We can just define a new device type with a Draw method.
Unlike other languages, Go Interfaces are implemented implicitly, so we don't need something like an implements keyword. This means that a type satisfies an interface automatically when it has "all the methods" of the interface.
Empty Interface
Next, let's talk about the empty interface. An empty interface can take on a value of any type.
Here's how we declare it.
var x interface{}
But why do we need it?
Empty interfaces can be used to handle values of unknown types.
Some examples are:
- Reading heterogeneous data from an API.
- Variables of an unknown type, like in the
fmt.Printlnfunction.
To use a value of type empty interface{}, we can use type assertion or a type switch to determine the type of the value.
Type Assertion
A type assertion provides access to an interface value's underlying concrete value.
For example:
func main() {
var i interface{} = "hello"
s := i.(string)
fmt.Println(s)
}
This statement asserts that the interface value holds a concrete type and assigns the underlying type value to the variable.
We can also test whether an interface value holds a specific type.
A type assertion can return two values:
- The first one is the underlying value.
- The second is a boolean value that reports whether the assertion succeeded.
s, ok := i.(string)
fmt.Println(s, ok)
This can help us test whether an interface value holds a specific type or not.
In a way, this is similar to how we read values from a map.
And If this is not the case then, ok will be false and the value will be the zero value of the type, and no panic will occur.
f, ok := i.(float64)
fmt.Println(f, ok)
But if the interface does not hold the type, the statement will trigger a panic.
f = i.(float64)
fmt.Println(f) // Panic!
$ go run main.go
hello
hello true
0 false
panic: interface conversion: interface {} is string, not float64
Type Switch
Here, a switch statement can be used to determine the type of a variable of type empty interface{}.
var t interface{}
t = "hello"
switch t := t.(type) {
case string:
fmt.Printf("string: %s\n", t)
case bool:
fmt.Printf("boolean: %v\n", t)
case int:
fmt.Printf("integer: %d\n", t)
default:
fmt.Printf("unexpected: %T\n", t)
}
And if we run this, we can verify that we have a string type.
$ go run main.go
string: hello
Properties
Let's discuss some properties of interfaces.
Zero value
The zero value of an interface is nil.
package main
import "fmt"
type MyInterface interface {
Method()
}
func main() {
var i MyInterface
fmt.Println(i) // Output: <nil>
}
Embedding
We can embed interfaces like structs. For example:
type interface1 interface {
Method1()
}
type interface2 interface {
Method2()
}
type interface3 interface {
interface1
interface2
}
Values
Interface values are comparable.
package main
import "fmt"
type MyInterface interface {
Method()
}
type MyType struct{}
func (MyType) Method() {}
func main() {
t := MyType{}
var i MyInterface = MyType{}
fmt.Println(t == i)
}
Interface Values
Under the hood, an interface value can be thought of as a tuple consisting of a value and a concrete type.
package main
import "fmt"
type MyInterface interface {
Method()
}
type MyType struct {
property int
}
func (MyType) Method() {}
func main() {
var i MyInterface
i = MyType{10}
fmt.Printf("(%v, %T)\n", i, i) // Output: ({10}, main.MyType)
}
With that, we covered interfaces in Go.
It's a really powerful feature, but remember, "Bigger the interface, the weaker the abstraction" - Rob Pike.
Errors
In this tutorial, let's talk about error handling.
Notice how I said errors and not exceptions as there is no exception handling in Go.
Instead, we can just return a built-in error type which is an interface type.
type error interface {
Error() string
}
We will circle back to this shortly. First, let's try to understand the basics.
So, let's declare a simple Divide function which, as the name suggests, will divide integer a by b.
func Divide(a, b int) int {
return a/b
}
Great. Now, we want to return an error, let's say, to prevent the division by zero. This brings us to error construction.
Constructing Errors
There are multiple ways to do this, but we will look at the two most common ones.
errors package
The first is by using the New function provided by the errors package.
package main
import "errors"
func main() {}
func Divide(a, b int) (int, error) {
if b == 0 {
return 0, errors.New("cannot divide by zero")
}
return a/b, nil
}
Notice, how we return an error with the result. And if there is no error we simply return nil as it is the zero value of an error because after all, it's an interface.
But how do we handle it? So, for that, let's call the Divide function in our main function.
package main
import (
"errors"
"fmt"
)
func main() {
result, err := Divide(4, 0)
if err != nil {
fmt.Println(err)
// Do something with the error
return
}
fmt.Println(result)
// Use the result
}
func Divide(a, b int) (int, error) {...}
$ go run main.go
cannot divide by zero
As you can see, we simply check if the error is nil and build our logic accordingly. This is considered quite idiomatic in Go and you will see this being used a lot.
Another way to construct our errors is by using the fmt.Errorf function.
This function is similar to fmt.Sprintf and it lets us format our error. But instead of returning a string, it returns an error.
It is often used to add some context or detail to our errors.
...
func Divide(a, b int) (int, error) {
if b == 0 {
return 0, fmt.Errorf("cannot divide %d by zero", a)
}
return a/b, nil
}
And it should work similarly.
$ go run main.go
cannot divide 4 by zero
Sentinel Errors
Another important technique in Go is defining expected Errors so they can be checked explicitly in other parts of the code. These are sometimes referred to as sentinel errors.
package main
import (
"errors"
"fmt"
)
var ErrDivideByZero = errors.New("cannot divide by zero")
func main() {...}
func Divide(a, b int) (int, error) {
if b == 0 {
return 0, ErrDivideByZero
}
return a/b, nil
}
In Go, it is considered conventional to prefix the variable with Err. For example, ErrNotFound.
But what's the point?
So, this becomes useful when we need to execute a different branch of code if a certain kind of error is encountered.
For example, now we can check explicitly which error occurred using the errors.Is function.
package main
import (
"errors"
"fmt"
)
func main() {
result, err := Divide(4, 0)
if err != nil {
switch {
case errors.Is(err, ErrDivideByZero):
fmt.Println(err)
// Do something with the error
default:
fmt.Println("no idea!")
}
return
}
fmt.Println(result)
// Use the result
}
func Divide(a, b int) (int, error) {...}
$ go run main.go
cannot divide by zero
Custom Errors
This strategy covers most of the error handling use cases. But sometimes we need additional functionalities such as dynamic values inside of our errors.
Earlier, we saw that error is just an interface. So basically, anything can be an error as long as it implements the Error() method which returns an error message as a string.
So, let's define our custom DivisionError struct which will contain an error code and a message.
package main
import (
"errors"
"fmt"
)
type DivisionError struct {
Code int
Msg string
}
func (d DivisionError) Error() string {
return fmt.Sprintf("code %d: %s", d.Code, d.Msg)
}
func main() {...}
func Divide(a, b int) (int, error) {
if b == 0 {
return 0, DivisionError{
Code: 2000,
Msg: "cannot divide by zero",
}
}
return a/b, nil
}
Here, we will use errors.As instead of errors.Is function to convert the error to the correct type.
func main() {
result, err := Divide(4, 0)
if err != nil {
var divErr DivisionError
switch {
case errors.As(err, &divErr):
fmt.Println(divErr)
// Do something with the error
default:
fmt.Println("no idea!")
}
return
}
fmt.Println(result)
// Use the result
}
func Divide(a, b int) (int, error) {...}
$ go run main.go
code 2000: cannot divide by zero
But what's the difference between errors.Is and errors.As?
The difference is that this function checks whether the error has a specific type, unlike the Is function, which examines if it is a particular error object.
We can also use type assertions but it's not preferred.
func main() {
result, err := Divide(4, 0)
if e, ok := err.(DivisionError); ok {
fmt.Println(e.Code, e.Msg) // Output: 2000 cannot divide by zero
return
}
fmt.Println(result)
}
Lastly, I will say that error handling in Go is quite different compared to the traditional try/catch idiom in other languages. But it is very powerful as it encourages the developer to actually handle the error in an explicit way, which improves readability as well.
Panic and Recover
So earlier, we learned that the idiomatic way of handling abnormal conditions in a Go program is using errors. While errors are sufficient for most cases, there are some situations where the program cannot continue.
In those cases, we can use the built-in panic function.
Panic
func panic(interface{})
The panic is a built-in function that stops the normal execution of the current goroutine. When a function calls panic, the normal execution of the function stops immediately and the control is returned to the caller. This is repeated until the program exits with the panic message and stack trace.
Note: We will discuss goroutines later in the course.
So, let's see how we can use the panic function.
package main
func main() {
WillPanic()
}
func WillPanic() {
panic("Woah")
}
And if we run this, we can see panic in action.
$ go run main.go
panic: Woah
goroutine 1 [running]:
main.WillPanic(...)
.../main.go:8
main.main()
.../main.go:4 +0x38
exit status 2
As expected, our program printed the panic message, followed by the stack trace, and then it was terminated.
So, the question is, what to do when an unexpected panic happens?
Recover
Well, it is possible to regain control of a panicking program using the built-in recover function, along with the defer keyword.
func recover() interface{}
Let's try an example by creating a handlePanic function. And then, we can call it using defer.
package main
import "fmt"
func main() {
WillPanic()
}
func handlePanic() {
data := recover()
fmt.Println("Recovered:", data)
}
func WillPanic() {
defer handlePanic()
panic("Woah")
}
$ go run main.go
Recovered: Woah
As we can see, our panic was recovered and now our program can continue execution.
Lastly, I will mention that panic and recover can be considered similar to the try/catch idiom in other languages. But one important factor is that we should avoid panic and recover and use errors when possible.
If so, then this brings us to the question, when should we use panic?
Use Cases
There are two valid use cases for panic:
- An unrecoverable error
Which can be a situation where the program cannot simply continue its execution.
For example, reading a configuration file which is important to start the program, as there is nothing else to do if the file read itself fails.
- Developer error
This is the most common situation. For example, dereferencing a pointer when the value is nil will cause a panic.
Testing
In this tutorial, we will talk about testing in Go. So, let's start using a simple example.
We have created a math package that contains an Add function Which as the name suggests, adds two integers.
package math
func Add(a, b int) int {
return a + b
}
It's being used in our main package like this.
package main
import (
"example/math"
"fmt"
)
func main() {
result := math.Add(2, 2)
fmt.Println(result)
}
And, if we run this, we should see the result.
$ go run main.go
4
Now, we want to test our Add function. So, in Go, we declare test files with _test suffix in the file name. So for our add.go, we will create a test as add_test.go. Our project structure should look like this.
.
├── go.mod
├── main.go
└── math
├── add.go
└── add_test.go
We will start by using a math_test package, and importing the testing package from the standard library. That's right! Testing is built into Go, unlike many other languages.
But wait...why do we need to use math_test as our package, can't we just use the same math package?
Well yes, we can write our test in the same package if we wanted, but I personally think doing this in a separate package helps us write tests in a more decoupled way.
Now, we can create our TestAdd function. It will take an argument of type testing.T which will provide us with helpful methods.
package math_test
import "testing"
func TestAdd(t *testing.T) {}
Before we add any testing logic, let's try to run it. But this time, we cannot use go run command, instead, we will use the go test command.
$ go test ./math
ok example/math 0.429s
Here, we will have our package name which is math, but we can also use the relative path ./... to test all packages.
$ go test ./...
? example [no test files]
ok example/math 0.348s
And if Go doesn't find any test in a package, it will let us know.
Perfect, let's write some test code. To do this, we will check our result with an expected value and if they do not match, we can use the t.Fail method to fail the test.
package math_test
import "testing"
func TestAdd(t *testing.T) {
got := math.Add(1, 1)
expected := 2
if got != expected {
t.Fail()
}
}
Great! Our test seems to have passed.
$ go test math
ok example/math 0.412s
Let's also see what happens if we fail the test, for that, we can simply change our expected result.
package math_test
import "testing"
func TestAdd(t *testing.T) {
got := math.Add(1, 1)
expected := 3
if got != expected {
t.Fail()
}
}
$ go test ./math
ok example/math (cached)
If you see this, don't worry. For optimization, our tests are cached. We can use the go clean command to clear our cache and then re-run the test.
$ go clean -testcache
$ go test ./math
--- FAIL: TestAdd (0.00s)
FAIL
FAIL example/math 0.354s
FAIL
So, this is what a test failure will look like.
Table driven tests
This brings us to table-driven tests. But what exactly are they?
So earlier, we had function arguments and expected variables which we compared to determine if our tests passed or fail. But what if we defined all that in a slice and iterate over that? This will make our tests a little bit more flexible and help us run multiple cases easily.
Don't worry, we will learn this by example. So we will start by defining our addTestCase struct.
package math_test
import (
"example/math"
"testing"
)
type addTestCase struct {
a, b, expected int
}
var testCases = []addTestCase{
{1, 1, 3},
{25, 25, 50},
{2, 1, 3},
{1, 10, 11},
}
func TestAdd(t *testing.T) {
for _, tc := range testCases {
got := math.Add(tc.a, tc.b)
if got != tc.expected {
t.Errorf("Expected %d but got %d", tc.expected, got)
}
}
}
Notice, how we declared addTestCase with a lower case. That's right we don't want to export it as it's not useful outside our testing logic. Let's run our test.
$ go run main.go
--- FAIL: TestAdd (0.00s)
add_test.go:25: Expected 3 but got 2
FAIL
FAIL example/math 0.334s
FAIL
Seems like our tests broke, let's fix them by updating our test cases.
var testCases = []addTestCase{
{1, 1, 2},
{25, 25, 50},
{2, 1, 3},
{1, 10, 11},
}
Perfect, it's working!
$ go run main.go
ok example/math 0.589s
Code coverage
Finally, let's talk about code coverage. When writing tests, it is often important to know how much of your actual code the tests cover. This is generally referred to as code coverage.
To calculate and export the coverage for our test, we can simply use the -coverprofile argument with the go test command.
$ go test ./math -coverprofile=coverage.out
ok example/math 0.385s coverage: 100.0% of statements
Seems like we have great coverage. Let's also check the report using the go tool cover command which gives us a detailed report.
$ go tool cover -html=coverage.out

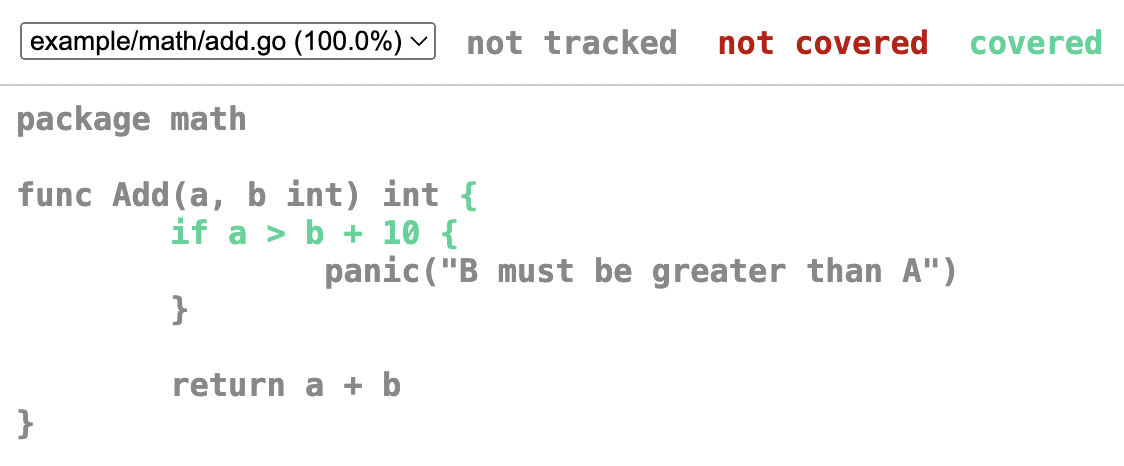
As we can see, this is a much more readable format. And best of all, it is built right into standard tooling.
Fuzz testing
Lastly, let's look at fuzz testing which was introduced in Go version 1.18.
Fuzzing is a type of automated testing that continuously manipulates inputs to a program to find bugs.
Go fuzzing uses coverage guidance to intelligently walk through the code being fuzzed to find and report failures to the user.
Since it can reach edge cases that humans often miss, fuzz testing can be particularly valuable for finding bugs and security exploits.
Let's try an example:
func FuzzTestAdd(f *testing.F) {
f.Fuzz(func(t *testing.T, a, b int) {
math.Add(a , b)
})
}
If we run this, we'll see that it'll automatically create test cases. Because our Add function is quite simple, tests will pass.
$ go test -fuzz FuzzTestAdd example/math
fuzz: elapsed: 0s, gathering baseline coverage: 0/192 completed
fuzz: elapsed: 0s, gathering baseline coverage: 192/192 completed, now fuzzing with 8 workers
fuzz: elapsed: 3s, execs: 325017 (108336/sec), new interesting: 11 (total: 202)
fuzz: elapsed: 6s, execs: 680218 (118402/sec), new interesting: 12 (total: 203)
fuzz: elapsed: 9s, execs: 1039901 (119895/sec), new interesting: 19 (total: 210)
fuzz: elapsed: 12s, execs: 1386684 (115594/sec), new interesting: 21 (total: 212)
PASS
ok foo 12.692s
But if we update our Add function with a random edge case such that the program will panic if b + 10 is greater than a.
func Add(a, b int) int {
if a > b + 10 {
panic("B must be greater than A")
}
return a + b
}
And if we re-run the test, this edge case will be caught by fuzz testing.
$ go test -fuzz FuzzTestAdd example/math
warning: starting with empty corpus
fuzz: elapsed: 0s, execs: 0 (0/sec), new interesting: 0 (total: 0)
fuzz: elapsed: 0s, execs: 1 (25/sec), new interesting: 0 (total: 0)
--- FAIL: FuzzTestAdd (0.04s)
--- FAIL: FuzzTestAdd (0.00s)
testing.go:1349: panic: B is greater than A
I think this is a really cool feature of Go 1.18. You can learn more about fuzz testing from the official Go blog.
Generics
In this section, we will learn about Generics which is a much awaited feature that was released with Go version 1.18.
What are Generics?
Generics means parameterized types. Put simply, generics allow programmers to write code where the type can be specified later because the type isn't immediately relevant.
Let's take a look at an example to understand this better.
For our example, we have simple sum functions for different types such as int, float64, and string. Since method overriding is not allowed in Go we usually have to create new functions.
package main
import "fmt"
func sumInt(a, b int) int {
return a + b
}
func sumFloat(a, b float64) float64 {
return a + b
}
func sumString(a, b string) string {
return a + b
}
func main() {
fmt.Println(sumInt(1, 2))
fmt.Println(sumFloat(4.0, 2.0))
fmt.Println(sumString("a", "b"))
}
As we can see, apart from the types, these functions are pretty similar.
Let's see how we can define a generic function.
func fnName[T constraint]() {
...
}
Here, T is our type parameter and constraint will be the interface that allows any type implementing the interface.
I know, I know, this is confusing. So, let's start building our generic sum function.
Here, we will use T as our type parameter with an empty interface{} as our constraint.
func sum[T interface{}](a, b T) T {
fmt.Println(a, b)
}
Also, starting with Go 1.18 we can use any, which is pretty much equivalent to the empty interface.
func sum[T any](a, b T) T {
fmt.Println(a, b)
}
With type parameters, comes the need to pass type arguments, which can make our code verbose.
sum[int](1, 2) // explicit type argument
sum[float64](4.0, 2.0)
sum[string]("a", "b")
Luckily, Go 1.18 comes with type inference which helps us to write code that calls generic functions without explicit types.
sum(1, 2)
sum(4.0, 2.0)
sum("a", "b")
Let's run this and see if it works.
$ go run main.go
1 2
4 2
a b
Now, let's update the sum function to add our variables.
func sum[T any](a, b T) T {
return a + b
}
fmt.Println(sum(1, 2))
fmt.Println(sum(4.0, 2.0))
fmt.Println(sum("a", "b"))
But now if we run this, we will get an error that operator + is not defined in the constraint.
$ go run main.go
./main.go:6:9: invalid operation: operator + not defined on a (variable of type T constrained by any)
While constraint of type any generally works it does not support operators.
So let's define our own custom constraint using an interface. Our interface should define a type set containing int, float, and string.

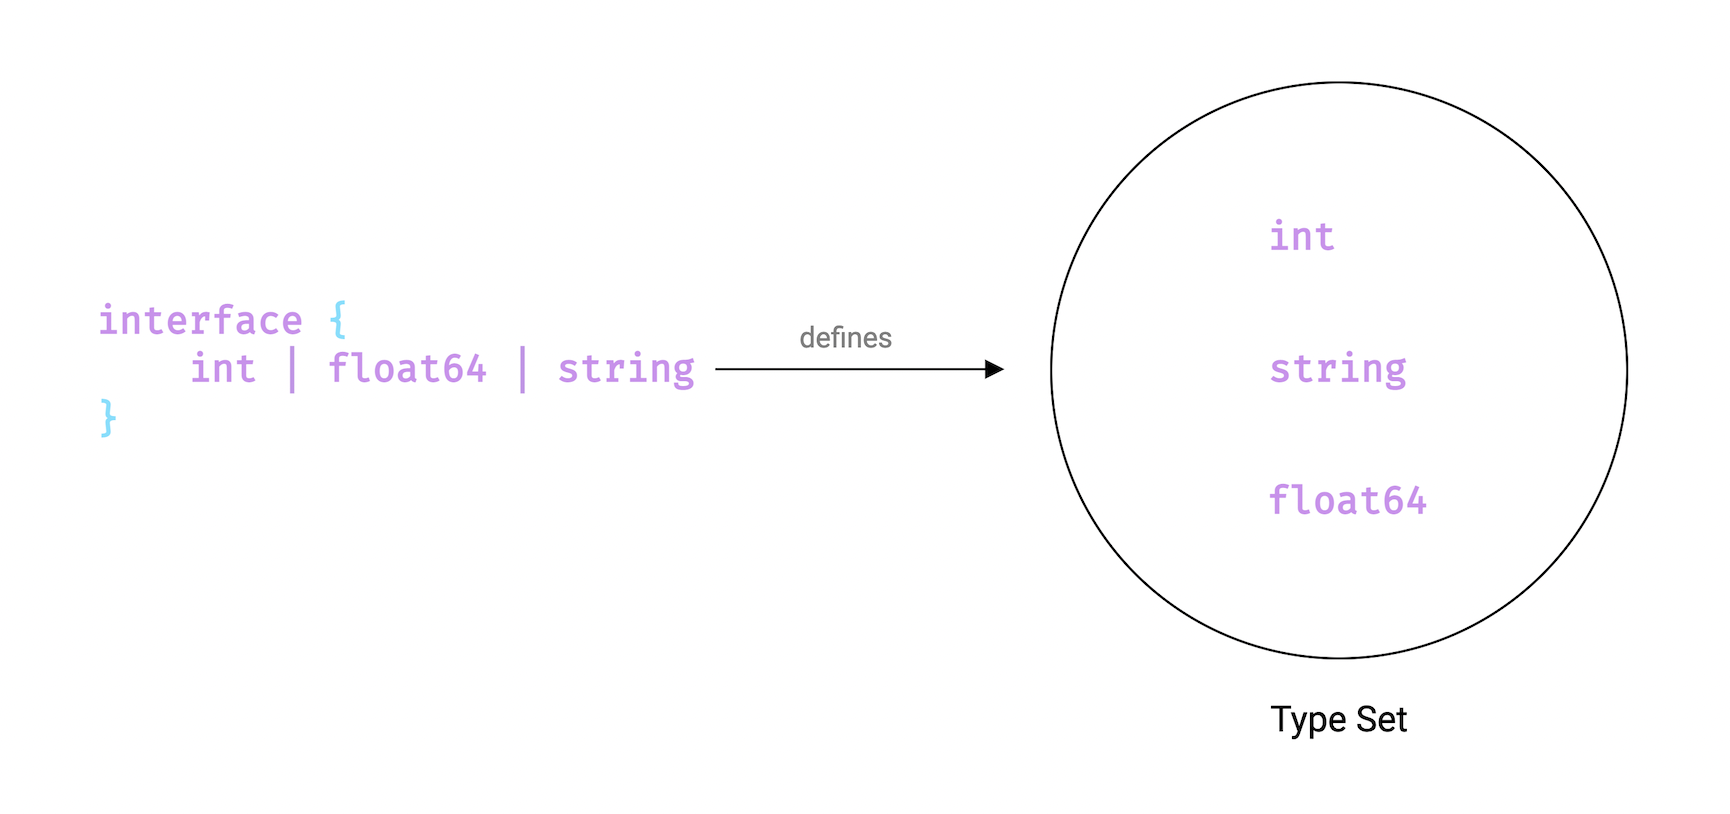
Here's how our SumConstraint interface looks.
type SumConstraint interface {
int | float64 | string
}
func sum[T SumConstraint](a, b T) T {
return a + b
}
func main() {
fmt.Println(sum(1, 2))
fmt.Println(sum(4.0, 2.0))
fmt.Println(sum("a", "b"))
}
And this should work as expected.
$ go run main.go
3
6
ab
We can also use the constraints package which defines a set of useful constraints to be used with type parameters.
type Signed interface {
~int | ~int8 | ~int16 | ~int32 | ~int64
}
type Unsigned interface {
~uint | ~uint8 | ~uint16 | ~uint32 | ~uint64 | ~uintptr
}
type Integer interface {
Signed | Unsigned
}
type Float interface {
~float32 | ~float64
}
type Complex interface {
~complex64 | ~complex128
}
type Ordered interface {
Integer | Float | ~string
}
For that, we will need to install the constraints package.
$ go get golang.org/x/exp/constraints
go: added golang.org/x/exp v0.0.0-20220414153411-bcd21879b8fd
import (
"fmt"
"golang.org/x/exp/constraints"
)
func sum[T constraints.Ordered](a, b T) T {
return a + b
}
func main() {
fmt.Println(sum(1, 2))
fmt.Println(sum(4.0, 2.0))
fmt.Println(sum("a", "b"))
}
Here we are using the Ordered constraint.
type Ordered interface {
Integer | Float | ~string
}
~ is a new token added to Go and the expression ~string means the set of all types whose underlying type is string.
And it still works as expected.
$ go run main.go
3
6
ab
Generics is an amazing feature because it permits writing abstract functions that can drastically reduce code duplication in certain cases.
When to use generics
So, when to use generics? We can take the following use cases as an example:
- Functions that operate on arrays, slices, maps, and channels.
- General purpose data structures like stack or linked list.
- To reduce code duplication.
Lastly, I will add that while generics are a great addition to the language, they should be used sparingly.
And, it is advised to start simple and only write generic code once we have written very similar code at least 2 or 3 times.
Concurrency
In this lesson, we will learn about concurrency which is one of the most powerful features of Go.
So, let's start by asking What is "concurrency"?
What is Concurrency
Concurrency, by definition, is the ability to break down a computer program or algorithm into individual parts, which can be executed independently.
The final outcome of a concurrent program is the same as that of a program that has been executed sequentially.
Using concurrency, we can achieve the same results in lesser time, thus increasing the overall performance and efficiency of our programs.
Concurrency vs Parallelism

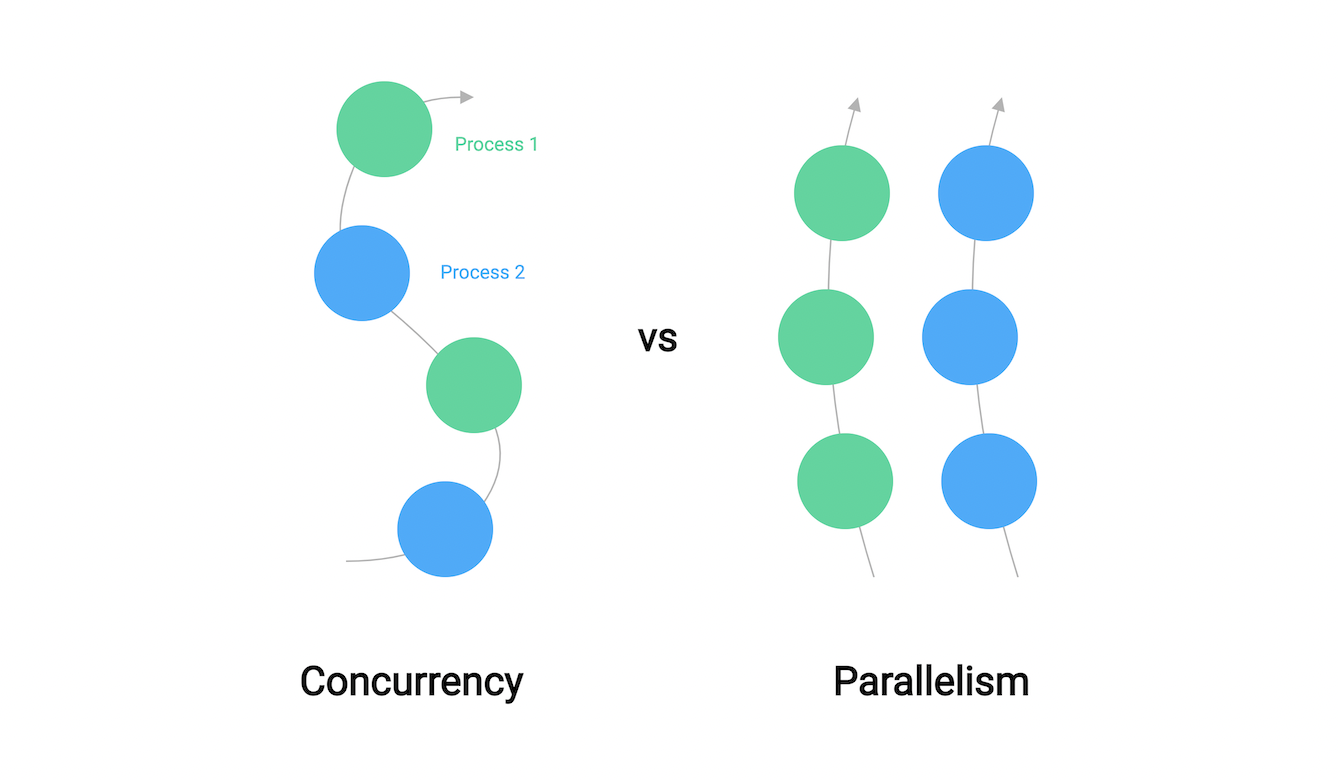
A lot of people confuse concurrency with parallelism because they both somewhat imply executing code simultaneously, but they are two completely different concepts.
Concurrency is the task of running and managing multiple computations at the same time, while parallelism is the task of running multiple computations simultaneously.
A simple quote from Rob Pike pretty much sums it up.
"Concurrency is about dealing with lots of things at once. Parallelism is about doing lots of things at once"
But concurrency in Go is more than just syntax. In order to harness the power of Go, we need to first understand how Go approaches concurrent execution of code. Go relies on a concurrency model called CSP (Communicating Sequential Processes).
Communicating Sequential Processes (CSP)
Communicating Sequential Processes (CSP) is a model put forth by Tony Hoare in 1978 which describes interactions between concurrent processes. It made a breakthrough in Computer Science, especially in the field of concurrency.
Languages like Go and Erlang have been highly inspired by the concept of communicating sequential processes (CSP).
Concurrency is hard, but CSP allows us to give a better structure to our concurrent code and provides a model for thinking about concurrency in a way that makes it a little easier. Here, processes are independent and they communicate by sharing channels between them.

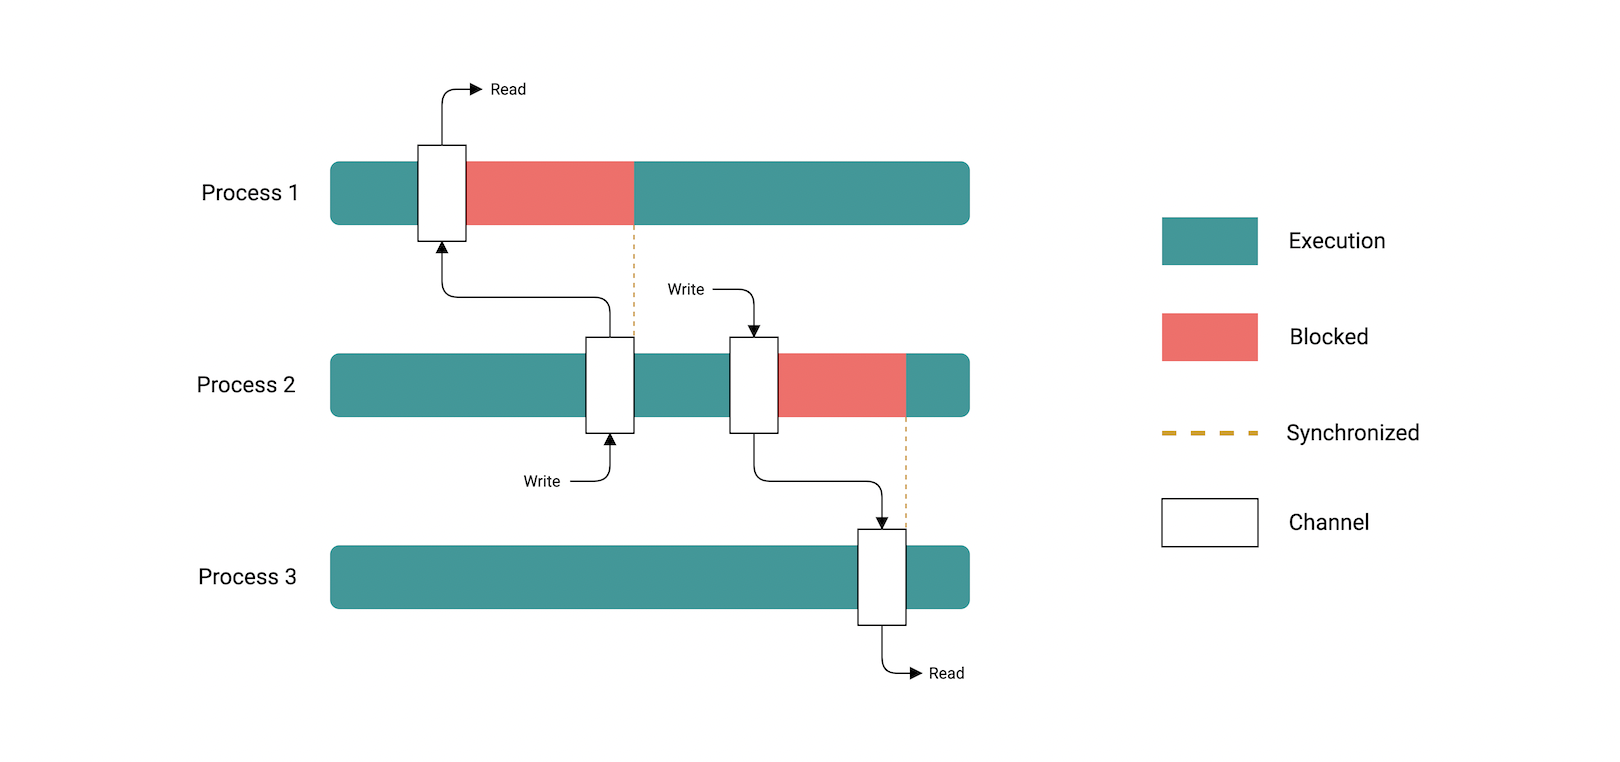
We'll learn how Golang implements it using goroutines and channels later in the course.
Basic Concepts
Now, let's get familiar with some basic concurrency concepts.
Data Race
A data race occurs when processes have to access the same resource concurrently.
For example, one process reads while another simultaneously writes to the exact same resource.
Race Conditions
A race condition occurs when the timing or order of events affects the correctness of a piece of code.
Deadlocks
A deadlock occurs when all processes are blocked while waiting for each other and the program cannot proceed further.
Coffman Conditions
There are four conditions, known as the Coffman conditions, all of them must be satisfied for a deadlock to occur.
- Mutual Exclusion
A concurrent process holds at least one resource at any one time making it non-sharable.
In the diagram below, there is a single instance of Resource 1 and it is held by Process 1 only.

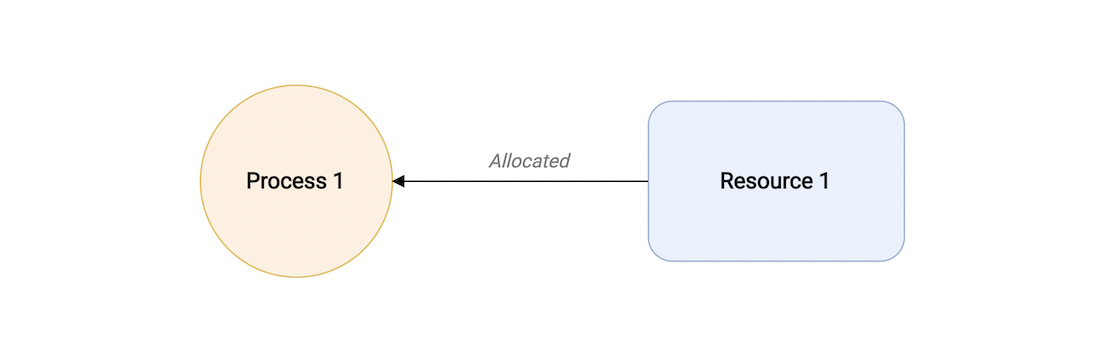
- Hold and wait
A concurrent process holds a resource and is waiting for an additional resource.
In the diagram given below, Process 2 holds Resource 2 and Resource 3 and is requesting the Resource 1 which is held by Process 1.

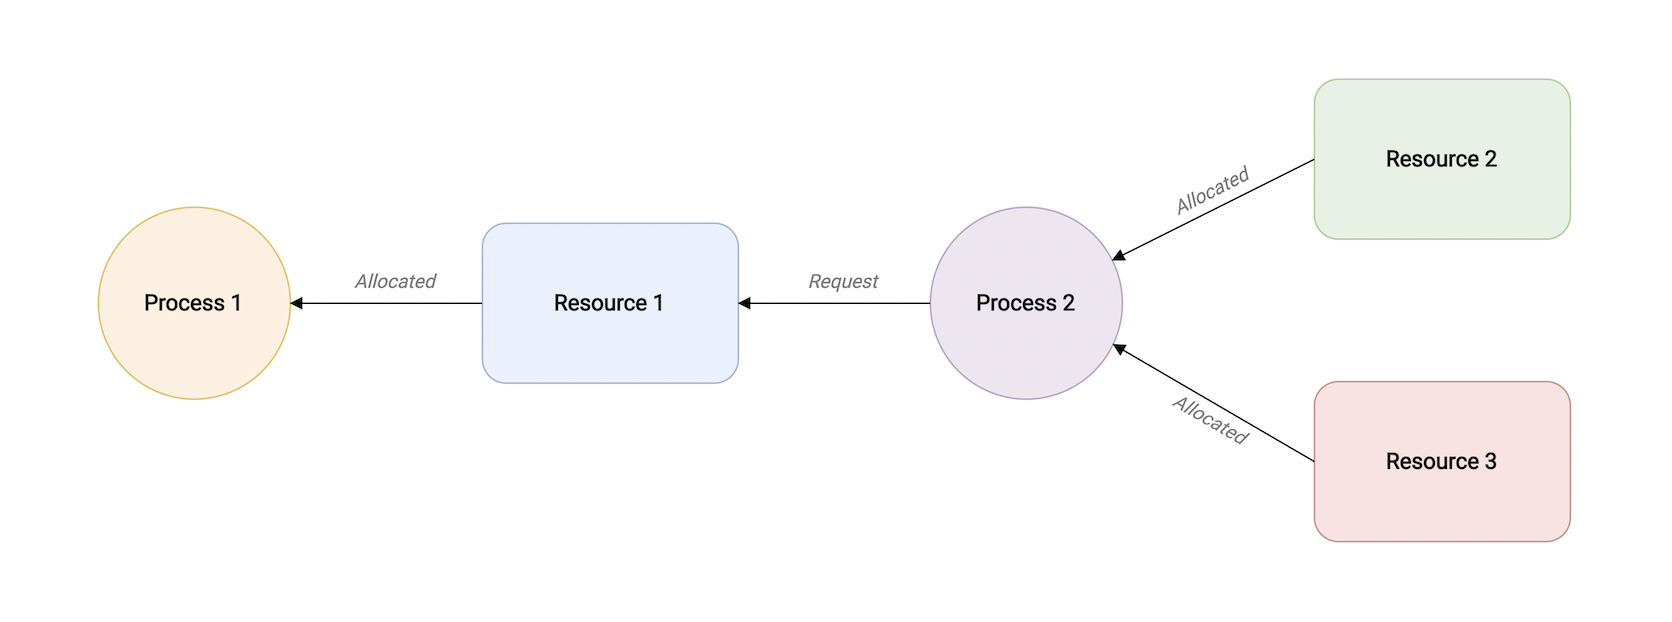
- No preemption
A resource held by a concurrent process cannot be taken away by the system. It can only be freed by the process holding it.
In the diagram below, Process 2 cannot preempt Resource 1 from Process 1. It will only be released when Process 1 relinquishes it voluntarily after its execution is complete.

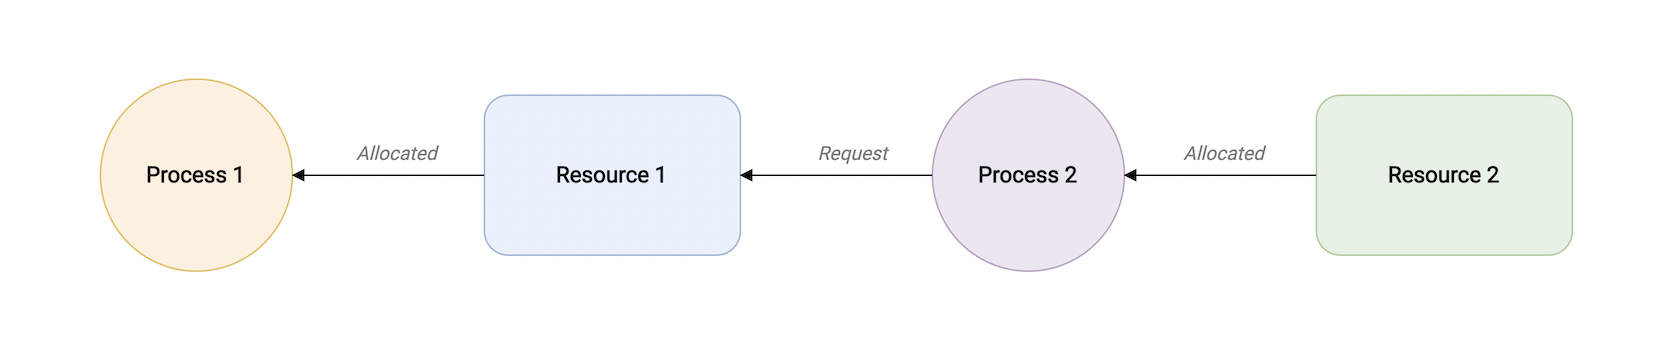
- Circular wait
A process is waiting for the resource held by the second process, which is waiting for the resource held by the third process, and so on, till the last process is waiting for a resource held by the first process. Hence, forming a circular chain.
In the diagram below, Process 1 is allocated Resource2 and it is requesting Resource 1. Similarly, Process 2 is allocated Resource 1 and it is requesting Resource 2. This forms a circular wait loop.

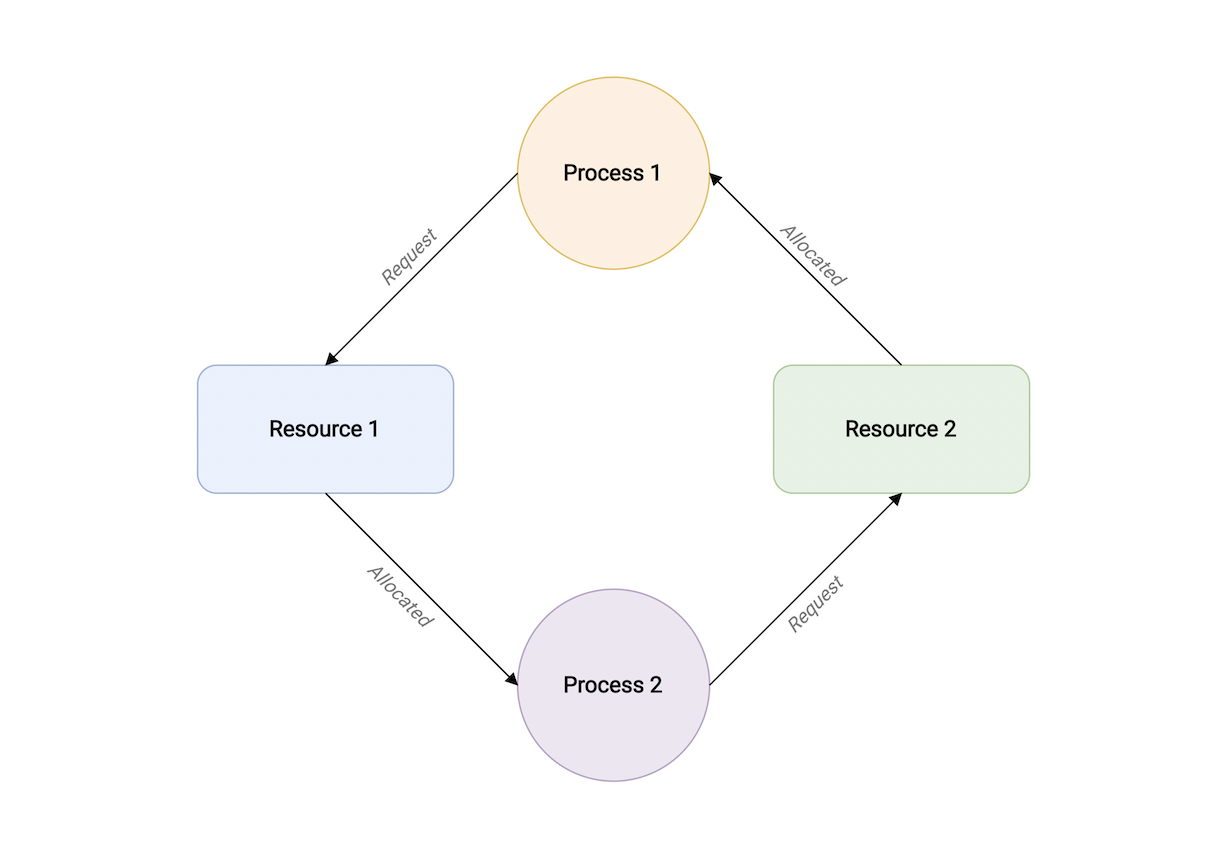
Livelocks
Livelocks are processes that are actively performing concurrent operations, but these operations do nothing to move the state of the program forward.
Starvation
Starvation happens when a process is deprived of necessary resources and is unable to complete its function.
Starvation can happen because of deadlocks or inefficient scheduling algorithms for processes. In order to solve starvation, we need to employ better resource-allotment algorithms that make sure that every process gets its fair share of resources.
Goroutines
In this lesson, we will learn about Goroutines.
But before we start our discussion, I wanted to share an important Go proverb.
"Don't communicate by sharing memory, share memory by communicating." - Rob Pike
What is a goroutine?
A goroutine is a lightweight thread of execution that is managed by the Go runtime and essentially let us write asynchronous code in a synchronous manner.
It is important to know that they are not actual OS threads and the main function itself runs as a goroutine.
A single thread may run thousands of goroutines in them by using the Go runtime scheduler which uses cooperative scheduling. This implies that if the current goroutine is blocked or has been completed, the scheduler will move the other goroutines to another OS thread. Hence, we achieve efficiency in scheduling where no routine is blocked forever.
We can turn any function into a goroutine by simply using the go keyword.
go fn(x, y, z)
Before we write any code, it is important to briefly discuss the fork-join model.
Fork-Join Model
Go uses the idea of the fork-join model of concurrency behind goroutines. The fork-join model essentially implies that a child process splits from its parent process to run concurrently with the parent process. After completing its execution, the child process merges back into the parent process. The point where it joins back is called the join point.

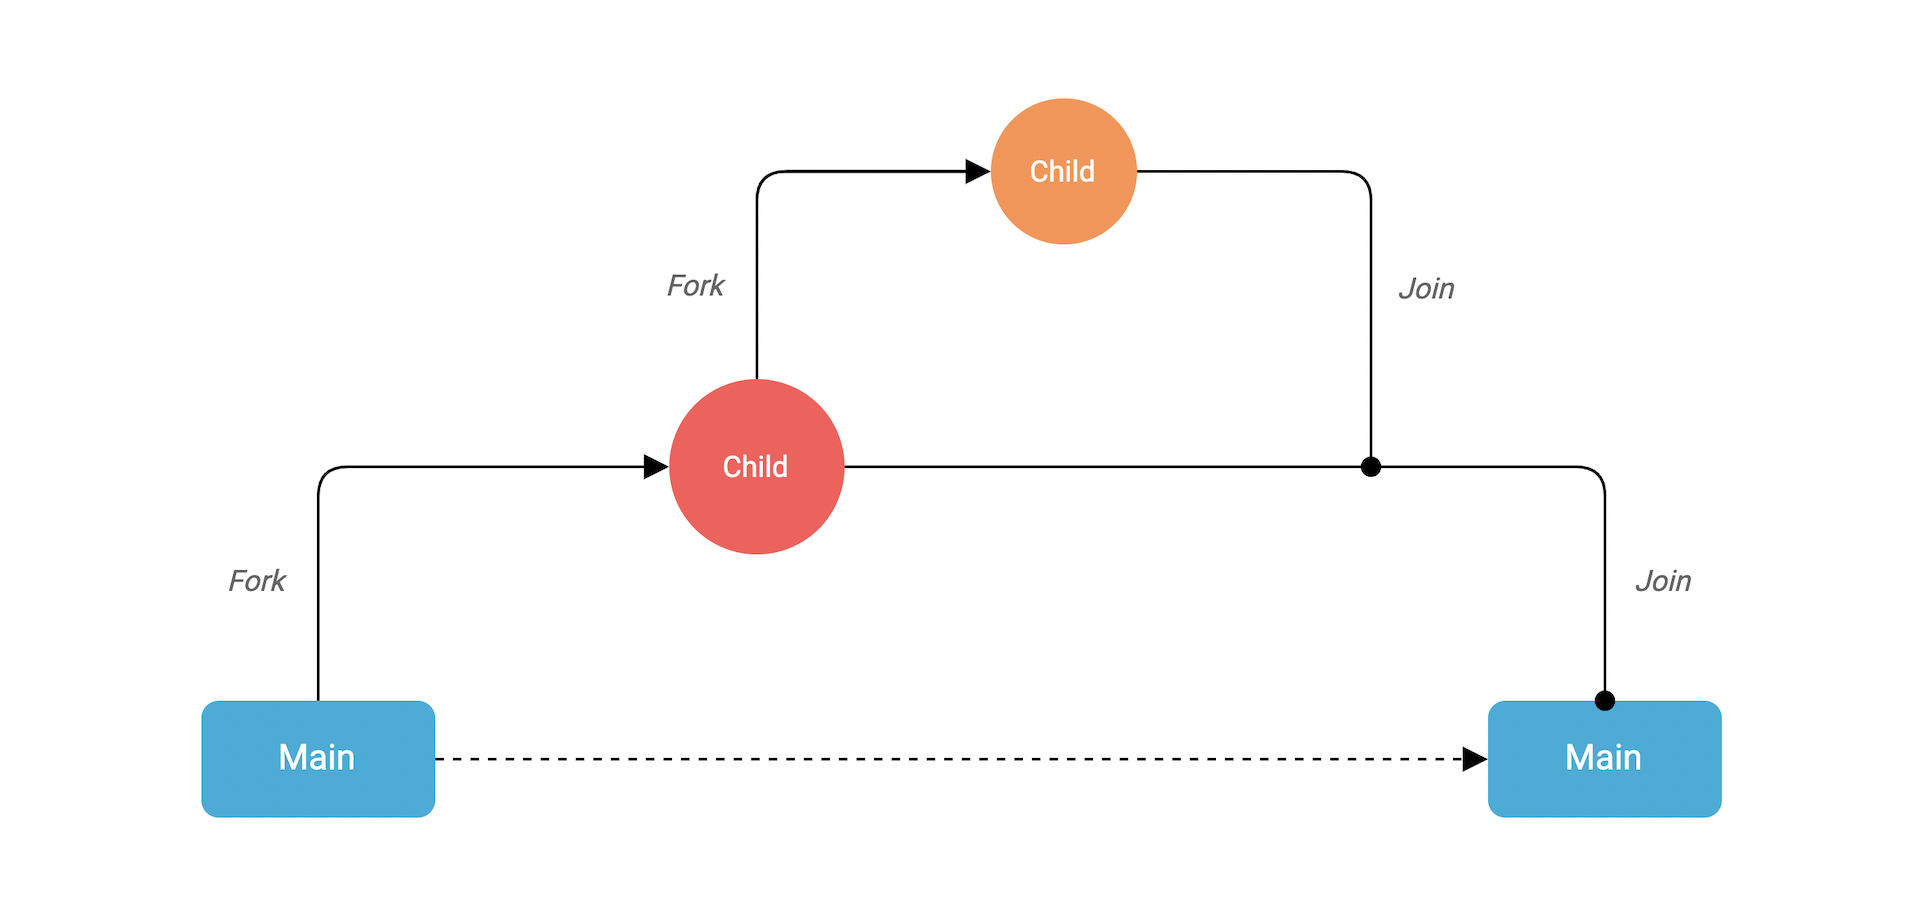
Now, let's write some code and create our own goroutine.
package main
import "fmt"
func speak(arg string) {
fmt.Println(arg)
}
func main() {
go speak("Hello World")
}
Here the speak function call is prefixed with the go keyword. This will allow it to run as a separate goroutine. And that's it, we just created our first goroutine. It's that simple!
Great, let's run this:
$ go run main.go
Interesting, it seems like our program did not run completely as it's missing some output. This is because our main goroutine exited and did not wait for the goroutine that we created.
What if we make our program wait using the time.Sleep function?
func main() {
...
time.Sleep(1 * time.Second)
}
$ go run main.go
Hello World
There we go, we can see our complete output now.
Okay, so this works but it's not ideal. So how do we improve this?
Well, the most tricky part about using goroutines is knowing when they will stop. It is important to know that goroutines run in the same address space, so access to shared memory must be synchronized.
Channels
In this lesson, we will learn about Channels.
So what are channels?
Well, simply defined a channel is a communications pipe between goroutines. Things go in one end and come out another in the same order until the channel is closed.

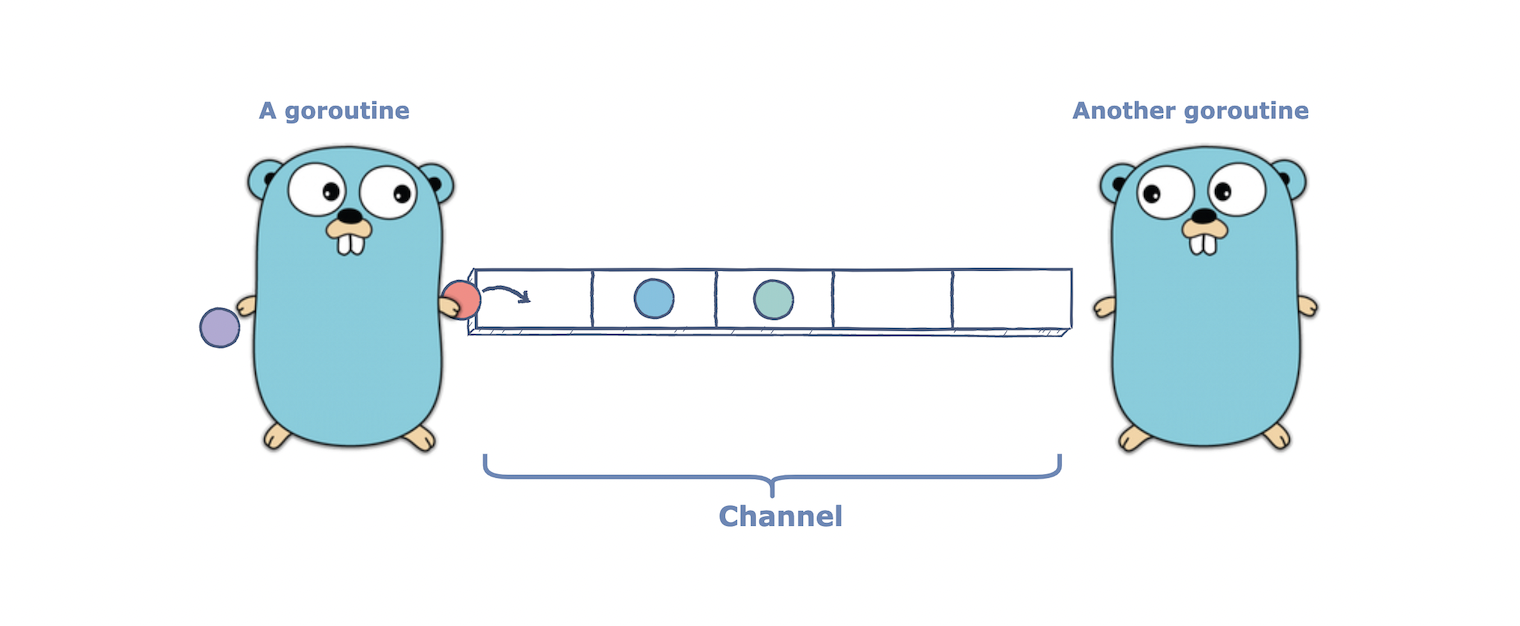
As we learned earlier, channels in Go are based on Communicating Sequential Processes (CSP).
Creating a channel
Now that we understand what channels are, let's see how we can declare them.
var ch chan T
Here, we prefix our type T which is the data type of the value we want to send and receive with the keyword chan which stands for a channel.
Let's try printing the value of our channel ch of type string.
func main() {
var ch chan string
fmt.Println(ch)
}
$ go run main.go
<nil>
As we can see, the zero value of a channel is nil and if we try to send data over the channel our program will panic.
So, similar to slices we can initialize our channel using the built-in make function.
func main() {
ch := make(chan string)
fmt.Println(ch)
}
And if we run this, we can see our channel was initialized.
$ go run main.go
0x1400010e060
Sending and Receiving data
Now that we have a basic understanding of channels, let us implement our earlier example using channels to learn how we can use them to communicate between our goroutines.
package main
import "fmt"
func speak(arg string, ch chan string) {
ch <- arg // Send
}
func main() {
ch := make(chan string)
go speak("Hello World", ch)
data := <-ch // Receive
fmt.Println(data)
}
Notice how we can send data using the channel<-data and receive data using the data := <-channel syntax.
$ go run main.go
Hello World
Perfect, our program ran as we expected.
Buffered Channels
We also have buffered channels that accept a limited number of values without a corresponding receiver for those values.

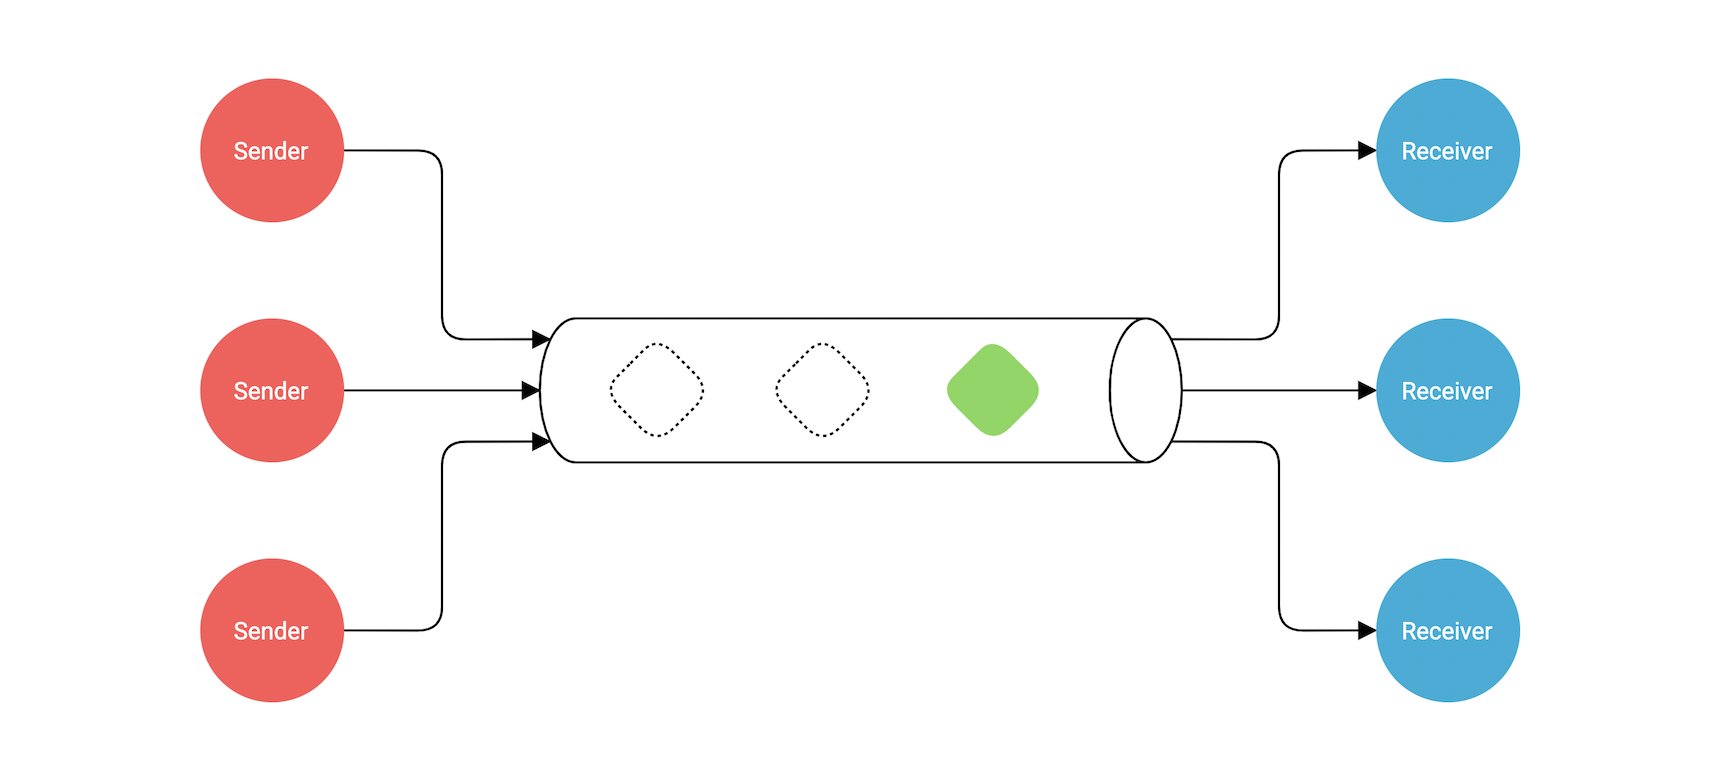
This buffer length or capacity can be specified using the second argument to the make function.
func main() {
ch := make(chan string, 2)
go speak("Hello World", ch)
go speak("Hi again", ch)
data1 := <-ch
fmt.Println(data1)
data2 := <-ch
fmt.Println(data2)
}
Because this channel is buffered, we can send these values into the channel without a corresponding concurrent receive. This means sends to a buffered channel block only when the buffer is full and receives block when the buffer is empty.
By default, a channel is unbuffered and has a capacity of 0, hence, we omit the second argument of the make function.
Next, we have directional channels.
Directional channels
When using channels as function parameters, we can specify if a channel is meant to only send or receive values. This increases the type-safety of our program as by default a channel can both send and receive values.

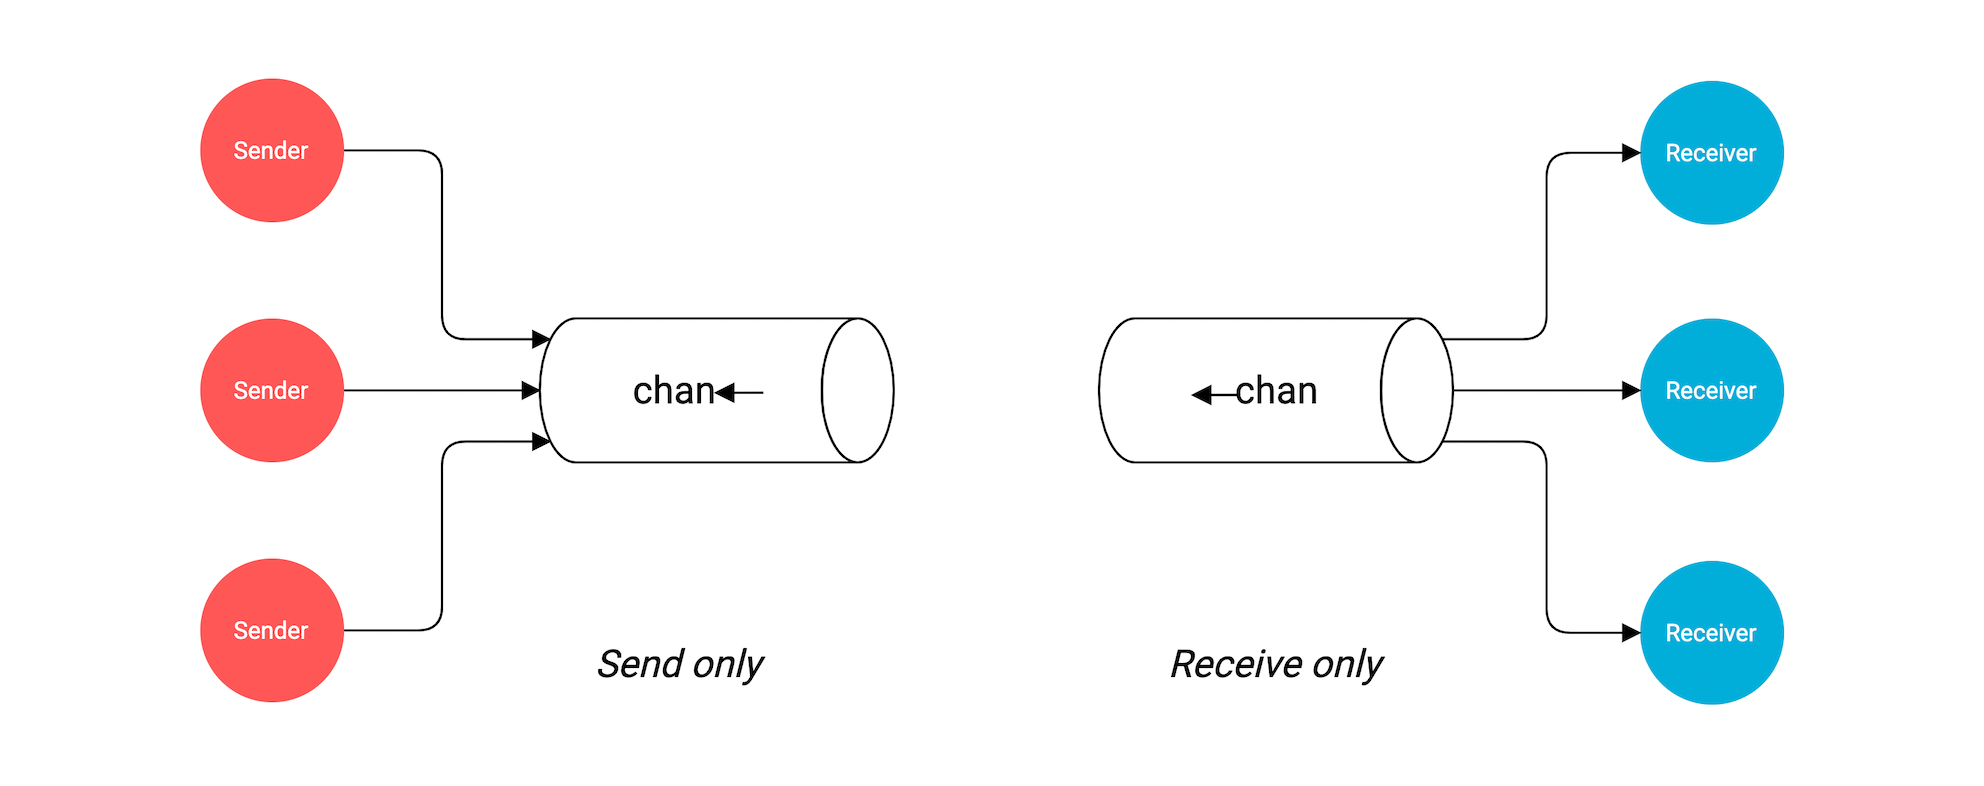
In our example, we can update our speak function's second argument such that it can only send a value.
func speak(arg string, ch chan<- string) {
ch <- arg // Send Only
}
Here, chan<- can only be used for sending values and will panic if we try to receive values.
Closing channels
Also, just like any other resource, once we're done with our channel, we need to close it. This can be achieved using the built-in close function.
Here, we can just pass our channel to the close function.
func main() {
ch := make(chan string, 2)
go speak("Hello World", ch)
go speak("Hi again", ch)
data1 := <-ch
fmt.Println(data1)
data2 := <-ch
fmt.Println(data2)
close(ch)
}
Optionally, receivers can test whether a channel has been closed by assigning a second parameter to the receive expression.
func main() {
ch := make(chan string, 2)
go speak("Hello World", ch)
go speak("Hi again", ch)
data1 := <-ch
fmt.Println(data1)
data2, ok := <-ch
fmt.Println(data2, ok)
close(ch)
}
if ok is false then there are no more values to receive and the channel is closed.
In a way, this is similar to how we check if a key exists or not in a map.
Properties
Lastly, let's discuss some properties of channels:
- A send to a
nilchannel blocks forever.
var c chan string
c <- "Hello, World!" // Panic: all goroutines are asleep - deadlock!
- A receive from a
nilchannel blocks forever.
var c chan string
fmt.Println(<-c) // Panic: all goroutines are asleep - deadlock!
- A send to a closed channel causes a panic.
var c = make(chan string, 1)
c <- "Hello, World!"
close(c)
c <- "Hello, Panic!" // Panic: send on closed channel
- A receive from a closed channel returns the zero value immediately.
var c = make(chan int, 2)
c <- 5
c <- 4
close(c)
for i := 0; i < 4; i++ {
fmt.Printf("%d ", <-c) // Output: 5 4 0 0
}
- Range over channels.
We can also use for and range to iterate over values received from a channel.
package main
import "fmt"
func main() {
ch := make(chan string, 2)
ch <- "Hello"
ch <- "World"
close(ch)
for data := range ch {
fmt.Println(data)
}
}
Select
In this tutorial, we will learn about the select statement in Go.
The select statement blocks the code and waits for multiple channel operations simultaneously.
A select blocks until one of its cases can run, then it executes that case. It chooses one at random if multiple are ready.
package main
import (
"fmt"
"time"
)
func main() {
one := make(chan string)
two := make(chan string)
go func() {
time.Sleep(time.Second * 2)
one <- "One"
}()
go func() {
time.Sleep(time.Second * 1)
two <- "Two"
}()
select {
case result := <-one:
fmt.Println("Received:", result)
case result := <-two:
fmt.Println("Received:", result)
}
close(one)
close(two)
}
Similar to switch, select also has a default case that runs if no other case is ready. This will help us send or receive without blocking.
func main() {
one := make(chan string)
two := make(chan string)
for x := 0; x < 10; x++ {
go func() {
time.Sleep(time.Second * 2)
one <- "One"
}()
go func() {
time.Sleep(time.Second * 1)
two <- "Two"
}()
}
for x := 0; x < 10; x++ {
select {
case result := <-one:
fmt.Println("Received:", result)
case result := <-two:
fmt.Println("Received:", result)
default:
fmt.Println("Default...")
time.Sleep(200 * time.Millisecond)
}
}
close(one)
close(two)
}
It's also important to know that an empty select {} blocks forever.
func main() {
...
select {}
close(one)
close(two)
}
Sync Package
As we learned earlier, goroutines run in the same address space, so access to shared memory must be synchronized. The sync package provides useful primitives.
WaitGroup
A WaitGroup waits for a collection of goroutines to finish. The main goroutine calls Add to set the number of goroutines to wait for. Then each of the goroutines runs and calls Done when finished. At the same time, Wait can be used to block until all goroutines have finished.
Usage
We can use the sync.WaitGroup using the following methods:
Add(delta int)takes in an integer value which is essentially the number of goroutines that theWaitGrouphas to wait for. This must be called before we execute a goroutine.Done()is called within the goroutine to signal that the goroutine has successfully executed.Wait()blocks the program until all the goroutines specified byAdd()have invokedDone()from within.
Example
Let's take a look at an example.
package main
import (
"fmt"
"sync"
)
func work() {
fmt.Println("working...")
}
func main() {
var wg sync.WaitGroup
wg.Add(1)
go func() {
defer wg.Done()
work()
}()
wg.Wait()
}
If we run this, we can see our program runs as expected.
$ go run main.go
working...
We can also pass the WaitGroup to the function directly.
func work(wg *sync.WaitGroup) {
defer wg.Done()
fmt.Println("working...")
}
func main() {
var wg sync.WaitGroup
wg.Add(1)
go work(&wg)
wg.Wait()
}
But is important to know that a WaitGroup must not be copied after first use. And if it's explicitly passed into functions, it should be done by a pointer. This is because it can affect our counter which will disrupt the logic of our program.
Let's also increase the number of goroutines by calling the Add method to wait for 4 goroutines.
func main() {
var wg sync.WaitGroup
wg.Add(4)
go work(&wg)
go work(&wg)
go work(&wg)
go work(&wg)
wg.Wait()
}
And as expected, all our goroutines were executed.
$ go run main.go
working...
working...
working...
working...
Mutex
A Mutex is a mutual exclusion lock that prevents other processes from entering a critical section of data while a process occupies it to prevent race conditions from happening.
What's a critical section?
So, a critical section can be a piece of code that must not be run by multiple threads at once because the code contains shared resources.
Usage
We can use sync.Mutex using the following methods:
Lock()acquires or holds the lock.Unlock()releases the lock.TryLock()tries to lock and reports whether it succeeded.
Example
Let's take a look at an example, we will create a Counter struct and add an Update method which will update the internal value.
package main
import (
"fmt"
"sync"
)
type Counter struct {
value int
}
func (c *Counter) Update(n int, wg *sync.WaitGroup) {
defer wg.Done()
fmt.Printf("Adding %d to %d\n", n, c.value)
c.value += n
}
func main() {
var wg sync.WaitGroup
c := Counter{}
wg.Add(4)
go c.Update(10, &wg)
go c.Update(-5, &wg)
go c.Update(25, &wg)
go c.Update(19, &wg)
wg.Wait()
fmt.Printf("Result is %d", c.value)
}
Let's run this and see what happens.
$ go run main.go
Adding -5 to 0
Adding 10 to 0
Adding 19 to 0
Adding 25 to 0
Result is 49
That doesn't look accurate, seems like our value is always zero but we somehow got the correct answer.
Well, this is because, in our example, multiple goroutines are updating the value variable. And as you must have guessed, this is not ideal.
This is the perfect use case for Mutex. So, let's start by using sync.Mutex and wrap our critical section in between Lock() and Unlock() methods.
package main
import (
"fmt"
"sync"
)
type Counter struct {
m sync.Mutex
value int
}
func (c *Counter) Update(n int, wg *sync.WaitGroup) {
c.m.Lock()
defer wg.Done()
fmt.Printf("Adding %d to %d\n", n, c.value)
c.value += n
c.m.Unlock()
}
func main() {
var wg sync.WaitGroup
c := Counter{}
wg.Add(4)
go c.Update(10, &wg)
go c.Update(-5, &wg)
go c.Update(25, &wg)
go c.Update(19, &wg)
wg.Wait()
fmt.Printf("Result is %d", c.value)
}
$ go run main.go
Adding -5 to 0
Adding 19 to -5
Adding 25 to 14
Adding 10 to 39
Result is 49
Looks like we solved our issue and the output looks correct as well.
Note: Similar to WaitGroup a Mutex must not be copied after first use.
RWMutex
An RWMutex is a reader/writer mutual exclusion lock. The lock can be held by an arbitrary number of readers or a single writer.
In other words, readers don't have to wait for each other. They only have to wait for writers holding the lock.
sync.RWMutex is thus preferable for data that is mostly read, and the resource that is saved compared to a sync.Mutex is time.
Usage
Similar to sync.Mutex, we can use sync.RWMutex using the following methods:
Lock()acquires or holds the lock.Unlock()releases the lock.RLock()acquires or holds the read lock.RUnlock()releases the read lock.
Notice how RWMutex has additional RLock and RUnlock methods compared to Mutex.
Example
Let's add a GetValue method which will read the counter value. We will also change sync.Mutex to sync.RWMutex.
Now, we can simply use the RLock and RUnlock methods so that readers don't have to wait for each other.
package main
import (
"fmt"
"sync"
"time"
)
type Counter struct {
m sync.RWMutex
value int
}
func (c *Counter) Update(n int, wg *sync.WaitGroup) {
defer wg.Done()
c.m.Lock()
fmt.Printf("Adding %d to %d\n", n, c.value)
c.value += n
c.m.Unlock()
}
func (c *Counter) GetValue(wg *sync.WaitGroup) {
defer wg.Done()
c.m.RLock()
defer c.m.RUnlock()
fmt.Println("Get value:", c.value)
time.Sleep(400 * time.Millisecond)
}
func main() {
var wg sync.WaitGroup
c := Counter{}
wg.Add(4)
go c.Update(10, &wg)
go c.GetValue(&wg)
go c.GetValue(&wg)
go c.GetValue(&wg)
wg.Wait()
}
$ go run main.go
Get value: 0
Adding 10 to 0
Get value: 10
Get value: 10
Note: Both sync.Mutex and sync.RWMutex implements the sync.Locker interface.
type Locker interface {
Lock()
Unlock()
}
Cond
The sync.Cond condition variable can be used to coordinate those goroutines that want to share resources. When the state of shared resources changes, it can be used to notify goroutines blocked by a mutex.
Each Cond has an associated lock (often a *Mutex or *RWMutex), which must be held when changing the condition and when calling the Wait method.
But why do we need it?
One scenario can be when one process is receiving data, and other processes must wait for this process to receive data before they can read the correct data.
If we simply use a channel or mutex, only one process can wait and read the data. There is no way to notify other processes to read the data. Thus, we can sync.Cond to coordinate shared resources.
Usage
sync.Cond comes with the following methods:
NewCond(l Locker)returns a new Cond.Broadcast()wakes all goroutines waiting on the condition.Signal()wakes one goroutine waiting on the condition if there is any.Wait()atomically unlocks the underlying mutex lock.
Example
Here is an example that demonstrates the interaction of different goroutines using the Cond.
package main
import (
"fmt"
"sync"
"time"
)
var done = false
func read(name string, c *sync.Cond) {
c.L.Lock()
for !done {
c.Wait()
}
fmt.Println(name, "starts reading")
c.L.Unlock()
}
func write(name string, c *sync.Cond) {
fmt.Println(name, "starts writing")
time.Sleep(time.Second)
c.L.Lock()
done = true
c.L.Unlock()
fmt.Println(name, "wakes all")
c.Broadcast()
}
func main() {
var m sync.Mutex
cond := sync.NewCond(&m)
go read("Reader 1", cond)
go read("Reader 2", cond)
go read("Reader 3", cond)
write("Writer", cond)
time.Sleep(4 * time.Second)
}
$ go run main.go
Writer starts writing
Writer wakes all
Reader 2 starts reading
Reader 3 starts reading
Reader 1 starts reading
As we can see, the readers were suspended using the Wait method until the writer used the Broadcast method to wake up the process.
Once
Once ensures that only one execution will be carried out even among several goroutines.
Usage
Unlike other primitives, sync.Once only has a single method:
Do(f func())calls the functionfonly once. IfDois called multiple times, only the first call will invoke the functionf.
Example
This seems pretty straightforward, let's take an example:
package main
import (
"fmt"
"sync"
)
func main() {
var count int
increment := func() {
count++
}
var once sync.Once
var increments sync.WaitGroup
increments.Add(100)
for i := 0; i < 100; i++ {
go func() {
defer increments.Done()
once.Do(increment)
}()
}
increments.Wait()
fmt.Printf("Count is %d\n", count)
}
$ go run main.go
Count is 1
As we can see, even when we ran 100 goroutines, the count only got incremented once.
Pool
Pool is s a scalable pool of temporary objects and is also concurrency safe. Any stored value in the pool can be deleted at any time without receiving notification. In addition, under high load, the object pool can be dynamically expanded, and when it is not used or the concurrency is not high, the object pool will shrink.
The key idea is the reuse of objects to avoid repeated creation and destruction, which will affect the performance.
But why do we need it?
Pool's purpose is to cache allocated but unused items for later reuse, relieving pressure on the garbage collector. That is, it makes it easy to build efficient, thread-safe free lists. However, it is not suitable for all free lists.
The appropriate use of a Pool is to manage a group of temporary items silently shared among and potentially reused by concurrent independent clients of a package. Pool provides a way to spread the cost of allocation overhead across many clients.
It is important to note that Pool also has its performance cost. It is much slower to use sync.Pool than simple initialization. Also, a Pool must not be copied after first use.
Usage
sync.Pool gives us the following methods:
Get()selects an arbitrary item from the Pool, removes it from the Pool, and returns it to the caller.Put(x any)adds the item to the pool.
Example
Now, let's look at an example.
First, we will create a new sync.Pool, where we can optionally specify a function to generate a value when we call, Get, otherwise it will return a nil value.
package main
import (
"fmt"
"sync"
)
type Person struct {
Name string
}
var pool = sync.Pool{
New: func() any {
fmt.Println("Creating a new person...")
return &Person{}
},
}
func main() {
person := pool.Get().(*Person)
fmt.Println("Get object from sync.Pool for the first time:", person)
fmt.Println("Put the object back in the pool")
pool.Put(person)
person.Name = "Gopher"
fmt.Println("Set object property name:", person.Name)
fmt.Println("Get object from pool again (it's updated):", pool.Get().(*Person))
fmt.Println("There is no object in the pool now (new one will be created):", pool.Get().(*Person))
}
And if we run this, we'll see an interesting output:
$ go run main.go
Creating a new person...
Get object from sync.Pool for the first time: &{}
Put the object back in the pool
Set object property name: Gopher
Get object from pool again (it's updated): &{Gopher}
Creating a new person...
There is no object in the pool now (new one will be created): &{}
Notice how we did type assertion when we call Get.
It can be seen that the sync.Pool is strictly a temporary object pool, which is suitable for storing some temporary objects that will be shared among goroutines.
Map
Map is like the standard map[any]any but is safe for concurrent use by multiple goroutines without additional locking or coordination. Loads, stores, and deletes are spread over constant time.
But why do we need it?
The Map type is specialized. Most code should use a plain Go map instead, with separate locking or coordination, for better type safety and to make it easier to maintain other invariants along with the map content.
The Map type is optimized for two common use cases:
- When the entry for a given key is only ever written once but read many times, as in caches that only grow.
- When multiple goroutines read, write, and overwrite entries for disjoint sets of keys. In these two cases, the use of a
sync.Mapmay significantly reduce lock contention compared to a Go map paired with a separateMutexorRWMutex.
The zero Map is empty and ready for use. A Map must not be copied after first use.
Usage
sync.Map gives us the following methods:
Delete()deletes the value for a key.Load(key any)returns the value stored in the map for a key, or nil if no value is present.LoadAndDelete(key any)deletes the value for a key, returning the previous value if any. The loaded result reports whether the key was present.LoadOrStore(key, value any)returns the existing value for the key if present. Otherwise, it stores and returns the given value. The loaded result is true if the value was loaded, and false if stored.Store(key, value any)sets the value for a key.Range(f func(key, value any) bool)callsfsequentially for each key and value present in the map. Iffreturns false, the range stops the iteration.
Note: Range does not necessarily correspond to any consistent snapshot of the Map's contents.
Example
Let's look at an example. Here, we will launch a bunch of goroutines that will add and retrieve values from our map concurrently.
package main
import (
"fmt"
"sync"
)
func main() {
var wg sync.WaitGroup
var m sync.Map
wg.Add(10)
for i := 0; i <= 4; i++ {
go func(k int) {
v := fmt.Sprintf("value %v", k)
fmt.Println("Writing:", v)
m.Store(k, v)
wg.Done()
}(i)
}
for i := 0; i <= 4; i++ {
go func(k int) {
v, _ := m.Load(k)
fmt.Println("Reading: ", v)
wg.Done()
}(i)
}
wg.Wait()
}
As expected, our store and retrieve operation will be safe for concurrent use.
$ go run main.go
Reading: <nil>
Writing: value 0
Writing: value 1
Writing: value 2
Writing: value 3
Writing: value 4
Reading: value 0
Reading: value 1
Reading: value 2
Reading: value 3
Atomic
Package atomic provides low-level atomic memory primitives for integers and pointers that are useful for implementing synchronization algorithms.
Usage
atomic package provides several functions that do the following 5 operations for int, uint, and uintptr types:
- Add
- Load
- Store
- Swap
- Compare and Swap
Example
We won't be able to cover all of the functions here. So, let's take a look at the most commonly used function like AddInt32 to get an idea.
package main
import (
"fmt"
"sync"
"sync/atomic"
)
func add(w *sync.WaitGroup, num *int32) {
defer w.Done()
atomic.AddInt32(num, 1)
}
func main() {
var n int32 = 0
var wg sync.WaitGroup
wg.Add(1000)
for i := 0; i < 1000; i = i + 1 {
go add(&wg, &n)
}
wg.Wait()
fmt.Println("Result:", n)
}
Here, atomic.AddInt32 guarantees that the result of n will be 1000 as the instruction execution of atomic operations cannot be interrupted.
$ go run main.go
Result: 1000
Advanced Concurrency Patterns
In this tutorial, we will discuss some advanced concurrency patterns in Go. Often, these patterns are used in combination in the real world.
Generator

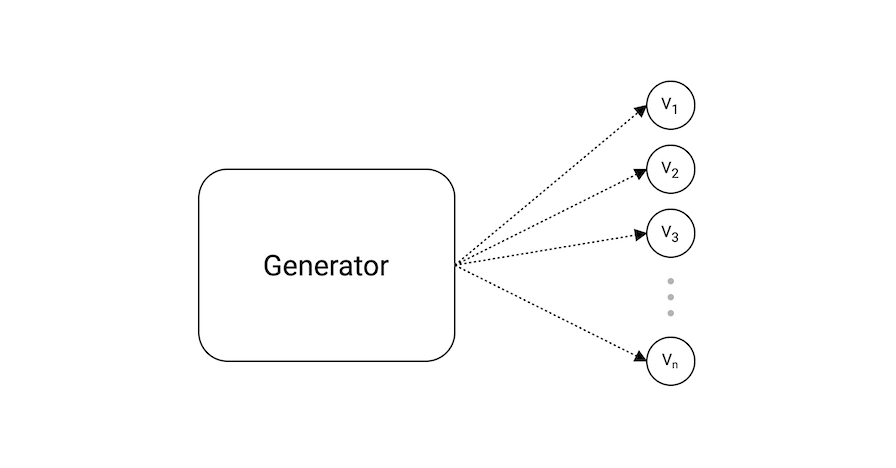
Then generator Pattern is used to generate a sequence of values which is used to produce some output.
In our example, we have a generator function that simply returns a channel from which we can read the values.
This works on the fact that sends and receives block until both the sender and receiver are ready. This property allowed us to wait until the next value is requested.
package main
import "fmt"
func main() {
ch := generator()
for i := 0; i < 5; i++ {
value := <-ch
fmt.Println("Value:", value)
}
}
func generator() <-chan int {
ch := make(chan int)
go func() {
for i := 0; ; i++ {
ch <- i
}
}()
return ch
}
If we run this, we'll notice that we can consume values that were produced on demand.
$ go run main.go
Value: 0
Value: 1
Value: 2
Value: 3
Value: 4
This is a similar behavior as yield in JavaScript and Python.
Fan-in

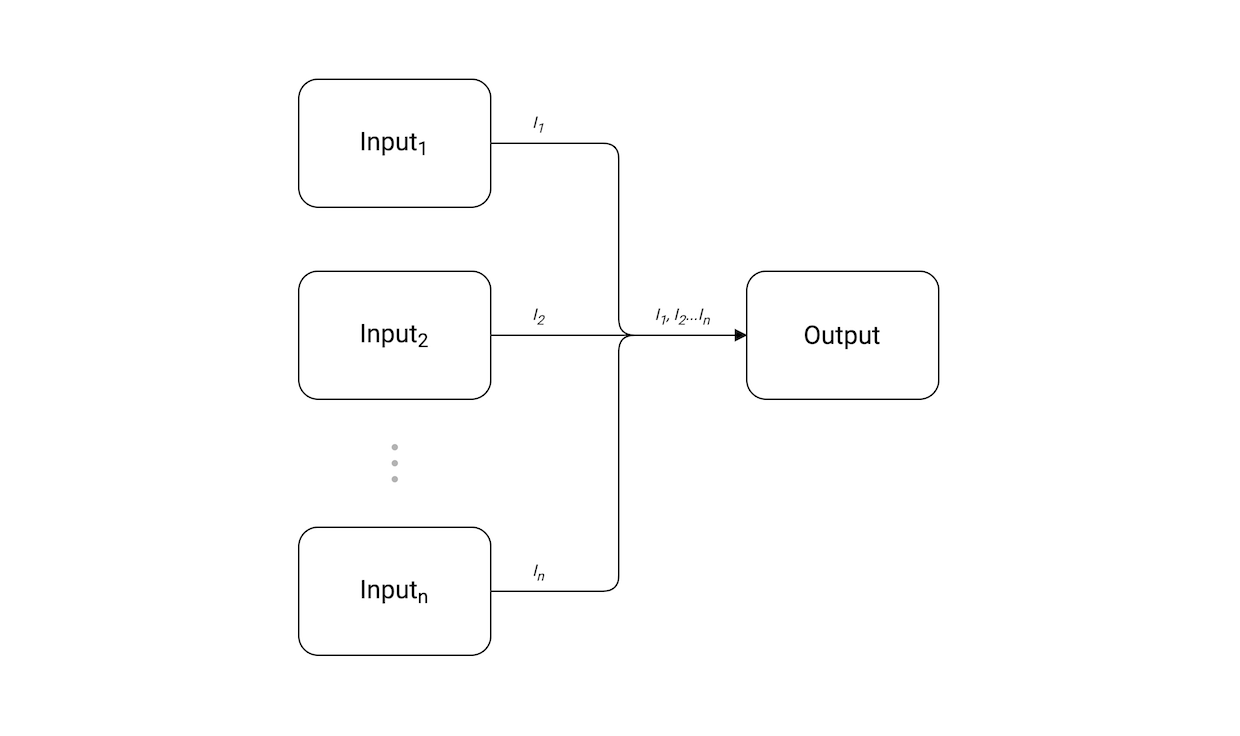
The fan-in pattern combines multiple inputs into one single output channel. Basically, we multiplex our inputs.
In our example, we create the inputs i1 and i2 using the generateWork function. Then we use our variadic function fanIn to combine values from these inputs to a single output channel from which we can consume values.
Note: order of input will not be guaranteed.
package main
import (
"fmt"
"sync"
)
func main() {
i1 := generateWork([]int{0, 2, 6, 8})
i2 := generateWork([]int{1, 3, 5, 7})
out := fanIn(i1, i2)
for value := range out {
fmt.Println("Value:", value)
}
}
func fanIn(inputs ...<-chan int) <-chan int {
var wg sync.WaitGroup
out := make(chan int)
wg.Add(len(inputs))
for _, in := range inputs {
go func(ch <-chan int) {
for {
value, ok := <-ch
if !ok {
wg.Done()
break
}
out <- value
}
}(in)
}
go func() {
wg.Wait()
close(out)
}()
return out
}
func generateWork(work []int) <-chan int {
ch := make(chan int)
go func() {
defer close(ch)
for _, w := range work {
ch <- w
}
}()
return ch
}
$ go run main.go
Value: 0
Value: 1
Value: 2
Value: 6
Value: 8
Value: 3
Value: 5
Value: 7
Fan-out

Fan-out patterns allow us to essentially split our single input channel into multiple output channels. This is a useful pattern to distribute work items into multiple uniform actors.
In our example, we break the input channel into 4 different output channels. For a dynamic number of outputs, we can merge outputs into a shared "aggregate" channel and use select.
Note: fan-out pattern is different from pub/sub.
package main
import "fmt"
func main() {
work := []int{1, 2, 3, 4, 5, 6, 7, 8}
in := generateWork(work)
out1 := fanOut(in)
out2 := fanOut(in)
out3 := fanOut(in)
out4 := fanOut(in)
for range work {
select {
case value := <-out1:
fmt.Println("Output 1 got:", value)
case value := <-out2:
fmt.Println("Output 2 got:", value)
case value := <-out3:
fmt.Println("Output 3 got:", value)
case value := <-out4:
fmt.Println("Output 4 got:", value)
}
}
}
func fanOut(in <-chan int) <-chan int {
out := make(chan int)
go func() {
defer close(out)
for data := range in {
out <- data
}
}()
return out
}
func generateWork(work []int) <-chan int {
ch := make(chan int)
go func() {
defer close(ch)
for _, w := range work {
ch <- w
}
}()
return ch
}
As we can see, our work has been split between multiple goroutines.
$ go run main.go
Output 1 got: 1
Output 2 got: 3
Output 4 got: 4
Output 1 got: 5
Output 3 got: 2
Output 3 got: 6
Output 3 got: 7
Output 1 got: 8
Pipeline

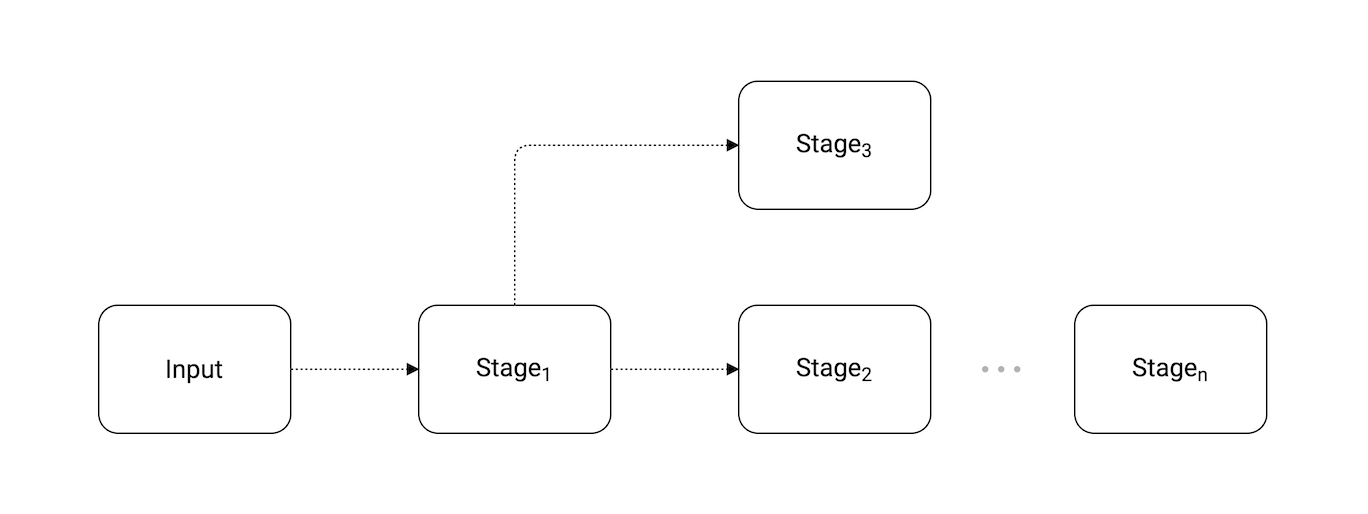
The pipeline pattern is a series of stages connected by channels, where each stage is a group of goroutines running the same function.
In each stage, the goroutines:
- Receive values from upstream via inbound channels.
- Perform some function on that data, usually producing new values.
- Send values downstream via outbound channels.
Each stage has any number of inbound and outbound channels, except the first and last stages, which have only outbound or inbound channels, respectively. The first stage is sometimes called the source or producer; the last stage is the sink or consumer.
By using a pipeline, we separate the concerns of each stage, which provides numerous benefits such as:
- Modify stages independent of one another.
- Mix and match how stages are combined independently of modifying the stage.
In our example, we have defined three stages, filter, square, and half.
package main
import (
"fmt"
"math"
)
func main() {
in := generateWork([]int{0, 1, 2, 3, 4, 5, 6, 7, 8})
out := filter(in) // Filter odd numbers
out = square(out) // Square the input
out = half(out) // Half the input
for value := range out {
fmt.Println(value)
}
}
func filter(in <-chan int) <-chan int {
out := make(chan int)
go func() {
defer close(out)
for i := range in {
if i%2 == 0 {
out <- i
}
}
}()
return out
}
func square(in <-chan int) <-chan int {
out := make(chan int)
go func() {
defer close(out)
for i := range in {
value := math.Pow(float64(i), 2)
out <- int(value)
}
}()
return out
}
func half(in <-chan int) <-chan int {
out := make(chan int)
go func() {
defer close(out)
for i := range in {
value := i / 2
out <- value
}
}()
return out
}
func generateWork(work []int) <-chan int {
ch := make(chan int)
go func() {
defer close(ch)
for _, w := range work {
ch <- w
}
}()
return ch
}
Seem like our input was processed correctly by the pipeline in a concurrent manner.
$ go run main.go
0
2
8
18
32
Worker Pool

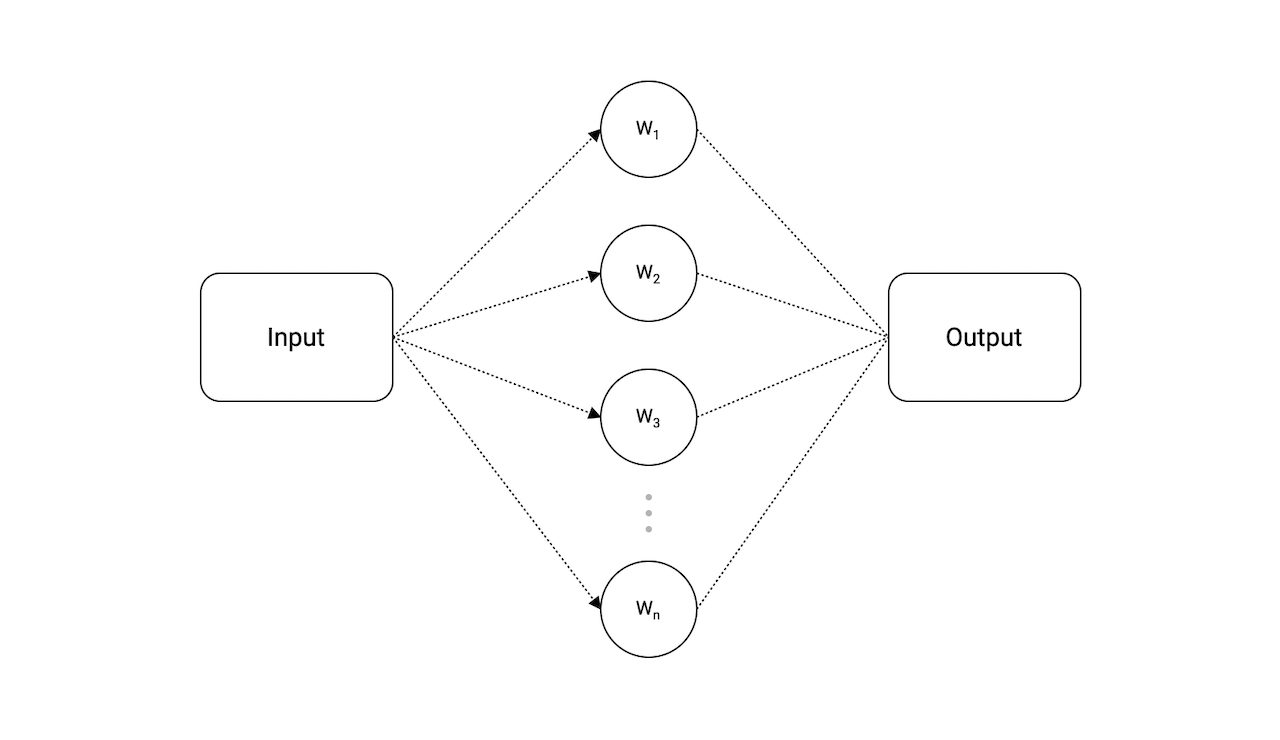
The worker pool is a really powerful pattern that lets us distributes the work across multiple workers (goroutines) concurrently.
In our example, we have a jobs channel to which we will send our jobs and a results channel where our workers will send the results once they've finished doing the work.
After that, we can launch our workers concurrently and simply receive the results from the results channel.
Ideally, totalWorkers should be set to runtime.NumCPU() which gives us the number of logical CPUs usable by the current process.
package main
import (
"fmt"
"sync"
)
const totalJobs = 4
const totalWorkers = 2
func main() {
jobs := make(chan int, totalJobs)
results := make(chan int, totalJobs)
for w := 1; w <= totalWorkers; w++ {
go worker(w, jobs, results)
}
// Send jobs
for j := 1; j <= totalJobs; j++ {
jobs <- j
}
close(jobs)
// Receive results
for a := 1; a <= totalJobs; a++ {
<-results
}
close(results)
}
func worker(id int, jobs <-chan int, results chan<- int) {
var wg sync.WaitGroup
for j := range jobs {
wg.Add(1)
go func(job int) {
defer wg.Done()
fmt.Printf("Worker %d started job %d\n", id, job)
// Do work and send result
result := job * 2
results <- result
fmt.Printf("Worker %d finished job %d\n", id, job)
}(j)
}
wg.Wait()
}
As expected, our jobs were distributed among our workers.
$ go run main.go
Worker 2 started job 4
Worker 2 started job 1
Worker 1 started job 3
Worker 2 started job 2
Worker 2 finished job 1
Worker 1 finished job 3
Worker 2 finished job 2
Worker 2 finished job 4
Queuing

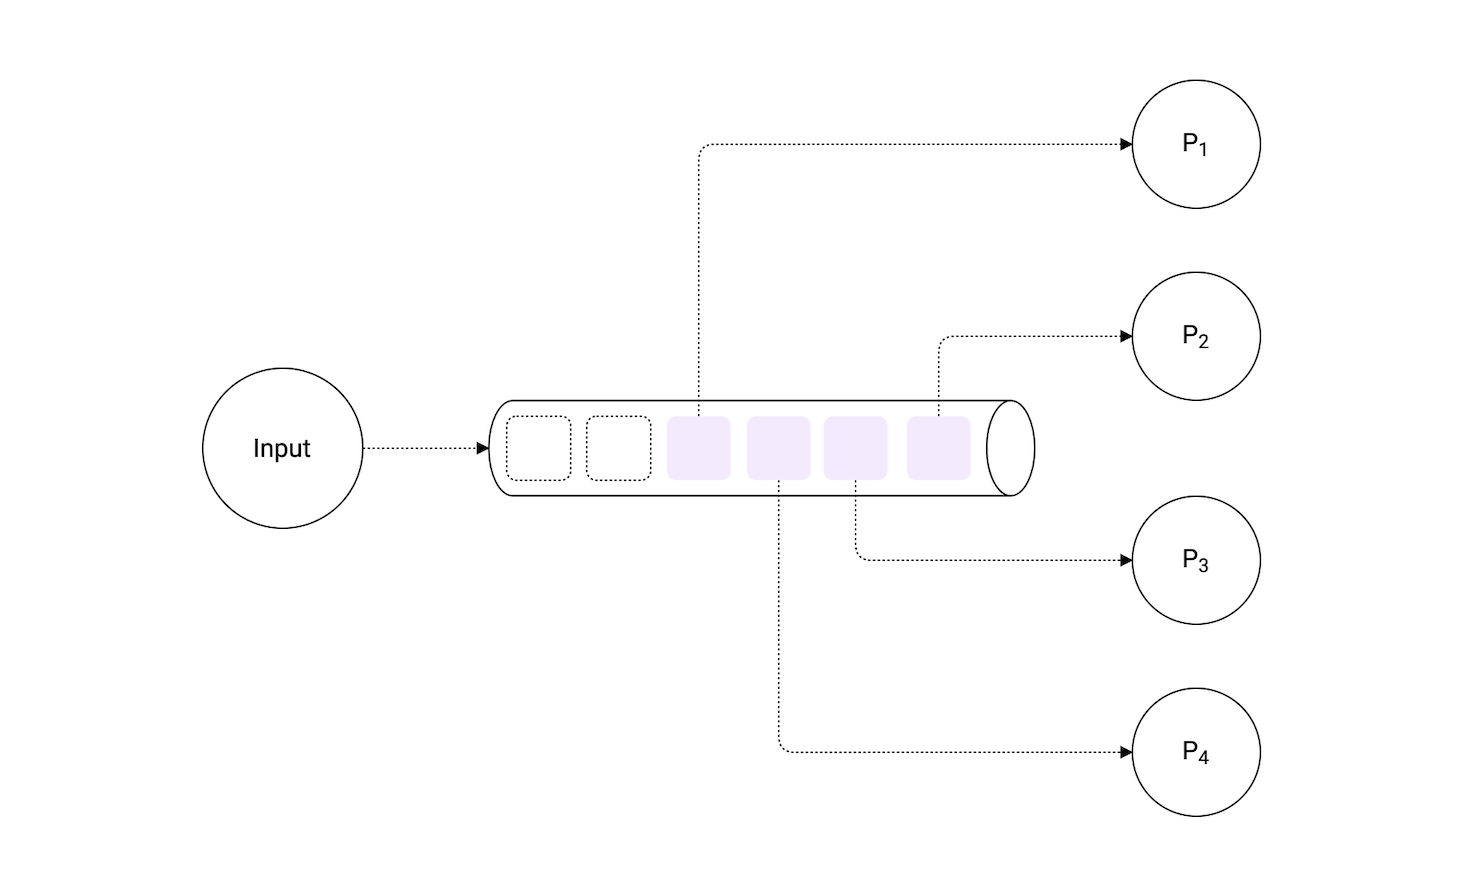
Queuing pattern allows us to process n number of items at a time.
In our example, we use a buffered channel to simulate a queue behavior. We simply send an empty struct to our queue channel and wait for it to be released by the previous process so that we can continue.
This is because sends to a buffered channel block only when the buffer is full and receives block when the buffer is empty.
Here, we have total work of 10 items and we have a limit of 2. This means we can process 2 items at a time.
Notice how our queue channel is of type struct{} as an empty struct occupies zero bytes of storage.
package main
import (
"fmt"
"sync"
"time"
)
const limit = 2
const work = 10
func main() {
var wg sync.WaitGroup
fmt.Println("Queue limit:", limit)
queue := make(chan struct{}, limit)
wg.Add(work)
for w := 1; w <= work; w++ {
process(w, queue, &wg)
}
wg.Wait()
close(queue)
fmt.Println("Work complete")
}
func process(work int, queue chan struct{}, wg *sync.WaitGroup) {
queue <- struct{}{}
go func() {
defer wg.Done()
time.Sleep(1 * time.Second)
fmt.Println("Processed:", work)
<-queue
}()
}
If we run this, we will notice that it briefly pauses when every 2nd item (which is our limit) is processed as our queue waits to be dequeued.
$ go run main.go
Queue limit: 2
Processed: 1
Processed: 2
Processed: 4
Processed: 3
Processed: 5
Processed: 6
Processed: 8
Processed: 7
Processed: 9
Processed: 10
Work complete
Additional patterns
Some additional patterns that might be useful to know:
- Tee channel
- Bridge channel
- Ring buffer channel
- Bounded parallelism
Context
In concurrent programs, it's often necessary to preempt operations because of timeouts, cancellations, or failure of another portion of the system.
The context package makes it easy to pass request-scoped values, cancellation signals, and deadlines across API boundaries to all the goroutines involved in handling a request.
Types
Let's discuss some core types of the context package.
Context
The Context is an interface type that is defined as follows:
type Context interface {
Deadline() (deadline time.Time, ok bool)
Done() <-chan struct{}
Err() error
Value(key any) any
}
The Context type has the following methods:
Done() <- chan struct{}returns a channel that is closed when the context is canceled or times out. Done may returnnilif the context can never be canceled.Deadline() (deadline time.Time, ok bool)returns the time when the context will be canceled or timed out. Deadline returnsokasfalsewhen no deadline is set.Err() errorreturns an error that explains why the Done channel was closed. If Done is not closed yet, it returnsnil.Value(key any) anyreturns the value associated with the key ornilif none.
CancelFunc
A CancelFunc tells an operation to abandon its work and it does not wait for the work to stop. If it is called by multiple goroutines simultaneously, after the first call, subsequent calls to a CancelFunc does nothing.
type CancelFunc func()
Usage
Let's discuss functions that are exposed by the context package:
Background
Background returns a non-nil, empty Context. It is never canceled, has no values, and has no deadline.
It is typically used by the main function, initialization, and tests, and as the top-level Context for incoming requests.
func Background() Context
TODO
Similar to the Background function TODO function also returns a non-nil, empty Context.
However, it should only be used when we are not sure what context to use or if the function has not been updated to receive a context. This means we plan to add context to the function in the future.
func TODO() Context
WithValue
This function takes in a context and returns a derived context where the value val is associated with key and flows through the context tree with the context.
This means that once you get a context with value, any context that derives from this gets this value.
It is not recommended to pass in critical parameters using context values, instead, functions should accept those values in the signature making it explicit.
func WithValue(parent Context, key, val any) Context
Example
Let's take a simple example to see how we can add a key-value pair to the context.
package main
import (
"context"
"fmt"
)
func main() {
processID := "abc-xyz"
ctx := context.Background()
ctx = context.WithValue(ctx, "processID", processID)
ProcessRequest(ctx)
}
func ProcessRequest(ctx context.Context) {
value := ctx.Value("processID")
fmt.Printf("Processing ID: %v", value)
}
And if we run this, we'll see the processID being passed via our context.
$ go run main.go
Processing ID: abc-xyz
WithCancel
This function creates a new context from the parent context and derived context and the cancel function. The parent can be a context.Background or a context that was passed into the function.
Canceling this context releases resources associated with it, so the code should call cancel as soon as the operations running in this context is completed.
Passing around the cancel function is not recommended as it may lead to unexpected behavior.
func WithCancel(parent Context) (ctx Context, cancel CancelFunc)
WithDeadline
This function returns a derived context from its parent that gets canceled when the deadline exceeds or the cancel function is called.
For example, we can create a context that will automatically get canceled at a certain time in the future and pass that around in child functions. When that context gets canceled because of the deadline running out, all the functions that got the context gets notified to stop work and return.
func WithDeadline(parent Context, d time.Time) (Context, CancelFunc)
WithTimeout
This function is just a wrapper around the WithDeadline function with the added timeout.
func WithTimeout(parent Context, timeout time.Duration) (Context, CancelFunc) {
return WithDeadline(parent, time.Now().Add(timeout))
}
Example
Let's look at an example to solidify our understanding of the context.
In the example below, we have a simple HTTP server that handles a request.
package main
import (
"fmt"
"net/http"
"time"
)
func handleRequest(w http.ResponseWriter, req *http.Request) {
fmt.Println("Handler started")
context := req.Context()
select {
// Simulating some work by the server, waits 5 seconds and then responds.
case <-time.After(5 * time.Second):
fmt.Fprintf(w, "Response from the server")
// Handling request cancellation
case <-context.Done():
err := context.Err()
fmt.Println("Error:", err)
}
fmt.Println("Handler complete")
}
func main() {
http.HandleFunc("/request", handleRequest)
fmt.Println("Server is running...")
http.ListenAndServe(":4000", nil)
}
Let's open two terminals. In terminal one we'll run our example.
$ go run main.go
Server is running...
Handler started
Handler complete
In the second terminal, we will simply make a request to our server. And if we wait for 5 seconds, we get a response back.
$ curl localhost:4000/request
Response from the server
Now, let's see what happens if we cancel the request before it completes.
Note: we can use ctrl + c to cancel the request midway.
$ curl localhost:4000/request
^C
And as we can see, we're able to detect the cancellation of the request because of the request context.
$ go run main.go
Server is running...
Handler started
Error: context canceled
Handler complete
I'm sure you can already see how this can be immensely useful.
For example, we can use this to cancel any resource-intensive work if it's no longer needed or has exceeded the deadline or a timeout.
Next Steps
Congratulations, you've finished the course!
Now that you know the fundamentals of Go, here are some additional things for you to try:
- Build a REST API with Go - For Beginners
- Connecting to PostgreSQL using GORM
- Web Scraping with Go
- Dockerize your Go app
- DevOps Roadmap
I hope this course was a great learning experience. I would love to hear feedback from you.
Wishing you all the best for further learning!
References
Here are the resources that were referenced while creating this course.